
Updated 25/01/2023 - New VRDE v2.0 mod and VRDE controls v2.0. What's new, look here: viewtopic.php?p=56925#p56925
Updated 10/02/2023 - New VRDE v2.1 mod and VRDE controls v2.1. What's new, look here: viewtopic.php?p=57268#p57268
Updated 16/10/2024 - New VRDE v3.0 mod and VRDE controls v3.0. What's new, look here: viewtopic.php?p=66165#p66165
========================================================================================
This has been developed using the standard game and TrackIR...
This 'proof of concept test' should work for ATS/ETS2 VR game versions 1.44 to 1.49 & 1.51 to 1.54
It will 'crash to desktop' if using game version 1.50 with any of the provided mods.
Note: From game version 1.51 there's no custom VRDE menu due to new UI limitations.
A quick test of Driving Academy (1.52): VRDE functions work correctly but when the on screen text
instructions state "press 'complex' to continue", just press your 'Activate' button.
As this is a test it will only work on some game default trucks,
see "Currently 'supported' SCS trucks" for more info.
If this test is proved to be successful, by someone with a VR Headset, then I'll add
support for all current game default trucks and improved outside 'walking' code.
========================================================================================
NOTE: I don't have a VR headset, so can't fully test this by just simulating VR inputs on the standard game version using my TrackIR 3, but I do think it will work as VR & TrackIR both share the same game inputs, so if you do have a VR headset and would like these new features, give it a try.
Example (using my 'TrackIR Driving Enhancements' mod), here's what 'refueling' should look like for VR users:
Driver seat -> Centre real steering wheel -> Look over your shoulder to outside (window open or closed) -> Press 'Action' -> Outside.
Turn real steering wheel left/right to 'walk' along side the truck or around the front to the other side.
Look at fuel tank - Press 'Action' - Refueling - Look up at drivers door window - Press 'Action' - Drivers seat.
Also see other TDE demo videos for what to expect: viewtopic.php?p=55562#p55562
==============================================================================
Currently 'supported' SCS trucks:
ATS: Freightliner Cascadia - International 9900i, International LoneStar & International LT - Kenworth T680 & Kenworth W900 - Mack Anthem - Peterbilt 389 & Peterbilt 579 - Volvo VNL 2014 - Westernstar 49X, Westernstar 57X & Westernstar 5700XE.
ETS2: DAF 2021, DAF XF105 & DAF XF - Iveco Hi-way & Iveco Stralis - MAN TGX & MAN TGX Euro 6 - Mercedes Actros & Mercedes New Actros - Renault Magnum, Renault Premium & Renault T - Scania R2009, Scania R, Scania S & Scania Streamline - Volvo FH Classic & Volvo FH.
==============================================================================
Features:
Game version 1.51+: Uses the in game Tobii Eye menu to select the required presets to suit you and any given truck.
Note: The file used to create the custom VRDE menu is no longer available within the game extracted files, hence no custom menu and reduced functionality.
Game version 1.44 to 1.49: An in game menu that has sliders so you can setup all of the 'VR Driving Enhancements' features to suit you and the supported game default trucks and then save as a preset. There's also plenty of presets to use, so you don't have to adjust anything, but you can if you want.
The VRDE mod code must be disabled via the VRDE menu when you use an 'unsupported' truck, resulting in game default VR controls.
Note: If you're driving view is stuck looking back over, its an 'unsupported' truck, disable VRDE code or use a 'supported' truck.
You can also disable the code, if for some reason you want to drive from an SCS non-internal camera view, on any truck.
You can have:
Game default head movement - Game standard unrestricted movement.
or
Manual head movement - Unrestricted movement - You'll have to lean out of the window rather than the game doing it for you.
or
Manual head movement with window blocking - Restricted movement within the cab - Open the window to lean out.
Use the supplied CAM 1 presets in the VRDE menu to choose your preferred mode.
Zoom interior camera with your head instead of a button press (This may not work for VR if FOV is fixed?). Can be disabled if you don't want this.
You can switch GPS screens or dash screens by looking at them and pressing the 'Action' button.
Centre console GPS or windscreen GPS - Change from on/zoom1/zoom2/zoom3/zoom4/off (1.44-1.45).
Centre console GPS or windscreen GPS - Change from zoom1/zoom2/zoom3/zoom4 (1.46+).
Note: SCS removed GPS on/off in 1.46 and instead you now need to assign a separate button for on/off.
You can change from driver seat to passenger seat to sleeper area or outside by looking at the location and pressing the 'Action' button.
You can position the passenger seat & sleeper area cameras where you want them for any given truck, using the VRDE menu, and save as a preset.
When outside, you can 'walk' around your truck by turning your steering wheel & pressing your pedals whilst still having full yaw/pitch/roll & y movement.
When outside, you can attach/detach the trailer & refuel by looking at their trigger points and pressing the 'Action' button.
You can only drive from the driving seat. Steering/accelerator/brake/clutch are all disabled in all other camera views due to those controls being used for walking around your truck.
Optional - As well as the above 'look action' functions, you can further reduce the number of keys/buttons you need for windows and suspension.
Both left & right windows open/close together when pressing just 1 key/button.
Both front & rear suspensions raise/lower with just 1 key/button.
Driver model removed, if you're outside of your truck then nobody should be sat in your seat.
Quick start setup on post 2, including a pre-configured controls.sii file for easy testing.
==============================================================================
Available cameras:
CAM 1 - Game standard driving view.
CAM 2 - NEW - Passenger Seat
CAM SHIFT+2 - Game standard chase view.
CAM 3 - NEW - Sleeper
CAM SHIFT+3 - Game standard top down view.
CAM 4 - NEW - Outside truck - Use your steering wheel to 'walk' around the truck.
CAM SHIFT+4 - Game standard roof view.
CAM 5 - Game standard Lean out view.
CAM 6 - Game standard Bumper view.
CAM 7 - Game standard On-Wheel view.
CAM 8 - Game standard Drive-By view.
CAM 9 - Cam Cycle Disabled. It doesn't work with new cameras.
Remember, this is about realism and so CAM 1, 2, 3 & 4 will be your main cameras.
==============================================================================
In game Tobii Eye menu (game version 1.51+):
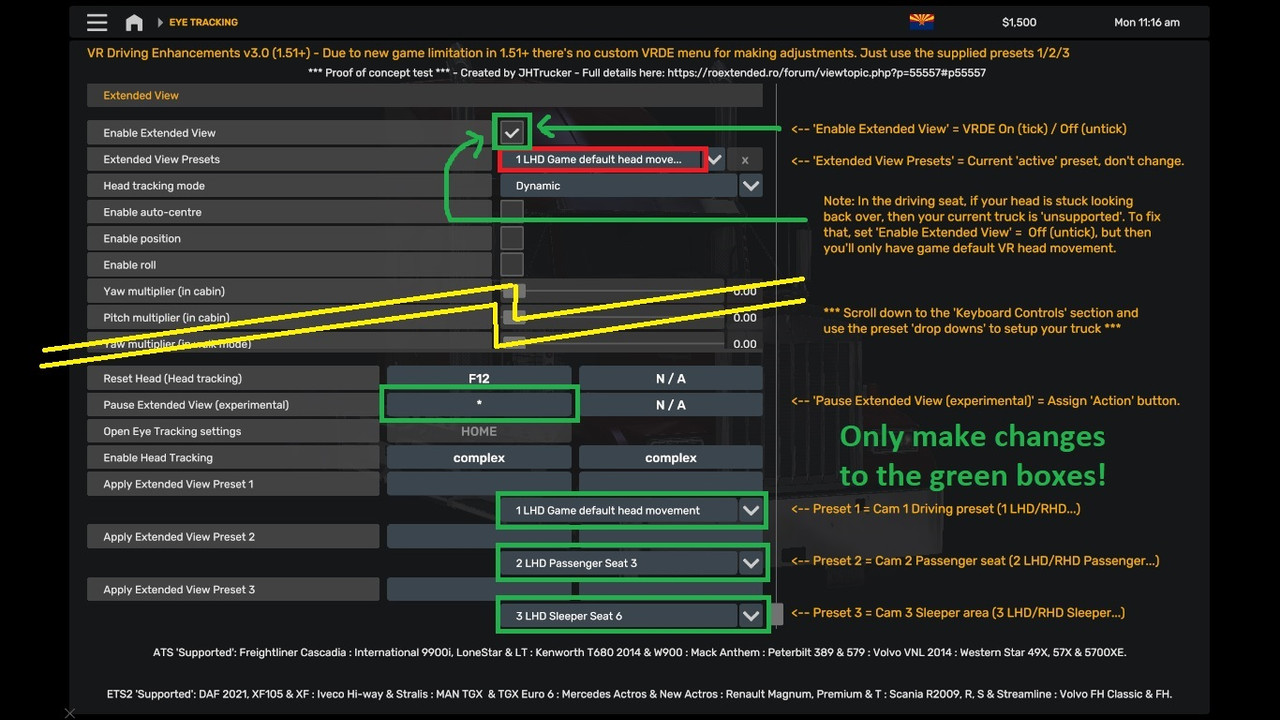
Press HOME to access menu mod to make changes as required (can be changed to a key or button of your choice).
Press ESCAPE to go back to driving screen.
VRDE only works with 'supported' trucks - If you're head is stuck looking back over then your truck is 'unsupported'
Enable VRDE code (Tick) or Disable code (Untick) for game default controls when using 'unsupported' trucks
"Extended View Presets" [drop down selector].
This indicates your current active preset only, don't make changes to this!
"Apply Extended View Preset 1" [drop down selector].
Always select the preset you want to use when driving. Whenever you select CAM 1 this preset will be applied.
"Apply Extended View Preset 2" [drop down selector].
Using 'Look Action' or pressing 'CAM 2' will change your position inside the cabin from driving seat to passenger seat.
"Apply Extended View Preset 3" [drop down selector].
Using 'Look Action' or pressing 'CAM 3' will change your position inside the cabin from driving seat to sleeper area.
----------
Changing Driving Seat Preset (game version 1.51+):
"Preset 1 " [drop down selector].
Choose from these defaults:
"1 LHD Game default head movement" <-- Same unrestricted head movement as standard VR game.
"1 LHD Game default & No Head Zoom" <-- Same unrestricted head movement as standard VR game but 'head zoom is disabled'.
"1 LHD Manual head movement" <-- Same unrestricted head movement as standard VR game but you'll need to lean through the window instead of the game doing it for you.
"1 LHD Manual head & window blocking" <-- Restricted head movement with the closed window. Open the window and lean out.
"1 RHD Game default head movement" <-- Same unrestricted head movement as standard VR game.
"1 RHD Game default & No Head Zoom" <-- Same unrestricted head movement as standard VR game but 'head zoom is disabled'.
"1 RHD Manual head movement" <-- Same unrestricted head movement as standard VR game but you'll need to lean through the window instead of the game doing it for you.
"1 RHD Manual head & window blocking" <-- Restricted head movement with the closed window. Open the window and lean out.
----------
Changing Passenger Seat & Sleeper Presets (game version 1.51+):
Preset 2 [Drop Down List]
Select from the list a basic 'Passenger seat' preset you'd like to use. Don't use any other type of preset!
You can choose from:
"2 LHD Passenger Seat 1, 2, 3, 4 & 5"
"2 RHD Passenger Seat 1, 2, 3, 4 & 5"
The number is how far to the passenger side the camera is positioned, 1 is closest to driver side & 5 is passenger side window or further depending on truck used. Select the one that best fits your current truck. ATS 1/2/3/4 - ETS 2/3/4/5 - (ATS cabs are generally narrower than ETS cabs).
Preset 3 [Drop Down List]
Select from the list a basic 'Sleeper' preset you'd like to use. Don't use any other type of preset!
You can choose from:
"3 LHD Sleeper Laid Down 1, 2, 3, 4, 5, 6, 7 & 8"
"3 LHD Sleeper Seat 1, 2, 3, 4, 5, 6, 7 & 8"
"3 RHD Sleeper Laid Down 1, 2, 3, 4, 5, 6, 7 & 8"
"3 RHD Sleeper Seat 1, 2, 3, 4, 5, 6, 7 & 8"
The number is how far to the rear the camera is positioned behind the drivers seat, 1 is closest to drivers seat & 8 far behind.
Select the one that best fits your current truck. ATS 3/4/5/6/7/8 - ETS 1/2/3 - (ATS sleeper cabs are generally longer than ETS cabs).
==============================================================================
In game VRDE menu (game version 1.44 to 1.49):
Note: This is a modded Tobii Eye menu so ignore the balloon tips.
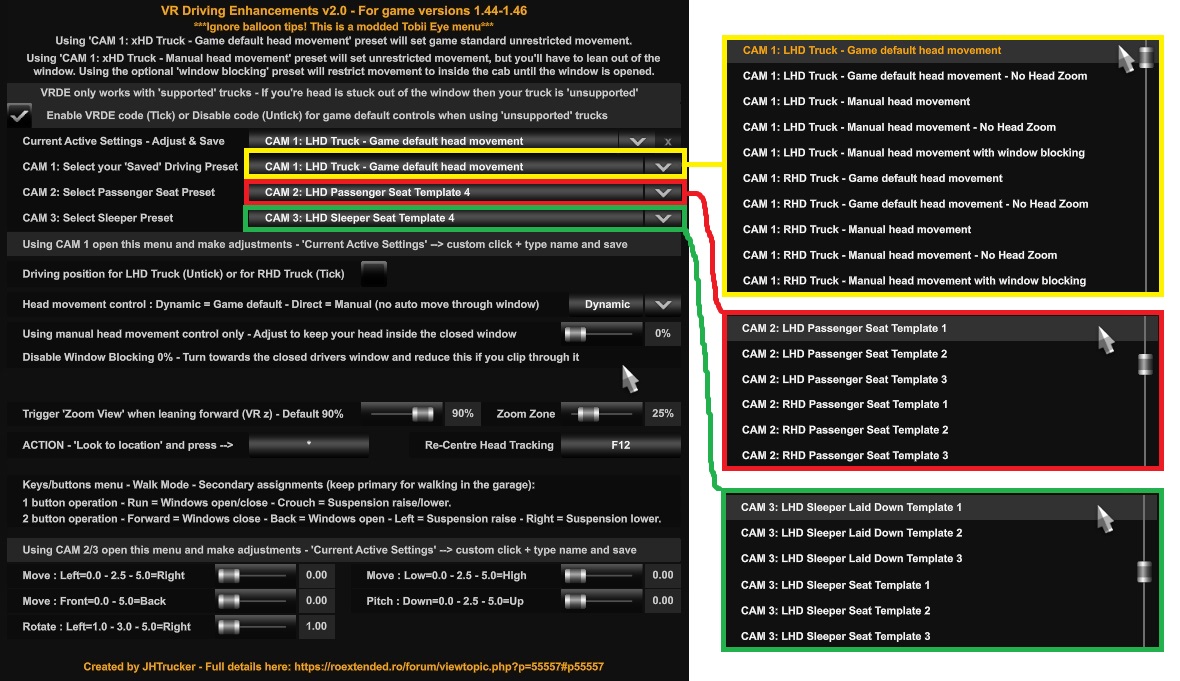
1 - CAM 1: Select your 'Saved' Driving Preset
2 - CAM 2: Select Passenger Seat Preset
3 - CAM 3: Select Sleeper Preset
Press HOME to access menu mod to make changes as required (can be changed to a key or button of your choice).
Press ESCAPE to go back to driving screen.
The Menu mod is in English only and consists of:-
VRDE only works with 'supported' trucks - If you're head is stuck looking back over then your truck is 'unsupported'
Enable VRDE code (Tick) or Disable code (Untick) for game default controls when using 'unsupported' trucks
'Current Active Settings - Adjust & Save' [drop down selector].
Select a suitable preset and adjust the sliders to how you want them for any given truck and then save as a preset so you can quickly select them again.
Select "Disable VR for Mouse only - Select another preset to re-enable". This allows you to turn off head tracking whilst in game, if required only.
"CAM 1: Select your 'Saved' Driving Preset" [drop down selector].
Always select the preset you want to use when driving. Whenever you select CAM 1 this preset will be applied overwriting any unsaved custom settings!
"CAM 2: Select Passenger Seat Preset" [drop down selector].
Pressing 'CAM 2' will change your position inside the cabin from driving seat to passenger seat.
"CAM 3: Select Sleeper Preset" [drop down selector].
Pressing 'CAM 3' will change your position inside the cabin from driving seat to sleeper area.
Using CAM 1 open this menu and make adjustments - 'Current Active Settings' --> custom click + type name and save
Driving position for LHD Truck (Untick) or for RHD Truck (Tick).
Set this to suit your current truck, so all features work correctly.
Head movement control : Dynamic = Game default - Direct = Manual (no auto move through window)
Choose manual if you'd prefer to lean out of the window when you want to and not because you turned your head. Works with or without 'window blocking'.
Using manual head movement control only - Adjust to keep your head inside the closed window
Disable Window Blocking 0% - Turn towards the closed drivers window and reduce this if you clip through it.
Trigger 'Zoom View' when leaning forward (TIR z) - Default 9.0
As standard, when you lean forward you get closer to the dash.
This adds to that feature by allowing you to lean further forward and thereby trigger the in game 'interior camera zoom' feature.
Set the slider to 0.0 to disable. The lower the value the sooner zoom will be triggered.
Feels right to lean forward to read up coming signs. One less button to press!
Zoom Zone - Default 0.55
This allows you to set the area to the left & right that "triggering zoom view" is active to prevent unwanted head zoom at higher head angles.
5.00 = Up to 180 degrees left/right (head zoom always on).
2.5 = Up to 90 degrees left/right.
1.25 = Up to 45 degrees left/right (prevent head zoom when looking around at junctions etc).
0.55 = Up to 20 degrees left/right - Default - (good for head zooming to just read upcoming signs in front of you).
ACTION - 'Look to location' and press -->
You can choose your own Action button.
You can change from driver seat to passenger seat to sleeper area or outside by looking at the location and pressing the 'Action' button.
You can attach/detach the trailer outside, refuel outside, switch GPS screens or switch dash screens by looking at them and pressing the 'Action' button.
Reset Head Tracking - Re-centers your in game head.
Existing game function shown here for completeness.
Using CAM 2/3 open this menu and make adjustments - 'Current Active Settings' --> custom click + type name and save
Move : Left=0.0 - (2.5 Drivers seat) - 5.0=Right ---------- Move : Low=0.0 - (2.5 Drivers seat) - 5.0=High
Move : Front=(0.0 Drivers seat) - 5.0=Back ---------- Pitch : Down=0.0 - (2.5 level) - 5.0=Up
Rotate : Left=1.0 - (3.0 straight ahead) - 5.0=Right
----------
Changing Driving Seat Preset in the VRDE menu (game version 1.44-1.49):
"CAM 1: Select your 'Saved' Driving Preset" [drop down selector].
Choose from these defaults:
"CAM 1: LHD Truck - Game default head movement" <-- Same unrestricted head movement as standard VR game.
"CAM 1: LHD Truck - Game default head movement - No Head Zoom" <-- Same unrestricted head movement as standard VR game but 'head zoom is disabled'.
"CAM 1: LHD Truck - Manual head movement" <-- Same unrestricted head movement as standard VR game but you'll need to lean through the window instead of the game doing it for you.
"CAM 1: LHD Truck - Manual head movement with window blocking" <-- Restricted head movement with the closed window. Open the window and lean out.
"CAM 1: RHD Truck - Game default head movement" <-- Same unrestricted head movement as standard VR game.
"CAM 1: RHD Truck - Game default head movement - No Head Zoom" <-- Same unrestricted head movement as standard VR game but 'head zoom is disabled'.
"CAM 1: RHD Truck - Manual head movement" <-- Same unrestricted head movement as standard VR game but you'll need to lean through the window instead of the game doing it for you.
"CAM 1: RHD Truck - Manual head movement with window blocking" <-- Restricted head movement with the closed window. Open the window and lean out.
If you make adjustments, save "custom" as your own preset by pressing "+" and typing your preset name.
Example: "CAM 1: LHD Truck - My driving preset" etc
----------
Changing Passenger Seat & Sleeper Presets in the VRDE menu (game version 1.44-1.49):
CAM 2: Select Passenger Seat Preset [Drop Down List]
Select from the list a basic 'Passenger seat' preset you'd like to use. Don't use any other type of preset!
You can choose from:
"CAM 2: LHD Passenger Seat 1, 2, 3, 4 & 5"
"CAM 2: RHD Passenger Seat 1, 2, 3, 4 & 5"
The number is how far to the passenger side the camera is positioned, 1 is closest to driver side & 5 is passenger side window or further depending on truck used. Select the one that best fits your current truck. ATS 1/2/3/4 - ETS 2/3/4/5 - (ATS cabs are generally narrower than ETS cabs).
CAM 3: Select Sleeper Preset [Drop Down List]
Select from the list a basic 'Sleeper' preset you'd like to use. Don't use any other type of preset!
You can choose from:
"CAM 3: LHD Sleeper Laid Down 1, 2, 3, 4, 5, 6, 7 & 8"
"CAM 3: LHD Sleeper Seat 1, 2, 3, 4, 5, 6, 7 & 8"
"CAM 3: RHD Sleeper Laid Down 1, 2, 3, 4, 5, 6, 7 & 8"
"CAM 3: RHD Sleeper Seat 1, 2, 3, 4, 5, 6, 7 & 8"
The number is how far to the rear the camera is positioned behind the drivers seat, 1 is closest to drivers seat & 8 far behind.
Select the one that best fits your current truck. ATS 3/4/5/6/7/8 - ETS 1/2/3 - (ATS sleeper cabs are generally longer than ETS cabs).
==============================================================================
Windows & Suspension operation:
The assigned buttons for windows and suspension now show as 'complex'. You can assign your preferred keys/buttons, but you'll lose the below functionality to reduce the number of keys/buttons required, test the below method first.
In game - Keys/buttons menu - Walk Mode - Secondary assignments (keep your preferred walk mode keys/buttons as primary assignments for walking in the garage):
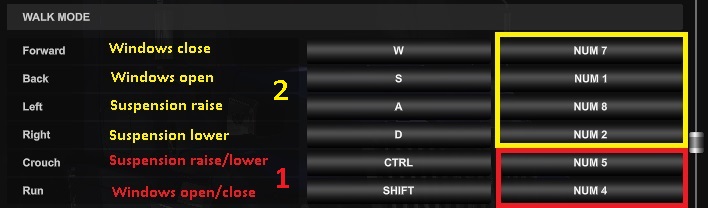
1 (Red) - When not using 'window blocking' you only need 1 button to open/close both windows and 1 button to raise/lower suspension.
Run = Windows open/close - Assign a suitable secondary button.
Crouch = Suspension raise/lower - Assign a suitable secondary button.
This 1 button method can also be used when VRDE is disabled and you are driving an unsupported truck.
2 (Yellow) - If you prefer to use 'window blocking' you need to use 2 buttons for open/close both windows and 2 buttons to raise/lower suspension.
Forward = Windows close - Assign a suitable secondary button.
Back = Windows open - Assign a suitable secondary button.
Left = Suspension raise - Assign a suitable secondary button.
Right = Suspension lower - Assign a suitable secondary button.
This 2 button method can be used in all modes, including when VRDE is disabled and you are driving an unsupported truck.
Note 1: You can only operate the windows and suspension from the drivers seat.
Note 2: You don't need a button for 'reset suspension' as the game will do that for you once you start driving, but you can assign one if required.
Note 3: You only need to assign 2 or 4 buttons.
Note 4: If you'd prefer not to use the above methods then just assign windows & suspension as normal, but doing so will delete the code used by the above methods and will prevent them from working if you decide to use them at some point in the future.
See 'How to fix missing functionality' section on post 4
==============================================================================
Window operation - When using 'window blocking':
You press 'open driver window' button and your head is unblocked, it can now pass through the opening window.
You press 'open driver window' button again and your head is blocked, back to only turning head inside the cab.
You press 'close driver window' button and your head is blocked, back to only turning head inside the cab.
To open driver window to 50% only and therefore still be blocked, do this:
Quick press 'open driver window' button.
When window is ~50% open, quick press 'open driver window' button again. This will stop the window motion and will block your head. So you can open the window as far as you like as long as you then press 'open drivers window' button again to stop the motion and you'll still be blocked.
To open driver window fully, do this:
Quick press 'open driver window' button and leave it to open.
Your head isn't blocked whilst the window is opening, so just wait for it to finish.
Note 1: Pressing 'close driver window' button will always block your head no matter how open the window is.
Note 2: Every time you start the game your head will be blocked whether the window is open or closed. The controls.sii file gets no feedback from the game to set it correctly. Just press 'open driver window' button to get back in sync if required.
Note 3: You should only press the window buttons with the truck electricity on.
==============================================================================
For the best experience use 'Look Action':
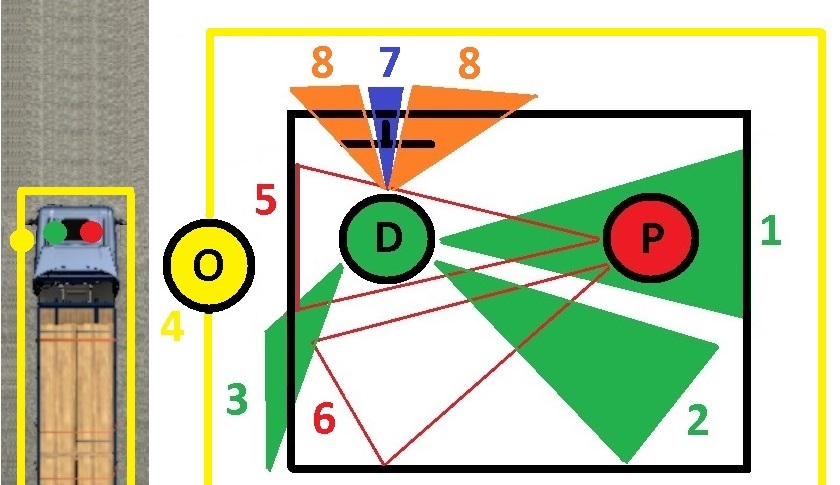
D = Drivers Seat, P = Passenger Seat & O = Outside truck
1 = From drivers seat - Look to passenger seat trigger zone and press 'Action'.
2 = From drivers seat - Look to sleeper trigger zone and press 'Action'.
3 = From drivers seat - With steering centered, look over your shoulder to outside trigger zone and press 'Action'.
4 = From outside drivers door - With steering centered, look up to drivers door window and press 'Action'.
5 = From passenger seat - Look to driver seat trigger zone and press 'Action'.
6 = From passenger seat - Look to sleeper trigger zone and press 'Action'.
7 = From drivers seat - Look to dash & look down slightly to the trigger zone and press 'Action'.
8 = From drivers seat - Look to gps (windscreen or console mounted) trigger zone and press 'Action'.
Not shown on above trigger zones sketch:
Amended (9-12) 10/02/2023
9 = From sleeper area - Look up at ceiling and press 'Action' to sleep. You must already be parked on a rest icon.
10 = From sleeper area - Look down from the ceiling whilst keeping your head within ~45 degrees left/right and press 'Action' to return to the drivers seat. If your head is turned too far left/right, nothing will happen.
11 = From drivers seat - Look down between drivers seat and passenger seat (~90 degrees right LHD or ~90 left RHD & ~60 degrees down) and press 'Action' to switch to devcam. After using devcam in the usual way, press 'Action' again to switch back to outside drivers door.
12 = From drivers seat - Look down at the drivers inside door handle (~90 degrees left LHD or ~90 right RHD & ~45 degrees down) and press 'Action' to switch to outside.
Trigger zones for refuel & crank handle when using 'Action' button:
It's not possible to distinguish between different truck chassis lengths and where the fuel tank(s) are located.
This pic shows the trigger zones for drivers door (purple), refueling (yellow) and 'attach/detach' crank handle (red). Fuel and crank handle zones are the same at the passenger side. This should work for all truck types and lengths.
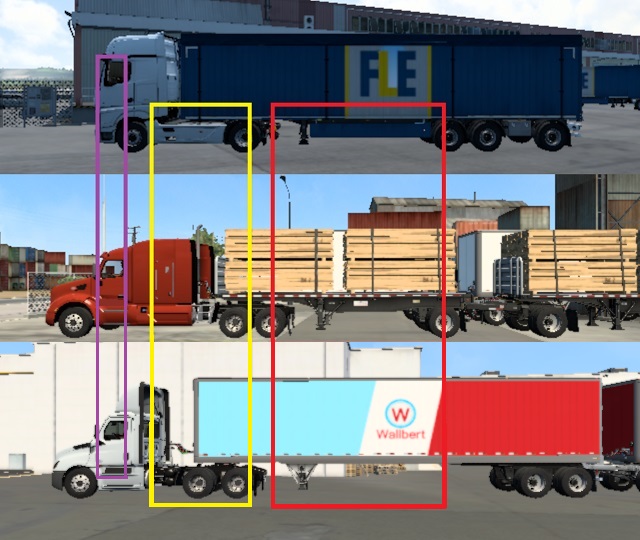
Note: ATS fuel tanks are closer to or under the drivers door area compared to ETS but having the trigger area here would cause an 'activation' every time you exit the truck and may result in activating sleep/job select etc when it wasn't wanted.
You can still use your 'Activate' button to refuel inside or outside if you really want to.
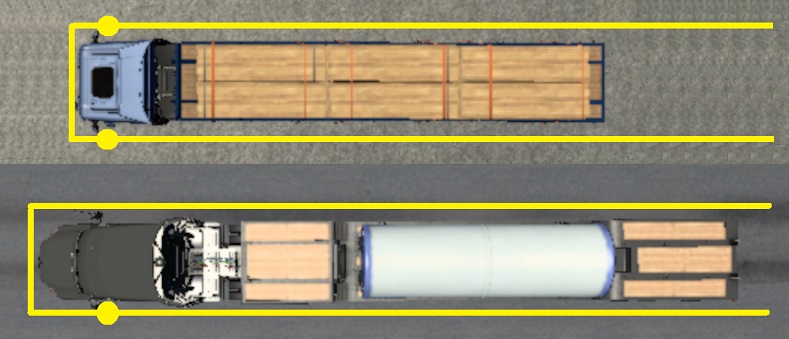
Outside movement limits:
Enter and exit the truck via the drivers door for LHD or RHD.
The yellow line represents the 'walk' path around the truck.
Outside the drivers door is the start point when your real steering wheel is centered. Turn it left or right to 'walk' around whilst you have full VR yaw/pitch/roll/y to look where you want to.
Use your real clutch pedal to move away from your truck and trailer (blue line) but keeping parallel with the yellow 'walk' path around your truck and trailer.
Useful if you want to stand back to take a screenshot from eye level, check external cab accessories or step to the side to 'walk' past a wide load on the trailer etc.
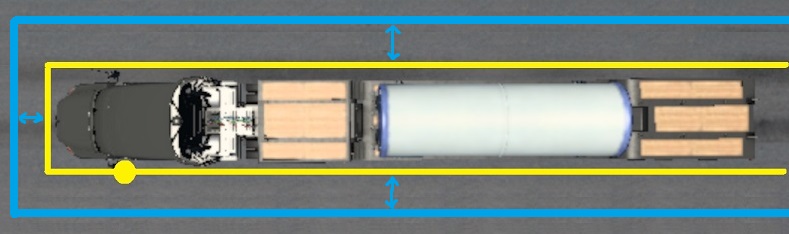
Note 1: Refueling and 'look up to get back into cab' actions are disabled if the clutch pedal is pressed as you won't be next to the truck.
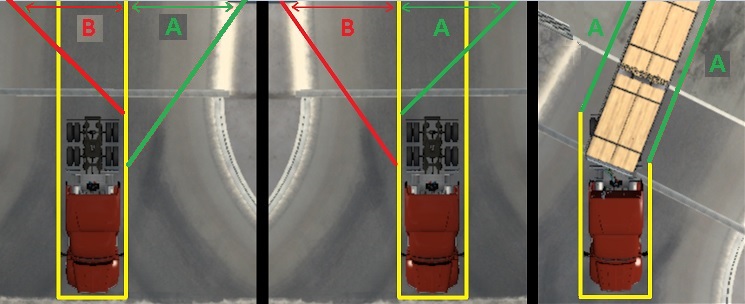
Amended 10/02/2023
If your truck and trailer(s) are not inline then you can use your real accelerator and brake pedals to adjust the walk path to suit.
Press Accelerator Pedal (A) to turn the path to the right.
Press Brake Pedal (B) to turn the path to the left.
Turn your real steering wheel as normal to 'walk' the adjusted path whilst keeping a constant pressure on the required pedal (see post 3 for 'stepped' options).
Note 1: If your pedals have "dirty pots" then the movement will be jittery due to the fluctuating values coming from the pedals potentiometers.
Note 2: The adjustment point where the path turns is fixed to avoid 'walking' through your truck.
Note 3: If your truck & trailer(s) are not inline and you 'walk' into the side of your trailer, you'll walk straight through it. It's not ideal but the game code reacts to collision data in a way that would feel uncomfortable when wearing a VR headset.
Note 4: Extra 'walk' options available on post 3.