Updated 13/03/2025 - New controls.sii file edits date highlighted. What's new, look here: viewtopic.php?p=67654#p67654
Updated 04/04/2025 - New 'DE' mod v2.0 & controls.sii file edits date highlighted. What's new, look here: viewtopic.php?p=67720#p67720
==============================================================================
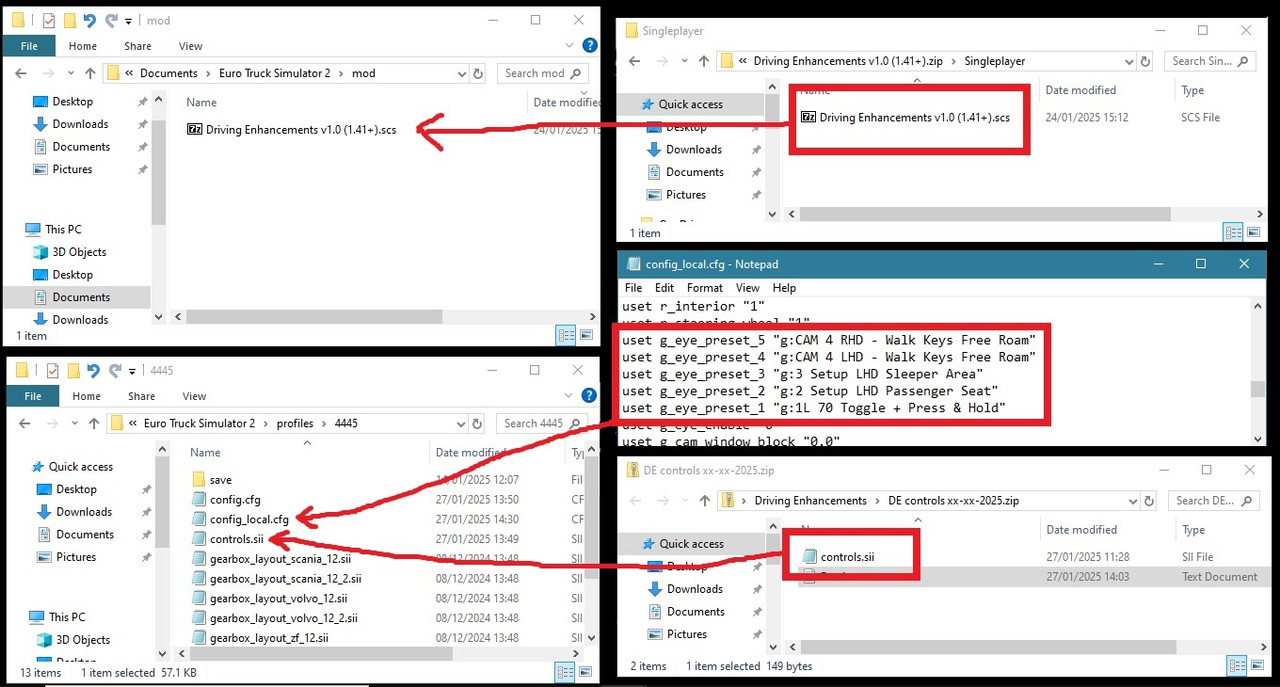
This isn't a mod to just drop into your mod manager, you'll also need to follow instructions and edit your controls.sii & config_local.cfg files, using Notepad or similar.
For ATS/ETS2 game version 1.41+
The supplied mod contains no game version specific files, but the code that controls all the functions does require at least game version 1.41.
Confirmed to work for game versions 1.41 to 1.54
Note 1: This will NOT work with VR or Tobii Eye devices, see these links instead:
Tobii Eye Driving Enhancements - viewtopic.php?p=57548#p57548
VR Driving Enhancements - viewtopic.php?p=55557#p55557
Note 2: This will NOT work if you use 'Steam Controller Support', that will remove all of the required code from the controls.sii file.
To disable steam controller support:
In Steam Library - Right Click Game - Properties - Controller - Select - Disable Steam Input.
If you don't know how to configure your controller without using steam input, it's probably best not to even attempt trying this mod.
Note 3: If you have '-sysmouse' set in the games steam launch options, remove it, else the 'Driving Enhancements' features will not function correctly.
==============================================================================
If like to role play or just want a little more immersion in your sim...
Driving Enhancements Features:
In the driving seat, select from:
SCS game default look functions (interior instant look & variable look or from 1.53+ smooth look motion with auto centre options).
Or
New, for 1.41+, 'Driving Enhancements' smooth look left, right, behind (out of window) & down at dash (for a closer look) either with 'Press & Hold' or 'Toggle', all with smooth re-centre.
Pressing CAM 1 will also smooth re-centre the view.
You can adjust smooth look speed to how fast you want it.
You can set your required look left/right angle to 50, 60, 70, 80 or 90 degrees.
You can select the above to have mouse look enabled or disabled.
Optional - Auto zoom when 'Toggle' looking at the passenger side mirror.
Optional - Press & Hold or Toggle Interior Zoom on/off.
CAM 1, Driving seat - CAM 2, Passenger Seat - CAM 3, Sleeper area - CAM 4, Outside.
You can only drive from the driving seat or any game default external camera (CAM 5, 6, 7, 8, 9 & 10 - see camera list below).
First person animated movement between drivers seat, passenger seat, sleeper area & outside.
You can therefore move into the sleeper before you activate 'sleep', you must first be parked in a sleep area.
'Action' Button, can be used to move to and from sleeper area & to and from outside.
Outside the truck:
Basic first person 'walking' movement with a fixed height, head bob and crouch (don't expect GTA style exploring!).
You can 'Walk' around the general area of your truck, stand next to the fuel tank when refueling or the crank handle when you attach/detach the trailer.
If parked on an 'Activate' icon you can 'walk' to a suitable location before pressing your 'Activate' key/button.
For example Service, Showroom, Job select (nearby office/hut), hotel (to sleep if using day cab) etc. Once activated, 'walk' back to your truck.
Note: The above 'walking' feature is optional, you can still sit in the driving seat to refuel, attach/detach the trailer etc.
All features can be controlled via a keyboard, gamepad or wheel.
TrackIR can also be used, if required, but VR and Tobii Eye are NOT supported and will not function at all.
This is not fixed mod forcing you to do all features it contains, choose just the ones you want, you can for example:
Play the game the way you always have been, but now use only the 'lay down in the sleeper before activating sleep', feature.
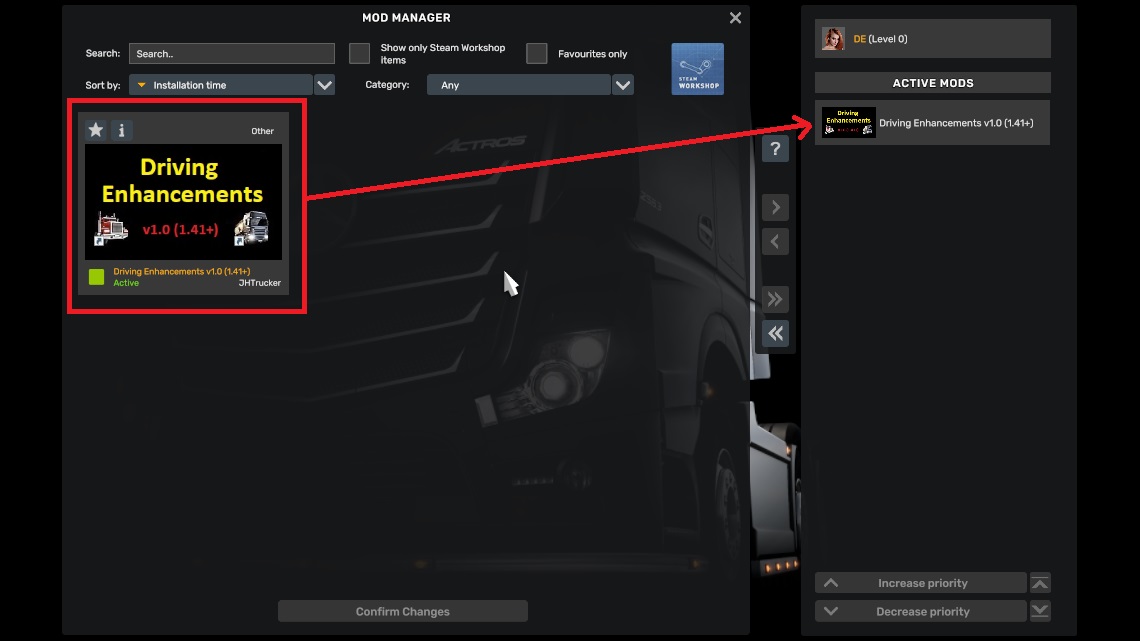
A 'Quick Start' controls.sii file is available, using game default keyboard setup for WASD driving and 'walking', so you can quickly test this out.
Here's a quick demo of some of the above features:
(Ignore the poor image quality, game on lowest settings, 30 fps and recorded at 720p on old camera phone).
Xbox360 controller was setup as:
Left thumbstick = Steer & Turn 'walk' view left/right.
Right trigger = Throttle & 'walk/run' forwards.
Left trigger = Brake & 'walk' backwards.
Button Yellow (Y) = 'Action'.
Button Blue (X) = Attach/detach trailer.
Button Red (B) = Activate.
Button Green (A) = Park brake.
Note: You can setup your controller the way you want it.
Here's a quick 'walking' only demo using 'DE' keyboard defaults:
(Ignore the poor image quality, game on lowest settings, 30 fps and recorded at 720p on old camera phone).
Features: 'Walking', 'Running', 'Crouching' & 'Climbing a ladder'.
Here's a quick driver seat 'look around' demo using 'DE' keyboard defaults:
(Ignore the poor image quality, game on lowest settings, 30 fps and recorded at 720p on old camera phone).
Note: If you'd rather use game default look functions, see "How to select driving seat look options" and simply choose the correct preset.
If you use TrackIR and want some more features, see 'TrackIR Driving Enhancements' instead: viewtopic.php?p=46457#p46457
==============================================================================
Driving Enhancements Cameras:
CAM 1 - Keyboard 1 - Game standard 'Driving Seat' view - Set your 'look' option via Preset 1 in Tobii Eye menu.
CAM 2 - Keyboard 2 - NEW - Passenger Seat. *** You cannot drive from this camera ***
CAM 3 - Keyboard 3 - NEW - Sleeper Area. *** You cannot drive from this camera ***
CAM 4 - Keyboard 4 - NEW - 'Walking' outside truck. *** You cannot drive from this camera ***
CAM 5 - Keyboard 5 - Game standard 'Lean Out' view.
CAM 6 - Keyboard 6 - Game standard 'Chase' view, game original cam 2.
CAM 7 - Keyboard 7 - Game standard 'Top Down' view, game original cam 3.
CAM 8 - Keyboard 8 - Game standard 'Roof' view, game original cam 4.
CAM 9 - Keyboard 9 - Game standard 'Drive-By' view, game original cam 8.
CAM 10 - ALT + Keyboard 8 - Game standard 'On Wheel' view, game original cam 7.
CAM 11 - ALT + Keyboard 9 - Game standard 'Bumper' view, game original cam 6.
Note 1: You can switch from (cam 1/2/3/4) to (cam 5/6/7/8/9/10/11) OR switch from (cam 5/6/7/8/9/10/11) to (cam 1).
Note 2: You can't switch from an external 'driving' camera (cam 5/6/7/8/9/10/11) to a 'non-driving' camera (cam 2/3/4) to avoid losing control of your truck.
Note 3: Game standard 'Cam Cycle' function is disabled because it breaks 'DE' functionality.
If required, you can keep the cameras numbered as they are in the default game and instead use 'ALT +' for Passenger seat, Sleeper & Outside.
See post 3 - Configuration options - "Choose which camera set to use".
==============================================================================
Use the games Tobii Eye menu to setup the Driving Enhancements features:
Open Tobii Eye menu (shift + numlock).
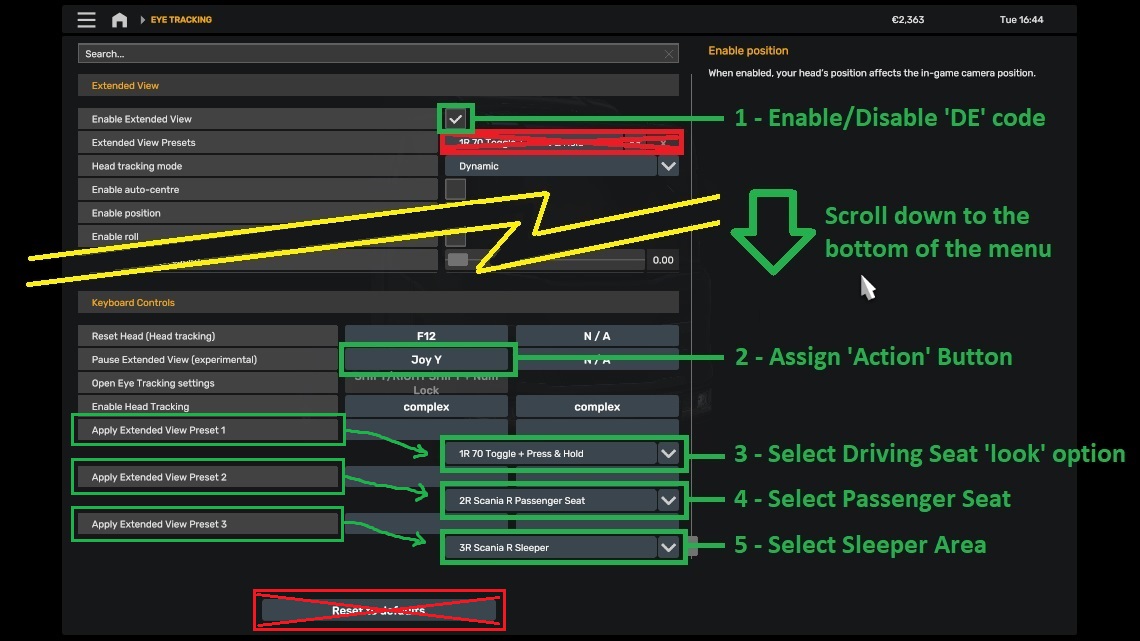
At the top of the menu:
1 - Enable/Disable 'DE' code (only game default functions when disabled).
Note: This is provided so you can quickly disable the 'DE' code if you think it's causing an issue with a certain aspect of the game, perhaps garage mode, photo mode, editor, driving academy etc? and then re-enable when you're back to doing driving and 'walking'.
At the bottom of the menu:
2 - Assign 'Action' Button.
3 - Select Driving Seat 'look' option.
4 - Select Passenger Seat.
5 - Select Sleeper Area.
Note: Don't click 'Reset to defaults' or any item not highlighted in a green box.
==============================================================================
How to select driving seat look options:
Open Tobii Eye menu (shift + numlock).
Scroll down to the very bottom of the menu and click on the drop down for 'Apply Extended View Preset 1'
Only choose presets that start with '1' and match your trucks driving side, LHD 'L' or RHD 'R'.
Example '1L ....' for LHD trucks or '1R ....' for RHD trucks.
1L - Game Default Look Options <-- LHD using game look functions.
1L - Game Default TrackIR <-- LHD using TrackIR - Passenger seat, sleeper & outside will also use TrackIR.
1L 50 Toggle + Press & Hold + Mouse <-- LHD Look angle 50 degrees and mouse can also be used.
1L 60 Toggle + Press & Hold + Mouse <-- LHD Look angle 60 degrees and mouse can also be used.
1L 70 Toggle + Press & Hold + Mouse <-- LHD Look angle 70 degrees and mouse can also be used.
1L 80 Toggle + Press & Hold + Mouse <-- LHD Look angle 80 degrees and mouse can also be used.
1L 90 Toggle + Press & Hold + Mouse <-- LHD Look angle 90 degrees and mouse can also be used.
Note: If you're mouse is too sensitive it may keep toggling off your selected look preference, if so, use the below to disable it.
1L 50 Toggle + Press & Hold <-- LHD Look angle 50 degrees.
1L 60 Toggle + Press & Hold <-- LHD Look angle 60 degrees.
1L 70 Toggle + Press & Hold <-- LHD Look angle 70 degrees.
1L 80 Toggle + Press & Hold <-- LHD Look angle 80 degrees.
1L 90 Toggle + Press & Hold <-- LHD Look angle 90 degrees.
1R - Game Default Look Options <-- RHD using game look functions.
1R - Game Default TrackIR <-- RHD using TrackIR - Passenger seat, sleeper & outside will also use TrackIR.
1R 50 Toggle + Press & Hold + Mouse <-- RHD Look angle 50 degrees and mouse can also be used.
1R 60 Toggle + Press & Hold + Mouse <-- RHD Look angle 60 degrees and mouse can also be used.
1R 70 Toggle + Press & Hold + Mouse <-- RHD Look angle 70 degrees and mouse can also be used.
1R 80 Toggle + Press & Hold + Mouse <-- RHD Look angle 80 degrees and mouse can also be used.
1R 90 Toggle + Press & Hold + Mouse <-- RHD Look angle 90 degrees and mouse can also be used.
Note: If you're mouse is too sensitive it may keep toggling off your selected look preference, if so, use the below to disable it.
1R 50 Toggle + Press & Hold <-- RHD Look angle 50 degrees.
1R 60 Toggle + Press & Hold <-- RHD Look angle 60 degrees.
1R 70 Toggle + Press & Hold <-- RHD Look angle 70 degrees.
1R 80 Toggle + Press & Hold <-- RHD Look angle 80 degrees.
1R 90 Toggle + Press & Hold <-- RHD Look angle 90 degrees.
Example: 1L 60 Toggle + Press & Hold <-- LHD truck with look angle 60 degrees and mouse look disabled.
Note: It's important to choose the correct driving position, LHD or RHD to suit your current truck, to prevent unintended results.
Once you exit the Tobii Eye menu press '1' to apply the preset you just selected.
==============================================================================
How to select the passenger seat to use:
Open Tobii Eye menu (shift + numlock).
Scroll down to the very bottom of the menu and click on the drop down for 'Apply Extended View Preset 2'
Only choose presets that start with '2' and match your trucks driving side, LHD 'L' or RHD 'R'.
2L (truck) Passenger Seat <-- LHD that matches your (truck) model
2R (truck) Passenger Seat <-- RHD that matches your (truck) model
Note: If using a mod truck you'll need to choose, what you think, may be a suitable preset from the ones provided.
Example: 2L Freightliner Cascadia Passenger Seat <-- LHD passenger seat for Freightliner Cascadia
==============================================================================
How to select the sleeper to use:
Open Tobii Eye menu (shift + numlock).
Scroll down to the very bottom of the menu and click on the drop down for 'Apply Extended View Preset 3'
Only choose presets that start with '3' and match your trucks driving side, LHD 'L' or RHD 'R'.
3L (truck) Sleeper <-- LHD that matches your (truck) model
3R (truck) Sleeper <-- RHD that matches your (truck) model
Note: If using a mod truck you'll need to choose, what you think, may be a suitable preset from the ones provided.
Example: 3R Iveco S-Way Sleeper <-- RHD sleeper for Iveco S-Way
==============================================================================
How to look around in the driver seat:
Using game default look options: (1L - Game Default Look Options OR 1R - Game Default Look Options).
Assign keys/buttons/gamepad thumbstick etc to these as required:
Look Left (default numpad /)
Look Right (default numpad *)
Interior Look Left (default numpad 4)
Interior Look Up Left (default numpad 7)
Interior Look Right (default numpad 6)
Interior Look Up Right (default numpad 9)
Interior Look Up Middle (default numpad 8)
Interior Look Forward (default numpad 5)
Note: This is exactly how SCS provide the look function in game, there's nothing new or different here, use this preset if that's how you like it.
Using keys/buttons with Driving Enhancements Look Functions: (1L/R xx Toggle + Press & Hold + Mouse OR 1L/R xx Toggle + Press & Hold)
Assign keys/buttons to these as required:
Look Left (default numpad /) <-- Smooth look to 50/60/70/80/90 degrees based on your preset 1 choice.
Look Right (default numpad *) <-- Smooth look to 50/60/70/80/90 degrees based on your preset 1 choice.
Interior Look Left (default numpad 4) <-- Smooth look to 50/60/70/80/90 degrees based on your preset 1 choice.
Interior Look Right (default numpad 6) <-- Smooth look to 50/60/70/80/90 degrees based on your preset 1 choice.
Interior Look Up Middle (default numpad 8) <-- Smooth look down at dash.
Interior Look Forward (default numpad 5) <-- Smooth re-centre. If required, this also toggles off any toggled on view.
Interior Look Up Left (default numpad 2) <-- Smooth look out of the drivers window to look behind you.
Interior Look Up Right (default numpad 9) <-- Smooth 'Auto Look Left/Right' function - See description below.
Note: 'Look Left/Interior Look Left' & 'Look Right/Interior Look Right' have the same functions, just choose which of them you want to assign a key too.
See post 3 - Configuration options - "Adjust Driver seat 'look' speed".
Using gamepad thumbstick with Driving Enhancements Look Functions: (1L/R xx Toggle + Press & Hold + Mouse OR 1L/R xx Toggle + Press & Hold)
Assign gamepad look thumbstick as required:
Look Up/Down Axis <-- Smooth look down at dash & smooth look out of the drivers window to look behind you.
Set 'Look Up/Down Axis mode' as required:
Centered = Up is look behind & Down is look at dash.
Inverted and centered = Up is look at dash & Down is look behind.
Look Left/Right Axis <-- Smooth look left/right to 50/60/70/80/90 degrees based on your preset 1 choice.
You can also assign your look thumbstick button press to:
Interior Look Forward <-- Smooth re-centre. If required, this also toggles off any toggled on view.
See post 3 - Configuration options - "Adjust Driver seat 'look' speed".
*** New 13/03/2025 ***
Smooth 'Auto Look Left/Right' function:
May be useful when trying to pull out of a busy junction?
Once initiated the driving view will continually look left/right at the speed and angle that is currently in use.
The view will pause at each left/right limit for a time that you can set, to suit your requirements.
This function stops and re-centres the view when pressing the throttle (after a time limit that you can set), pressing any of the 'Look' keys or by toggling it off.
To intitate:
Requires a suitable 'DE' driving preset 1 - (1L/R xx Toggle + Press & Hold + Mouse OR 1L/R xx Toggle + Press & Hold).
Press 'Interior Look Up Right' (default numpad 9) - To toggle on.
To stop this function, do any of the below actions:
Press 'Interior Look Up Right' (default numpad 9) - To toggle off.
Press any other 'Interior Look' functions (defaults numpad 2, 4, 5, 6 & 8).
Press Thottle, view will re-centre after your specified time (default 1 sec) - 0 = Instant smooth re-centre.
See post 3 - Configuration options --> "Adjust 'Auto Look Left/Right' function - Re-centre view when pressing throttle" & "Adjust 'Auto Look Left/Right' function - Pause view".
==============================================================================
How to move from the driver seat:
Using game default look functions: (1L - Game Default Look Options OR 1R - Game Default Look Options):
Driver Seat --> Press 2 --> Passenger Seat --> Press 1 --> Driver Seat.
Driver Seat --> Press 3 --> Sleeper Area --> Press 1 --> Driver Seat.
Driver Seat --> Press 4 --> Outside --> Press 1 --> Driver Seat.
OR
Driver Seat --> Press 'Action' --> Outside --> Press 'Action' --> Driver Seat.
Using Driving Enhancements Look Functions: (1L/R xx Toggle + Press & Hold OR 1L/R xx Toggle + Press & Hold + Mouse):
Driver Seat --> Press 2 --> Passenger Seat --> Press 1 --> Driver Seat.
Driver Seat --> Press 3 --> Sleeper Area --> Press 1 --> Driver Seat.
OR
Driver Seat --> 'Toggle Look to passenger side' and then Press 'Action' --> Sleeper Area --> Press 'Action' --> Driver Seat.
Driver Seat --> Press 4 --> Outside --> Press 1 --> Driver Seat.
OR
Driver Seat --> 'Toggle Look to drivers door window' and then Press 'Action' --> Outside --> Press 'Action' --> Driver Seat.
Using Driving Enhancements Look Functions: (1L - Game Default TrackIR OR 1R - Game Default TrackIR):
Driver Seat --> Look at the passenger seat and Press 'Action' --> Passenger Seat --> Look at the driver seat and Press 'Action' --> Driver Seat.
Driver Seat --> Look at the sleeper area and Press 'Action' --> Sleeper Area --> Press 'Action' --> Driver Seat.
Driver Seat --> Look out of the driver side door window and press 'Action' --> Outside --> Press 'Action' --> Driver Seat.
Note: You can still just press 1, 2, 3 & 4 but using above 'Look Action' is better!
==============================================================================
How to look around in the passenger seat, sleeper or outside:
Using the same keys/buttons you assigned for the driving seat look options:
Look Left (default numpad /) <-- Smooth look left, 'Press & Hold'.
Look Right (default numpad *) <-- Smooth look right, 'Press & Hold'.
Interior Look Left (default numpad 4) <-- Smooth look left, 'Press & Hold'.
Interior Look Right (default numpad 6) <-- Smooth look right, 'Press & Hold'.
Interior Look Up Middle (default numpad 8) <-- Smooth look up, 'Press & Hold'.
Interior Look Forward (default numpad 5) <-- Smooth re-centre, 'Quick Press'.
Interior Look Up Left (default numpad 2) <-- Smooth look down, 'Press & Hold'.
Using the same gamepad thumbstick you assigned for the driving seat look options:
Look Up/Down Axis <-- Smooth look up/down, 'Press & Hold'.
Look Left/Right Axis <-- Smooth look left/right, 'Press & Hold'.
Interior Look Forward <-- Smooth re-centre, 'Quick Press'.
See post 3 - Configuration options - "Adjust Passenger, Sleeper & Outside 'look' speed".
==============================================================================
How to 'walk' around outside your truck:
Using keyboard Steering, Throttle and Brake:
Press 'Steer Left' to turn the 'walk' direction left.
Press 'Steer Right' to turn the 'walk' direction right.
Press 'Throttle' to 'walk' forward.
Press 'Brake' to 'walk' backward.
Note: The above same keys also need to be assigned to the games WALKMODE keys for Left/Right/Forward/Back (which they are as 'DE' default WASD).
Using gamepad or wheel & pedals for Steering, Throttle and Brake:
Thumbstick left or turn wheel left to turn the 'walk' direction left.
Thumbstick right or turn wheel right to turn the 'walk' direction right.
Thumbstick forward, Throttle trigger or Throttle pedal to 'walk' forward.
Thumbstick backward, Brake trigger or Brake pedal to 'walk' backward.
Using whatever keys/buttons you have assigned in the games WALKMODE menu:
Press 'WALKMODE Left' to turn the 'walk' direction left.
Press 'WALKMODE Right' to turn the 'walk' direction right.
Press 'WALKMODE Forward' to 'walk' forward.
Press 'WALKMODE Back' to 'walk' backward.
Press 'WALKMODE Run' to run. Optional 'toggle' available, see post 3 - Configuration options for the required edit.
Press 'WALKMODE Jump' to climb ladders, see post 3 - Configuration options for the required edit.
Press 'WALKMODE Crouch' to crouch. Optional 'toggle' available, see post 3 - Configuration options for the required edit.
Note: If the WALKMODE keys you use are the same used for other functions (except steer/throttle/brake), those other functions will operate while you're 'walking'. To prevent this see post 3 - Configuration options.
General notes:
1 - When you are 'walking' around your truck the trucks steering, throttle, brake & clutch are all disabled to prevent it from moving whilst using the same controls to 'walk', but you should always apply the park brake first to prevent your truck rolling down a hill.
2 - There's no collision, you can 'walk' through everything. During development, with collision enabled, it just resulted in all sorts for strange jumping/lurking movements.
3 - For best results, only 'walk' around a flat area, you cannot 'walk' up/down slopes, you'll just 'walk' through them.
4 - There's a limit to how far you can 'walk' away from your truck, you'll know when you get there.
5 - Look left/right/up/down using your chosen method.
6 - When 'walking' around your truck, you can also climb ladders, for whatever reason.
When stood in front of a ladder, press & hold your WALKMODE JUMP key (default TAB) to climb it. Quick press WALKMODE CROUCH key to auto climb all the way back down.
Note a: It doesn't have to be a ladder, you can just climb up thin air!
Note b: Once on the ladder you can only climb up/down or look around, you can't 'walk' anywhere until you are back on the ground.
See post 3 - Configuration options - "Adjust 'Walk' speed", "Optional - WALKMODE RUN", "Optional - WALKMODE JUMP" & "Optional - WALKMODE CROUCH".
==============================================================================
Zoom Interior Camera:
You can Press & Hold or Toggle Interior Zoom on/off as required.
See post 3 - Configuration options - "Zoom Interior Camera - key/button".
You can enable Auto Zoom when looking at the passenger side mirror.
See post 3 - Configuration options - "Auto zoom when 'toggle' looking at the passenger mirror".
You can enable Auto Zoom when looking at the dash.
See post 3 - Configuration options - "Auto zoom dash".
Note: If you just assign a key/button to 'Zoom Interior Camera' in the games key/buttons menu, you'll lose the above optional features.
==============================================================================
What to expect when playing the game with 'Driving Enhancements':
For best results, always drive with cam 1, sleep with cam 3, 'walk' with cam 4 to attach/detach trailer & refuel and avoid 'skipping' parking.
Some game mechanics have been changed to avoid issues where, by default, the game will automatically change to cam 1, at certain times and can therefore cause the 'DE' code to be out of sync with the view.
Example: Whenever you choose a 'quick job' the game will always change to cam 1, regardless of what camera you were last using.
On game startup:
You'll be in the truck if you last exited the game whilst being in the truck, either driving seat, passenger seat or sleeper (Tip: Change to sleeper before exiting the game, your in game character may as well rest while your not playing!).
OR
You'll be stood outside the drivers door, in 'walk' mode, if you previously exited the game whilst 'walking' or using an external 'driving' camera. Press '1' to get back into the truck ready to drive it.
When using "external 'driving' cameras" (5/6/7/8/9/10):
Connect to a trailer, upon pressing your 'Trailer attach/detach' key/button, the 'DE' code will instant change to cam 1. If required, you can then re-select your preferred external 'driving' camera. This is unavoidable as there's no way to detect if you are attaching or detaching the trailer when pressing that one key/button, but it fixes the trailer delivery part, see next.
OR
Complete the job, by parking the trailer, upon pressing your 'Trailer attach/detach' key/button, the 'DE' code will instant change to cam 1 just before the 'completed' screen appears. This ensures the view, cam 1, and the 'DE' code are kept in sync ready for your next delivery.
OR
Complete the job by 'skipping' parking, the 'DE' code and view will be out of sync when you next drive - Press '1' to fix.
OR
Select a 'Special Transport' job, after the fly around cut scene the game will automatically change to cam 1 ready for driving, the 'DE' code will be out of sync - Press '1' to fix.
OR
Complete a job when using your own trailer by 'skipping' parking or pressing 'Activate' to unload, the 'DE' code and view will be out of sync when you next drive - Press '1' to fix.
Skip parking (if you need to):
For best results always change to cam 1 before selecting 'skip parking', this ensures the 'DE' code and view will remain in sync.
Using 'walk' mode:
When you press '4' to exit your truck to 'walk' around it to attach/detach the trailer etc, the 'DE' code will keep this camera mode forced on, if the game changes the view to cam 1 the 'DE' code will quickly revert it back to 'walking'.
Quick Job - Complete delivery, detach trailer in 'walk' mode, next quick job you'll be still in 'walk' mode, press '1' to get back into the truck to drive it.
Freight Market - Complete delivery, detach trailer in 'walk' mode, select another job or click 'drive' and you'll still in 'walk' mode, 'walk' back to the drivers door, press '1' to get into your truck to drive it.
Slight quirk when using 'walk' mode to buy a new truck:
If parked on a truck dealer icon, get out and 'walk' to the dealer entrance, press 'activate' to enter it and then buy a new truck and opt to drive it straight away. After the new truck cut scene is displayed you'll still be outside in 'walk' mode but you may be placed somewhere different. This is because the 'walk' camera origin is the drivers seat of the truck and if the new truck is spawned in a different place/orientation than where your old truck was parked, you'll therefore be re-located but still at the same distance from the drivers door, just 'walk' to the truck and press '1' to get back into the driving seat.
Slight quirk when manually loading a save game:
It seems that the variables used for 'DE' to function correctly are not restored when manually loading a save game and instead are just set to game defaults. This can result in incorrect functionality. Pressing any of the camera keys/buttons will fix that.
However, on game startup, your last save is automatically loaded and then the controls.sii file is read, resulting in the 'DE' variables set correctly, in this instance.
Notes:
There's probably more situations that may cause a glitch, if you think 'DE' isn't functioning correctly, pressing '1' will always fix it.
OR
Disable the 'DE' code, if it's causing a problem, see "Use the games Tobii Eye menu to setup the Driving Enhancements features" at the top of this post and then report that problem to me so I can hopefully fix it.
Although I developed and tested this mod, using the old cheap notebook you see in the demo video, I don't use it when driving, therefore I'm unlikely to spot any more bugs... I do, however, do all my driving on my 'old driving pc' using g27 wheel & pedals and my "TrackIR Driving Enhancements" mod, which this mod was developed from. Any bugs spotted there and fixed will also be applied to this mod if required.
==============================================================================
Post 1 - Description: viewtopic.php?p=67254#p67254
Post 2 - Quick start guide: viewtopic.php?p=67255#p67255
Post 3 - Configuration options: viewtopic.php?p=67256#p67256
Post 4 - Manual edits: viewtopic.php?p=67257#p67257
Post 5 - Help / Q & A: viewtopic.php?p=67258#p67258