Using Google Sheets, I’ve created calculators that will help you find the correct FOV and multimon settings for any monitor setup. This post will act as documentation, going over how the calculators work and what each parameter means.
For more information about FOV and a step by step guide on tuning your own setup, see my other post. Link: viewtopic.php?f=23&t=2125
General Information
The multimon_config.sii file provides the user with extensive control over the game’s camera. Up to 4 different camera views can be manipulated, changing the FOV, rotation, position, and cropping of each view. It also controls where on your screen the resulting views will appear.
The objective of the calculators is to provide the settings that match your specific setup as closely as possible. To do this, the calculator needs to know the position and orientation of your monitors relative to your head position. Your job is to enter in the requested measurements.
All distance values you enter must be in the same units. Which unit doesn’t matter (in, cm, mm), just don’t mix and match. Any angles you enter will be in degrees. I’ve tried to choose the easiest measurements that will give the calculator everything it needs to recreate your setup.
Included in the calculators are visualization diagrams that I’ve made out of graphs. They show what the setup you’ve entered looks like, so you can make sure it matches your actual setup.
To use the calculator, you must "Make A Copy". Do not request permission to edit.
- On desktop, go to File >> Make a copy.
- On mobile, tap the three dots to see more options, then it’s Share and Export >> Make a Copy.
Calculator Link: https://docs.google.com/spreadsheets/d/ ... sp=sharing
Landing Page
The landing page contains general information and links to various related resources. Of note is the Color Legend, which shows what the cell colors mean. It should be self explanatory, just follow the rules.
Simple Calculator
A calculator with only the most essential inputs to make it super simple to use. If you have a conventional setup with 1-3 identical monitors, this should be sufficient. It outputs a full multimon config file that you can easily copy paste from.
If more adjustment options are needed, use the Hybrid Calculator instead.
Capabilities
- Single, dual, or triple monitor setups
- Fixed center monitor, can angle side monitors inwards
- Assumes matching monitors, with triples being angled symmetrically
- Can adjust eye level up or down
Input Parameters
> Monitor Configuration:
- choose what type of setup you have from the dropdown
- if Single, monitor angle and bezels are unneeded and will stay grayed out
- width of the screen without bezels
- how angled the side monitors are compared to the center
- 0 is parallel, 90 is perpendicular, facing inward
- must be between 0 and 90, inclusive
- distance between opposite edges of center and side monitor, excluding outer bezels
- creates a triangle shape with your monitors, allowing an alternative way to solve for monitor angle
- resulting angle must be between 0 and 90, inclusive, or else measurement is invalid
- width of the bezel on one side of the monitor
- assumes center and side monitors have the same bezel width
- eye distance and FOV are directly related; choose your preferred adjustment method
- Eye Distance refers to perpendicular eye distance
- Target FOV refers to horizontal FOV
- Midpoint refers to the eye distance where you’re exactly centered between your monitors
- Midpoint is invalid for single monitor setups or when side monitor angle is 0
- the eye distance or target FOV for the center monitor
- for Eye Distance, just measure from your eyes to the screen in a straight line, don’t overthink
- for Target FOV, simply choose a desired value in degrees
- for Midpoint, this value is unused, as it’s auto calculated from the other inputs
- shifts eye level (horizon) up or down by a percentage of the screen height
- 0 means eye level centered, positive moves up, negative moves down
- does not affect Multimon File Output
- changes the shape of the monitors shown in front view visualization diagram
- changes the default resolution used for the copy script
- can enter any positive number or aspect ratio in the format x:y, the warning can be ignored
- if blank or invalid value, defaults to 16:9
Helper Values
The cell labeled “Approximate Total hFOV” calculates the horizontal view angle from the left-most edge to the right-most edge of your setup. The reason it is approximate is because it counts the bezels as part of the FOV.
The higher the number, the more can be seen at once. This lets you quickly judge how practical the settings will be to use, and may be useful for those wanting to optimize their setup, as you can easily compare different options.
It also serves as a status indicator to make sure you’ve entered a valid setup. If Invalid Method, switch off of Midpoint for FOV Adjustment Method. If Invalid Angle, set Monitor Angle to between 0 and 90. If Invalid Diagonal, try measuring again or switch to Monitor Angle.
Copy Inputs to Hybrid Calculator
I wrote a function using Google Apps Script that copies the inputs you’ve entered in Simple Calculator over to Hybrid Calculator to recreate the same setup. This can let you quickly switch calculators without needing to re-enter all the measurements.
I decided not to have it active in the main file as App Scripts require additional permissions to run, and could complicate the sharing process. To enable this functionality, switch the dropdown from Multimon Config File Output to Copy to Hybrid Calculator Script.
Copy the indicated text, then go to Extensions >> Apps Script. A new window with a code editor will open. Paste in my script, overwriting the existing code, and hit save. Return to the calculator and click the purple button, it should already be assigned to the correct function.
On first run, it will ask you for permission. The script has the tag @OnlyCurrentDoc, so it will not affect any other Google apps, it can only interact with this current copy of the calculator. Once permission is granted, the button should now run the script.
You must have a valid configuration entered in order for the function to work. It will clear Hybrid Calculator, then enter values where appropriate. Since the resolution is required, it will enter a default resolution based on the simulated aspect ratio; ex. 1920x1080 for 16:9. You can edit this after if that’s not correct.
Screen height will also be set to “Auto”, which calculates it from the screen width and aspect ratio. If you chose “Midpoint” for the FOV adjustment method, the equivalent perpendicular eye distance will be entered instead, as there is no midpoint option in Hybrid Calculator. Same with Diagonal Distance, if you used that, it will just enter the equivalent Monitor Angle.
Calculation Method
The calculations are based on 2D vectors, similar to the top down visualization diagram, but with eye position at the origin. Since the situations this calculator applies to are relatively simple, it’s fairly easy to calculate the positions of each monitor.
The center monitor position only varies based on eye distance. Then the side monitor edge positions can be calculated from screen width, side monitor angle, and bezel width, it’s just vector addition. The helper values section show these calculations.
With those positions, the right triangles relevant to horizontal FOV can be calculated, along with frustum subrect x and width. The values related to vertical FOV are just set so that they will be auto-calculated based on the aspect ratio.
If a Normalized Eye Level Offset is entered, frustum subrect height and y must be adjusted. The subrect width and height values are kept the same to maintain square pixels, and the FOV and x values are scaled accordingly to maintain the same view positions.
Hybrid Calculator
This calculator combines aspects from all my previous calculators. It provides the full range of options all in one place and can accommodate almost any setup, while still being fairly easy to use.
Use the Hybrid Calculator if the Simple Calculator isn’t enough to recreate your setup, or if you want to access the extra features. These include individual monitor adjustments, lateral and vertical offsets, curve compensation options, additional FOV info, virtual screen space/UI adjustment, and console script output.
Capabilities
- Allows up to four monitors total (max for the game)
- Adjustable center monitor plus left, right, up, or down monitors
- Can add multiple monitors to one side (ex. 2 right monitors)
- Can shift monitors horizontally or vertically
- Can yaw or pitch any monitor
- Has options for curved monitors
- Full virtual screen space control
Parameters
> Add Monitor to:
- choose from the drop-down in which direction this monitor should be added, relative to previous monitors
- for center monitor, choose whether monitor angle represents yaw or pitch
- how angled the monitor is compared to the previous adjacent monitor
- for center monitor, positive angle means back of monitor is facing right (if yaw) or up (if pitch)
- for center monitor, negative angle means back of monitor is facing left (if yaw) or down (if pitch)
- for other monitors, positive angle means angling inwards, negative angle means angling outwards
- LIMITATION: if a monitor is split horizontally, resulting pitch will always be 0
- width of screen without bezels
- typing “Auto” into the cell will have the width auto-calculated based on height, aspect ratio, and curvature
- cannot have both width and height be auto
- height of screen without bezels
- typing “Auto” into the cell will have the height auto-calculated based on width, aspect ratio, and curvature
- cannot have both width and height be auto
- width of the bezel on one side of the monitor
- just used to create a gap between screens, can be whatever distance you desire, even negative
- distance is applied parallel to the screen
- not all bezel widths are needed; if there is no adjacent monitor, it will not affect the result, so the cell will be grayed out
- move entire monitor horizontally by this distance
- positive values move to the right, negative values move to the left
- unused if left or right monitor, use bezels to perform lateral offset instead
- move entire monitor vertically by this distance
- positive values move up, negative values move down
- unused if up or down monitor, use bezels to perform vertical offset instead
- for center monitor, choose LHD or RHD to add the appropriate lateral offset for an LHD/RHD setup
- for left/right monitor, choose Center, Top, or Bottom to add the appropriate vertical offset to align with the center monitor
- for up/down monitor, choose Center, Left, or Right to add the appropriate lateral offset to align with the center monitor
- can be used together with lateral or vertical offset to precisely tweak alignment
- the curvature specification of the monitor, listed as the radius of a circle in millimeters (e.g. 1800R)
- convert to the same units used in your other distance measurements
- assumes curvature is along width for landscape aspect ratios and along height for portrait aspect ratios
- how many views the monitor should be evenly divided into
- the more views, the more accurate the approximation to the curve
- total number of views is limited to 4
- splits horizontally for landscape aspect ratios, and splits vertically for portrait aspect ratios
- pixel width of screen
- pixel height of screen
- move entire screen horizontally by this many pixels
- positive values move right, negative values move left
- move entire screen vertically by this many pixels
- positive values move down, negative values move up
- whether the game’s UI should display on this screen
- if none are checked, UI will display across all screens
- eye distance and FOV are directly related; choose your preferred adjustment method
- no matter what you choose, an eye distance to screen center value will be calculated and used for the rest of the calculations
- the eye distance or target FOV for the center monitor
- for Eye Distance to Screen Center, measure directly to center point of screen, even if at an angle
- for Perpendicular Eye Distance, measure in the direction perpendicular to the surface of the screen
- for Target Horizontal FOV or Target Vertical FOV, simply choose a desired value in degrees
- in recent game updates, the normalized y parameter was changed to specify the top edge of the monitor rather than the bottom
- this checkbox fixes that, uncheck it if you play on an older version before the change
Helper Values
The curvature angle helper value refers to how much of a circle the monitor should look like. For example, if it were 180, the monitor would look like a half circle. If it were 90, it would be a quarter circle.
The curvature depth helper value refers to the depth the screen has due to the curve. So if you were to draw a straight line from edge to edge of the curved monitor, how far the center of the screen would be from that line is the curvature depth.
These helper values can help you tweak the curvature radius input if you don’t know the curvature specification of your monitor, or if your monitor is not curved like a cylinder.
Apparent lateral and vertical skew attempts to quantify how far off center the view is on each monitor. Positive means the right or top of the monitor appears skewed, negative means it’s the left or bottom. A value of 1 means the center of the camera view is exactly at the edge of the screen.
Normally, this skew is just an inherent part of a mathematically correct view, you will not notice it as long as you’re in the correct head position. But if you don’t/can’t use that head position, this helper value can quantify how much apparent skew you can expect. Then you can figure out which settings will reduce skew, if that’s what you want.
There are also the center monitor stats, that show the eye distance and FOV for your center monitor. So if you chose to enter an eye distance for your adjustment method, you will see the resulting FOV, and if you chose a target FOV, you will see the correct eye distance you should be at.
Finally, the overall FOV stats help you estimate how much of the game world you’ll be able to see in each direction. For example, if you need to turn 45 degrees to face the left mirror in your truck, then the max left edge angle value will need to be at least 45 for it to be visible normally. Each direction has its own value to account for asymmetrical setups.
The approximate total FOV values work the same way as in the Simple Calculator. It calculates the FOV between the farthest edges of your setup, including any bezels in between. This gives a general idea of how much visibility your setup provides and allows you to quickly compare different settings.
Output Options
The default output is a full multimon config file that you can easily copy paste from, just like the Simple Calculator. However, there’s also a global resolution output and an option to use Aspect Ratio Compensation, which is related to the virtual screen space.
You will notice that there are two outputs for normalized ui x and width, either with or without aspect ratio compensation. The reason is that, since we can’t control the height or y values of the UI, it can sometimes get cut off on the top or bottom on certain setups.
The compensated values attempt to shrink the UI to make sure nothing is cut off. However, that means the UI won’t fill the screen all the way horizontally. You can see the difference in the visualization diagram if you toggle the UI Display Compensation checkmark.
For most normal setups, the values with or without compensation will be the same, indicating that there’s no clipping. But if there is a difference, choose whichever option you prefer to use for the output.
Also unique to the Hybrid Calculator is the console script output, which can be chosen from the dropdown. This provides a quick way to apply multimon config settings to the game through the in-game console. Usage instructions are in my step by step guide linked at the top.
Here’s how it works. The calculator generates a list of console commands that sets the game’s resolution, initiates the multimon file to a blank slate, adds each monitor and adjusts their parameters according to the output values, and saves everything to the multimon file.
Saving the list of commands to a text file lets you run all of them at once using one console command. You can have multiple files with different settings, allowing you to easily switch between them as well.
Note that if r_multimon_mode wasn’t set to 4 before opening the game, changing the multimon mode to 4 will only take effect after a game restart. So if you get an error about that when running the script, just restart your game.
Also, changing resolution through the console does not take effect until you reload the game’s graphics. You can do this by changing the Vsync setting, then reverting. You do not need to do this if only the multimon settings are changing.
Calculation Method
The calculations here are a combination of the previous Physical and Virtual Calculators, reworked to integrate curve compensation and the new features. All the previous curve compensation splitting logic was rewritten to improve functionality and consistency. Repetitive operations were also converted to named functions for better readability.
Overall, it’s a two stage process. In the first stage, any relative inputs are converted into absolute inputs, and useful values related to curvature are calculated. The physical measurements determine the 3D vector position of each monitor, using a 3D coordinate space where the head position is the origin point.
More specifically, the 3D position of the center monitor can be calculated from “eye distance to screen center”, “lateral offset”, and “vertical offset”. Then, the positions of each additional monitor can be found using their widths/heights, bezels, angles, and offsets. The math is mostly vector addition and rotation.
The virtual 2D positions of each monitor are also calculated in this stage. With the center monitor being at the origin, the other monitor positions are simple to calculate using their pixel widths/heights and offsets; it’s all just addition or subtraction.
In the second stage, monitors are split into the appropriate number of views. Each view is treated as a separate monitor, with adjusted angles, dimensions, and 3D vector positions based on the curvature. The math involves trigonometry and more vector addition and rotation. The 2D virtual coordinates and pixel dimensions are also adjusted accordingly.
Perpendicular eye distance and angle to edge values are then calculated, which provides the measurements for the right triangles used for FOV calculations. These values are obtained by rotating the 3D position vector of each monitor by their negative yaw and pitch values, which “realigns” the monitor to the axes.
FOV overrides and frustum subrect values can be calculated from that, with heading and pitch offsets being mostly trivial. Finally, the “normalized” multimon parameters are calculated using the pixel values, simply normalizing each value to the combined size of the screens.
For the UI compensation, first we need to understand how the UI works. When we set its horizontal position and width, it will automatically try to fill the game window vertically as much as it can. However, it has a maximum height; it cannot exceed a 16:10 aspect ratio. Additionally, the UI always centers itself vertically within the game window.
So I look at the top and bottom edges of the monitors to see if the UI would exceed those bounds. If so, the UI width is reduced so that the height is in bounds. It will display 0 if there’s no way for it to keep the UI in bounds. This method is far from perfect, as it doesn’t take into account any horizontal position or vertically stacked monitors, so it may overcorrect in some cases.
You can easily look at the formulas in each cell if you’re interested in delving deeper. I will try to answer any questions about the calculations if you have any.
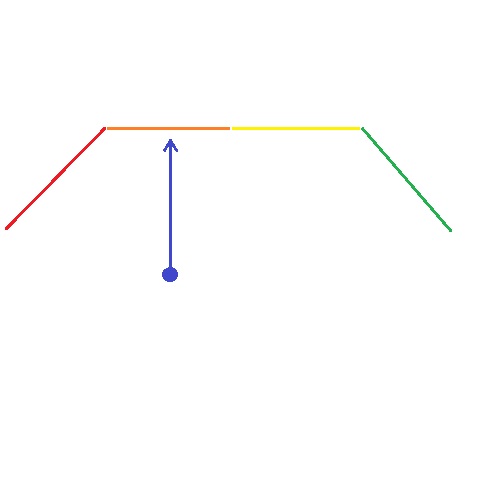
Visualization Diagrams
Each of the calculators have visualization diagrams. Use them to check whether you've entered everything correctly. It should match what your setup looks like, with accurate proportions and positions.
Parameters
> X-Axis Margin Scalar:
- adjust the x-axis margins of the diagram
- 0 means no margins, diagram can touch the side of graph
- positive values leaves more space on the sides
- negative values allow the diagram to go out of bounds on the side
- adjust the y-axis margins of the diagram
- 0 means no margins, diagram can touch the top or bottom of graph
- positive values leaves more space on the top and bottom
- negative values allow the diagram to go out of bounds on the top or bottom
Calculation Method
The diagrams are made from line charts. I specify the x and y values of points, that then form lines representing the monitors. The points are calculated from the measurements that have been entered into the calculator. They are all multiplied by the scale factor.
The scale factor is automatically calculated to keep the entire diagram within the bounds of the graph. The margin scalar values adjust the scale factor, which effectively lets you zoom in or out. You could even just overwrite the scale factor value and set it to whatever you want.
Conclusion
Hopefully you found these calculators useful. Let me know if you find any mistakes or weird behaviours. If you have questions, check the guide linked at the top first, you may find your answer there. If not, feel free to ask down below.
The next few sections are the documentation for older calculator versions that have since been replaced. They are here just for the sake of completeness. I thought it may be helpful if you find an older conversation about the calculator referring to one of these versions.
Basic Calculator (Legacy)
Formerly named Horizontal Calculator, this calculator is designed to be simple and straightforward to use. For the majority of common setups, this is all you need to get the correct settings.
It has since been superseded by the Simple Calculator, an even more simplified and streamlined version with extra convenience features. It drops support for mismatched monitors, but has much fewer input fields.
If needed, the cut functionality is still present in Hybrid Calculator, which I feel isn’t that much more complicated than Basic Calculator anyways.
Capabilities
- Allows up to three monitors total
- Fixed center monitor plus a left and a right monitor
- Can shift monitors vertically
Input Parameters
> Monitor Angle:
- how angled the side monitors are compared to the center
- 0 is parallel, 90 is perpendicular, facing inward
- must be between 0 and 90, not inclusive
- width of the screen without bezels
- height of the screen without bezels
- width of the bezel on one side of the monitor
- just used to create a gap between screens, can be whatever distance you desire, even negative
- distance is applied parallel to the screen
- distance from eye to screen, when your look direction is perpendicular to the screen’s surface
- when measuring, just go from your eyes to the screen in a straight line, don’t overthink
- as indicated by the colors, only enter eye distance for the center screen, the others are auto-calculated
- shift the monitor up or down
- requires screen height to function
- monitor moves up with positive values, down with negative values
- adds the appropriate offset to align the side monitor with the center monitor
- requires screen height of side monitor and center monitor to function
- can be used together with vertical offset to precisely tweak alignment
Helper Values
The column labeled “Normalized Eye Level Offset” shows the deviation of the eye level from screen center as a percentage of the screen height. If 0, the eye level is centered; if positive, eye level is above center; if negative, eye level is below center. Increasing vertical offset decreases eye level offset, and vice versa.
There are also potentially useful values worth mentioning. The cell labeled “Approximate Total hFOV” calculates the horizontal view angle from the left-most edge to the right-most edge of your setup. The reason it is approximate is because it counts the bezels as part of the FOV.
The higher the number, the more can be seen at once. This lets you quickly judge how practical the settings will be to use, and may be useful for those wanting to optimize their setup, as you can easily compare different options.
There are also cells labeled “Midpoint Between Center & Side Monitor”. This is referring to the eye distance where both the side monitor and center monitor are facing you directly. There are separate values for the left and right monitor.
This can be useful if you do not want to measure a specific eye position, and just want to sit in the midpoint between your monitors. To use it, copy the value to the center monitor’s perpendicular eye distance. You could also copy the formula if you want the value to continuously update.
Calculation Method
The situations this calculator applies to are relatively static, so I am simply doing some trigonometry to find the angles and distances I need.
By knowing the eye distance to the center monitor and the width of the screen, it creates an isosceles triangle that I can solve. The angles allow me to find the FOV for the center monitor.
For the side monitors, I can once again use triangles to find the distances and angles. I just need the screen width, bezel widths, and monitor angle, along with the measurements from the center monitor. This old post I made shows the general process. Link: viewtopic.php?f=23&t=2125&p=45056#p45056
The helper values in my calculator actually represent variables from the third diagram. From left to right, the helper values represent “a”, “c”, “e”, and “f”. The only difference in the formulas is how I deal with bezels.
This method is flawed though, since as the monitor angle approaches 90°, “a” and “c” approach infinity, and the formula breaks. The vector based calculations in the newer Simple Calculator and Hybrid Calculator avoid this issue.
Finally, if there is any eye level offset to apply, it uses the screen height and perpendicular eye distance to create more right triangles that are solvable. This other post shows the formulas I used. Link: viewtopic.php?f=23&t=2125&p=45057#p45057
Standalone Physical Calculator (Legacy)
Formerly named Quad Calculator or Advanced Calculator, this is an enhanced version of the Basic Calculator. It does the same job, dealing with the parameters related to physical dimensions, but can accommodate more setup types. It uses absolute inputs for consistency, which might make it less intuitive to use.
With the new Hybrid Calculator that combines all the different options into one place, there’s little reason to use this standalone calculator. It’s just another way to do the calculations, as the formulas are slightly different. I’ve since removed it from the main calculator to reduce clutter.
Capabilities
- Allows up to four monitors total (max for the game)
- Adjustable center monitor plus left, right, up, or down monitors
- Can add multiple monitors to one side (ex. 2 right monitors)
- Can shift monitors horizontally or vertically
- Can yaw and pitch any monitor
Parameters
> Add Monitor to:
- choose from the drop-down in which direction this monitor should be added, relative to previous monitors
- horizontal facing angle of monitor relative to forward look direction
- 0 means pointing directly forward (horizontally)
- negative angle means back of monitor is facing left
- positive angle means back of monitor is facing right
- vertical facing angle of monitor relative to forward look direction
- 0 means pointing directly forward (vertically)
- negative angle means back of monitor is facing down
- positive angle means back of monitor is facing up
- width of screen without bezels
- height of screen without bezels
- distance from eyes to center of monitor
- this is different from perpendicular eye distance, it does not need to be perpendicular
- as indicated by the colors, only enter eye distance for the center screen, the others are auto-calculated
- width of the bezel on one side of the monitor
- just used to create a gap between screens, can be whatever distance you desire, even negative
- distance is applied parallel to the screen
- not all bezel widths are needed; if there is no adjacent monitor, it will not affect the result, so the cell will be grayed out
- move entire monitor horizontally by this distance
- positive values move to the right, negative values move to the left
- unused if left or right monitor, use bezels to perform lateral offset instead
- move entire monitor vertically by this distance
- positive values move up, negative values move down
- unused if up or down monitor, use bezels to perform vertical offset instead
Calculation Method
The calculations here are much more complex than in the Basic Calculator. Since any monitor, including the center, can yaw and pitch, it’s a lot trickier to create the right triangles that I used to calculate the values before.
The way I did it is using 3D vectors in a 3D coordinate space, with the head position as the origin point. Starting with the center monitor, I could figure out the position vector of the center point using “eye distance to screen center”, “lateral offset”, and “vertical offset”.
Then, the position vector was projected onto the monitor’s normal direction, which is perpendicular to the surface of the monitor, found using the yaw and pitch. That gives me the perpendicular eye distance.
Next, the original position vector is rotated using matrix multiplication to “realign” the monitor to the axes. Finally, using the new coordinates along with the screen width/height and perpendicular eye distance, I can create my right triangles and find the angles that correspond to FOV.
For the other monitors, the process is similar, but I need to calculate their positions relative to the center monitor. Using the width, bezel, and angle measurements, this is not too difficult, just some trigonometry involved. Once I get the 3D position vector of the center point, the rest of the process is the same.
There’s definitely more efficient ways to do all of this, but I like using 3D vectors so I can visualize it in my head.
Standalone Virtual Calculator (Legacy)
This calculator is for the multimon parameters that pertain to the virtual screen space. These parameters only need to be tweaked for specific setups with mismatched monitor sizes, most setups will not need this. Its capabilities are similar to the Standalone Physical Calculator.
With the new Hybrid Calculator that combines all the different options into one place, there’s little reason to use this standalone calculator. It’s just a way to calculate these parameters separately. I’ve since removed it from the main calculator to reduce clutter.
Capabilities
- Allows up to four monitors total (max for the game)
- Adjustable center monitor plus left, right, up, or down monitors
- Can add multiple monitors to one side (ex. 2 right monitors)
- Can shift monitors horizontally or vertically
Parameters
> Add Monitor to:
- choose from the drop-down in which direction this monitor should be added, relative to previous monitors
- pixel width of screen
- pixel height of screen
- move entire screen horizontally by this many pixels
- positive values move right, negative values move left
- move entire screen vertically by this many pixels
- positive values move down, negative values move up
- whether the game’s UI should display on this screen
- if none are checked, UI will display across all screens
The compensated values attempt to shrink the UI to make sure nothing is cut off. However, that means the UI won’t fill the screen all the way horizontally. You can see the difference in the visualization diagram if you toggle the UI Display Compensation checkmark.
For most normal setups though, the values with or without compensation will be the same, indicating that there’s no clipping.
Calculation Method
This one is quite simple. All positions and distances are on a 2D coordinate grid, so I simply add the appropriate distances together to find the points I’m interested in. Normalize to the combined size of the screens to get the values for the multimon parameters. No trigonometry or 3D vectors involved.
For the UI compensation, first we need to understand how the UI works. When we set its horizontal position and width, it will automatically try to fill the game window vertically as much as it can. However, it has a maximum height; it cannot exceed a 16:10 aspect ratio. Additionally, the UI always centers itself vertically within the game window.
So I look at the top and bottom edges of the monitors to see if the UI would exceed those bounds. If so, the UI width is reduced so that the height is in bounds. It will display 0 if there’s no way for it to keep the UI in bounds. This method is far from perfect, as it doesn’t take into account any horizontal position or vertically stacked monitors, so it may overcorrect in some cases.