TrackIR Driving Enhancements - ATS/ETS2 1.41 to 1.54 - Updated 26/06/2025
Posted: September 23rd, 2021, 5:12 pm
Post 01 of 10 - TrackIR Driving Enhancements.
Note: This isn't a mod to just drop into your mod manager, you'll also need to follow instructions and edit your controls.sii & config_local.cfg files.
For TrackIR or devices that use the games TrackIR inputs.
Your TrackIR device must already be configured and working with the standard game.
Using just Yaw is possible but will result in some limited functionality.
For best results, use at least Yaw, Pitch, X & Z or better still, all 6DOF.
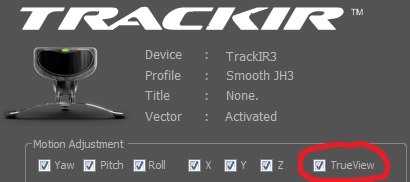
I used my TrackIR 3 (from 2005) to create this using Yaw, Pitch, Roll, X, Y, Z & Trueview enabled.
This won't work for VR. But you can try this "TEST" VR version here: viewtopic.php?p=55557#p55557
This won't work for Tobii Eye. But you can try 'Tobii Eye Driving Enhancements' instead: viewtopic.php?p=57548#p57548
If you don't have any headtracking devices, try this instead: viewtopic.php?p=67254#p67254
This is for, what I think, is a more realistic sim experience. The goal is to perform every thing in first person and move as seamlessly as possible from inside to outside and back again, be the driver... not the truck!
Updated 27/10/2021 - New menu mods (v2.0) and required date highlighted config_local.cfg & controls.sii file edits on post 2. Updated descriptions in this post.
Updated 06/11/2021 - Date highlighted updated descriptions in this post.
Updated 22/12/2021 - New menu mods (v2.2) and required date highlighted config_local.cfg & controls.sii file edits on post 2. Updated descriptions in this post. What's new, look here: viewtopic.php?p=48312#p48312
Updated 17/01/2022 - New mod 'TDE - Cabin Camera Creator v2' on post 5. Date highlighted controls.sii file edits on post 2. What's new, look here: viewtopic.php?p=49398#p49398
Updated 16/03/2022 - New menu mods (v3.0) and required Date highlighted controls.sii file edits on post 2. Updated descriptions in this post. What's new, look here: viewtopic.php?p=50213#p50213
Updated 22/04/2022 - New menu mods (v4.0) and required Date highlighted controls.sii file edits on post 2. Updated descriptions in this post. What's new, look here: viewtopic.php?p=50547#p50547
Updated 19/05/2022 - New menu mods v4.1 (1.38-1.43) & v5.0 (1.44) and required date highlighted controls.sii file edits (191/195/205/280/283/284/306/313/339/340/375/377/507). Updated descriptions in this post. What's new, look here: viewtopic.php?p=50918#p50918
Updated 15/07/2022 - Date highlighted amended controls.sii file edits (191/195/200'optional post 6'/279/510/513/514). What's new, look here: viewtopic.php?p=51893#p51893
Updated 12/08/2022 - New menu mods v5.1 (1.44 & 1.45) and date highlighted controls.sii file edit (config_lines[284]: "mix headtrz...) for 1.38 to 1.45. What's new, look here: viewtopic.php?p=52736#p52736
Updated 31/10/2022 - Date highlighted amended controls.sii file edits to fix a problem caused by using '-sysmouse' as a game launch option. What's new, look here: viewtopic.php?p=54640#p54640
Updated 16/12/2022 - New menu mods v4.2 (1.38-1.43) & v5.2 (1.44-1.46) and date highlighted controls.sii file edits. What's new, look here: viewtopic.php?p=56190#p56190
Updated 14/02/2023 - New menu mods v4.3 (1.38-1.43) & v5.3 (1.44-1.46) and date highlighted controls.sii file edits. What's new, look here: viewtopic.php?p=57402#p57402
Updated 07/03/2023 - Fixed a glitch in z movement for date highlighted 'mix headtrz...'
Updated 25/03/2023 - Fixed a glitch for sleep activation date highlighted 'mix activate ...'. What's new, look here: viewtopic.php?p=57910#p57910
Updated 01/07/2023 - New menu mods v4.4 (1.38-1.43) & v5.4 (1.44-1.47) and date highlighted controls.sii file edits. What's new, look here: viewtopic.php?p=59545#p59545
Updated 03/07/2023 - Fix for 'mix headtrz...' What's new, look here: viewtopic.php?p=59583#p59583
Update 24/08/2023 - TDE v5.4 and associated line edits still work on game version 1.48 but SCS has added a bug that affects their Tobii Eye menu and therefore also affects my TDE menu... See this post for more info: viewtopic.php?p=60275#p60275
Updated 11/12/2023 - New menu mods v4.5 (1.41-1.43) & v5.5 (1.44+) and date highlighted controls.sii file edits. What's new, look here: viewtopic.php?p=62527#p62527
Updated 06/01/2024 - New menu mod v5.51 (1.44+). What's new, look here: viewtopic.php?p=62993#p62993
Updated 22/01/2024 - Date highlighted controls.sii file edits. What's new, look here: viewtopic.php?p=63183#p63183
Updated 16/02/2024 - New menu mods v4.6 (1.38-1.43) & v5.6 (1.44+) and Date highlighted controls.sii & config_local.cfg file edits. What's new, look here: viewtopic.php?p=63446#p63446
Updated 04/04/2024 - Added first person animated movement. Date highlighted controls.sii file edits. What's new, look here: viewtopic.php?p=63906#p63906
Updated 19/05/2024 - New menu mod v6.0 (1.50). What's new, look here: viewtopic.php?p=64214#p64214
Updated 06/06/2024 - Added first person animated movement to Service/Showroom. Date highlighted controls.sii file edits. What's new, look here: viewtopic.php?p=64457#p64457
Updated 07/07/2024 - New menu mod v6.1 (1.50) and date highlighted controls.sii file edits. What's new, look here: viewtopic.php?p=65068#p65068
Updated 08/08/2024 - New TDE Optional sounds. What's new, look here: viewtopic.php?p=65430#p65430
Updated 22/09/2024 - New mod 'TDE (Unsupported) v7.0 (1.51+)'. What's new, look here: viewtopic.php?p=65781#p65781
Updated 27/09/2024 - New mod 'TrackIR Driving Enhancements v7.0 (1.51+)' and date highlighted controls.sii file edits. What's new, look here: viewtopic.php?p=65886#p65886
Updated 30/11/2024 - New mods 'TDE v4.7, v5.7, v6.2 & v7.1' and date highlighted config_local.cfg & controls.sii file edits. What's new, look here: viewtopic.php?p=66722#p66722
Updated 03/01/2025 - New mods 'TDE v4.8, v5.8, v6.3 & v7.2' and date highlighted config_local.cfg & controls.sii file edits. What's new, look here: viewtopic.php?p=67196#p67196
Updated 21/04/2025 - Small fixes/improvements with date highlighted controls.sii file edits. What's new, look here: viewtopic.php?p=68029#p68029
Updated 31/05/2025 - Small fixes/improvements with date highlighted controls.sii file edits. What's new, look here: viewtopic.php?p=68281#p68281
Updated 26/06/2025 - Bug fix with date highlighted controls.sii file edits. What's new, look here: viewtopic.php?p=68382#p68382
=======================================================================================
Confirmed to work for ATS/ETS2 game versions 1.41 to 1.54
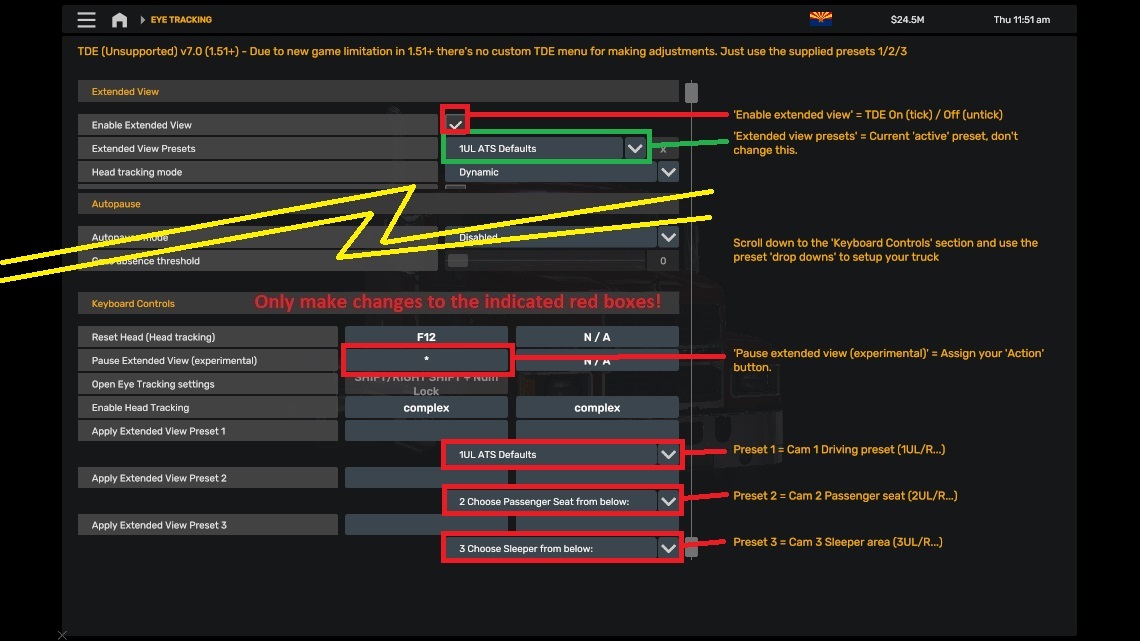
Note: From game version 1.51 there's no custom TDE menu, due to new UI limitations.
A quick test of Driving Academy (1.52): TDE functions work correctly but when the on screen text
instructions state "press 'complex' to continue", just press your 'Activate' button.
From update 11/12/2023 TDE will no longer work for game versions 1.38, 1.39 & 1.40
=======================================================================================
Features:
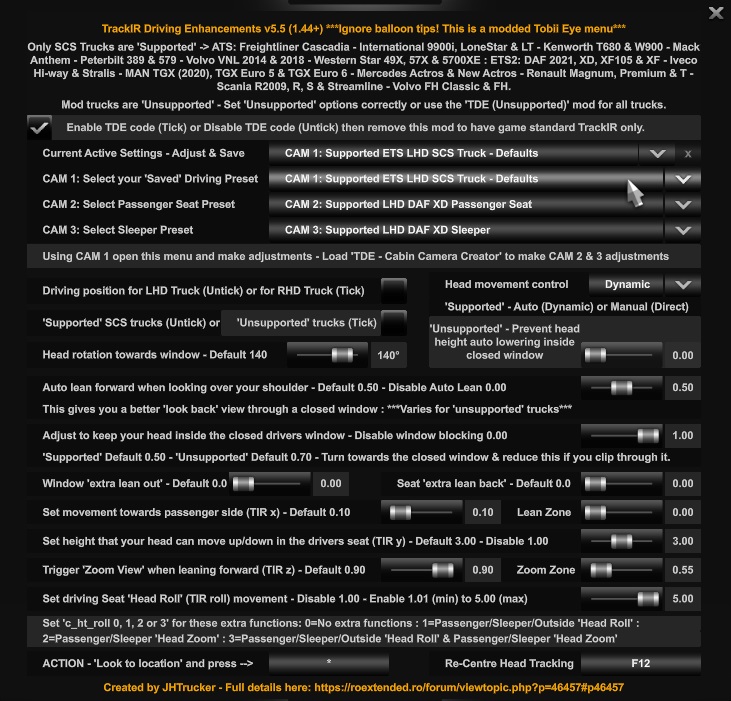
Game version 1.41 to 1.50: A custom in game menu that has drop down lists, tick boxes & sliders so you can setup all of the 'TrackIR Driving Enhancements' features to suit you and any given truck and then save as a preset.
Game version 1.51+: Uses the in game Tobii Eye menu to select the required presets to suit you and any given truck.
Note: The file used to create the custom TDE menu is no longer available within the game extracted files, hence no custom menu and reduced functionality.
TrackIR 6DOF Yaw, Pitch, Roll, X, Y & Z movements. When driving, those movements can each be disabled via TDE menu, if required, except Yaw. Full TrackIR is auto enabled for non-driving features.
TrackIR X, Y & Z improvements to help see around those massive mirrors or huge side exhaust.
'Window blocking' - Your head remains inside the truck cab when the windows are closed but still has full look left / right movement inside the cab. Open the windows to put your head out.
Note: 'Window blocking' can be disabled, if required, you'll then have game standard head movement through the open or closed window.
Sit in the passenger seat (cam 2) or lay down / sit in the sleeper area (cam 3) before activating sleep.
Exit your truck (cam 4) - Stand outside, in first person, whilst 'walking' a path around your truck to refuel or attach/detach the trailer etc with yaw/pitch/roll/y head movement.
You 'walk' on a path around your truck by using your wheel, gamepad thumbstick used for steering or the games 'walk mode' keys.
NEW 03/01/2025
Optional - Outside, basic 'Free Roam Walking'. You can 'walk' around the general area of your truck using your wheel/pedals, gamepad thumbsticks/triggers used for steering, accelerator & brake or your keyboard using the games 'walk mode' keys.
'Action' button - Combines multiple tasks to 1 button and your head movement. 'Action' button assigned via TDE menu.
You can change from driver seat to passenger seat to sleeper area or outside by looking at the location and pressing the 'Action' button.
The movement can be instant, 'Switch To' or auto animated in first person, 'Move To' (TDE Default).
Inside - You can switch GPS screens or switch dash screens by looking at them and pressing the 'Action' button.
Outside - You can refuel, attach/detach the trailer or load/unload the cargo by looking at their 'trigger zones' and pressing the 'Action' button.
Note: You can still assign individual keys/buttons to those actions, as per default game, if you'd rather keep it that way.
Lean forward to zoom interior camera with your head instead of a button press. This can be disabled, via TDE menu, if required.
Optional - Toggle interior camera zoom on/off using the 'Action' button.
Optional - Adjust the big left/right mirrors whilst sat in the driving seat without using the F4 menu.
Optional - Sound effects.
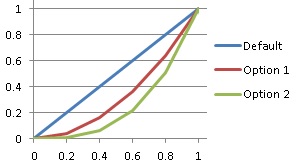
Optional - Non-linear Brake pedal movement:
This gives a more progressive brake pedal feel, rather than the default linear motion, whilst still having maximum braking force when you fully press your brake pedal.
By default, both left & right windows operate together when pressing 'open left window' & 'close left window' buttons. This way you only need to use the same two buttons, whether you are driving LHD or RHD trucks. You can still assign all 4 buttons if you want, so the windows once again operate independently.
The ability to disable all the line edits, via the TDE menu, and remove the mod for playing multiplayer, for example, with game standard TrackIR without having to re-edit your controls.sii file.
Quick start setup on post 3, including a pre-configured controls.sii file for easy testing.
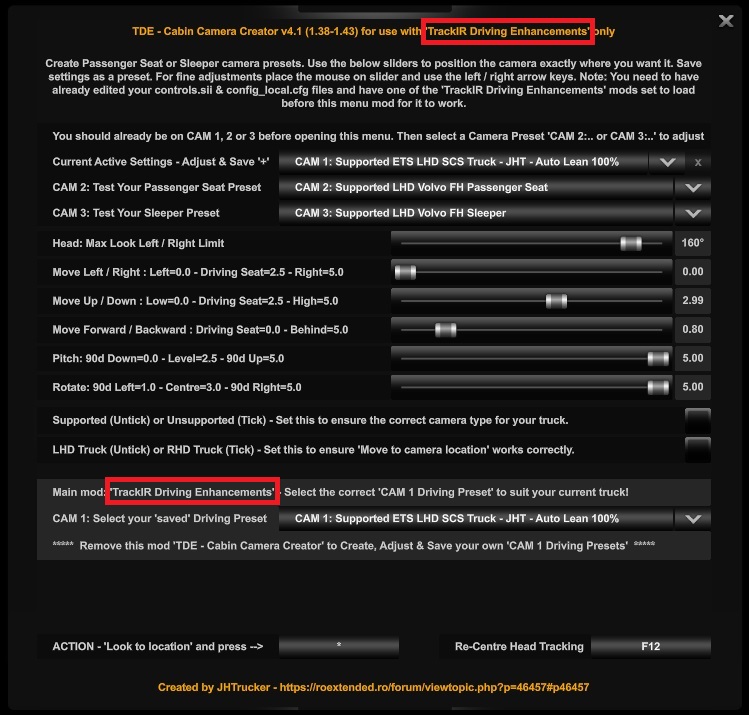
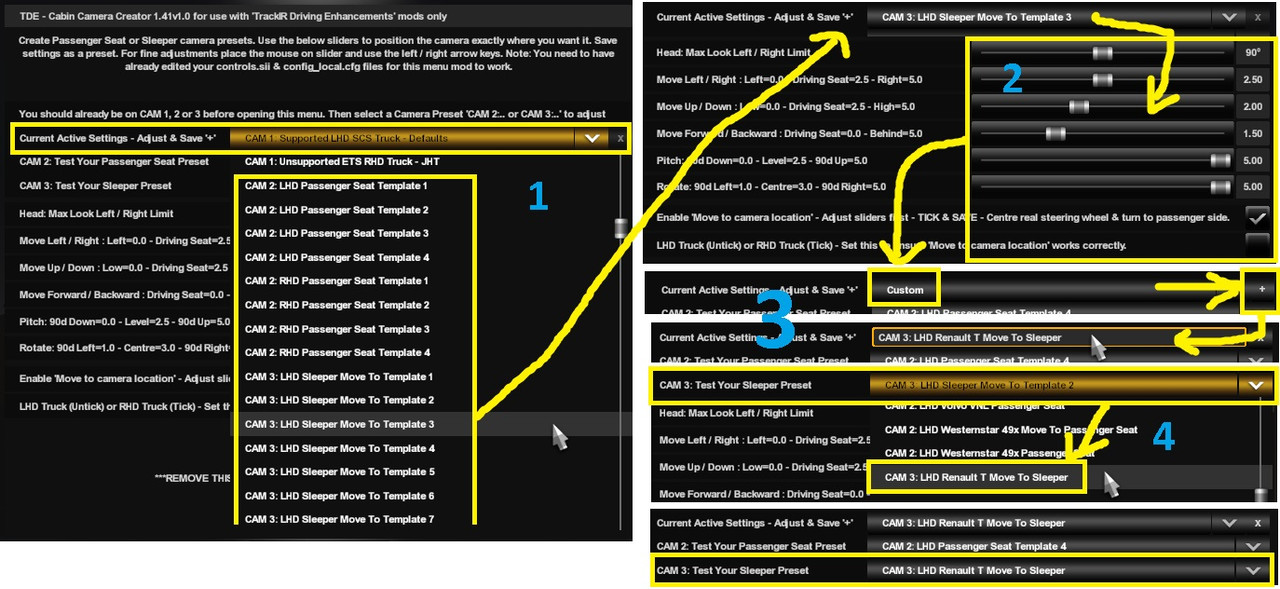
Optional - Game version 1.41 to 1.50 only: 'TDE - Cabin Camera Creator' is an additional custom Menu Mod to help you to position your Passenger Seat or Sleeper camera for any given truck and save as a preset. Each TDE mod has passenger seat and sleeper area presets for all game default trucks, you don't have to create any unless you'd like them positioned differently.
Optional - If the sunny days are too bright, toggle sunglasses on/off as required. See my 'Sunglasses' mod here: viewtopic.php?p=53334#p53334
For best results always use your own truck rather than a 'quick job' truck.
Here's a quick demo video showcasing some of the above features:
Getting out to refuel - Sleeping in the sleeper cab - Getting out to attach your trailer.
If you're wondering, that box with the coloured buttons on it is just a cheap usb number pad with big plastic buttons stuck to the keys that I use.
White --> TrackIR on/off (in TrackIR software) & Diff Lock
Blue --> Truck lift axle & Trailer lift axle
Red --> Park brake & Action
G27 buttons used for all other things I need to press.
All demo 'help' videos are here: viewtopic.php?p=46613#p46613
NOTE: If you don't want all the extra TrackIR functionality but only want game basic TrackIR along with sleeping in the sleeper and 'walking' around your truck to attach/detach the trailer & refuel, then you can use 'Driving Enhancements' instead: viewtopic.php?p=67254#p67254
==============================================================================
TDE cameras:
CAM 1 - Keyboard 1 - Game standard driving view.
CAM 2 - Keyboard 2 - NEW - Passenger Seat. *** You cannot drive from this camera ***
CAM 3 - Keyboard 3 - NEW - Sleeper Area. *** You cannot drive from this camera ***
CAM 4 - Keyboard 4 - NEW - Outside truck. *** You cannot drive from this camera ***
CAM 5 - Keyboard 5 - Game standard chase view.
CAM 6 - Keyboard 6 - Game standard top down view.
CAM 7 - Keyboard 7 - Game standard roof view.
CAM 8 - Keyboard 8 - Game standard Drive-By view.
CAM 9 - Keyboard 9 - Game standard bumper view.
CAM 10 - ALT + Keyboard 9 - Game standard On-Wheel view.
Note 1: You can switch from (cam 1/2/3/4) to (cam 5/6/7/8/9/10) OR switch from (cam 5/6/7/8/9/10) to (cam 1).
Note 2: You can't switch from an external 'driving' camera (cam 5/6/7/8/9/10) to a 'non-driving' camera (cam 2/3/4) to avoid losing control of your truck.
Note 3: Game standard 'Cam Cycle' function is disabled because it breaks TDE functionality.
Remember, this is about realism and keeping everything in first person, so CAM 1, 2, 3 & 4 should be the only cameras to use.
Available cameras when TDE code is disabled (via the TDE menu tick box):
CAM 1 - Keyboard 1 - Game standard driving view.
CAM 2 - Keyboard 2 - Game standard chase view.
CAM 3 - Keyboard 3 - Game standard top down view.
CAM 4 - Keyboard 4 - Game standard roof view.
CAM 5 - Keyboard 5 - Game standard drivers window view (the TDE mod also has to be removed for this camera to work correctly).
CAM 6 - Keyboard 6 - Game standard Bumper view.
CAM 7 - Keyboard 7 - Game standard On-Wheel view.
CAM 8 - Keyboard 8 - Game standard Drive-By view.
CAM 9 - Keyboard 9 - Cam Cycle.
You should take your time to familiarise yourself with all the settings.
(All information is split into sections and contained within the first 10 posts.)
Post 01 - Description - This post.
Post 02 - General Menu Information and Usage - viewtopic.php?p=46458#p46458
Post 03 - Quick start guide - viewtopic.php?p=46459#p46459
Post 04 - Controls.sii file edits (Part 1) - viewtopic.php?p=46460#p46460
Post 05 - Controls.sii file edits (Part 2) - viewtopic.php?p=46461#p46461
Post 06 - Optional edits - viewtopic.php?p=46462#p46462
Post 07 - Cabin Camera Creator - viewtopic.php?p=46506#p46506
Post 08 - Problems & Solutions / To do list - viewtopic.php?p=46559#p46559
Post 09 - Q & A Section - viewtopic.php?p=46612#p46612
Post 10 - TrackIR Driving Enhancements - Demo videos - viewtopic.php?p=46613#p46613
Using the supplied presets in the TDE menu is the easiest way to start.
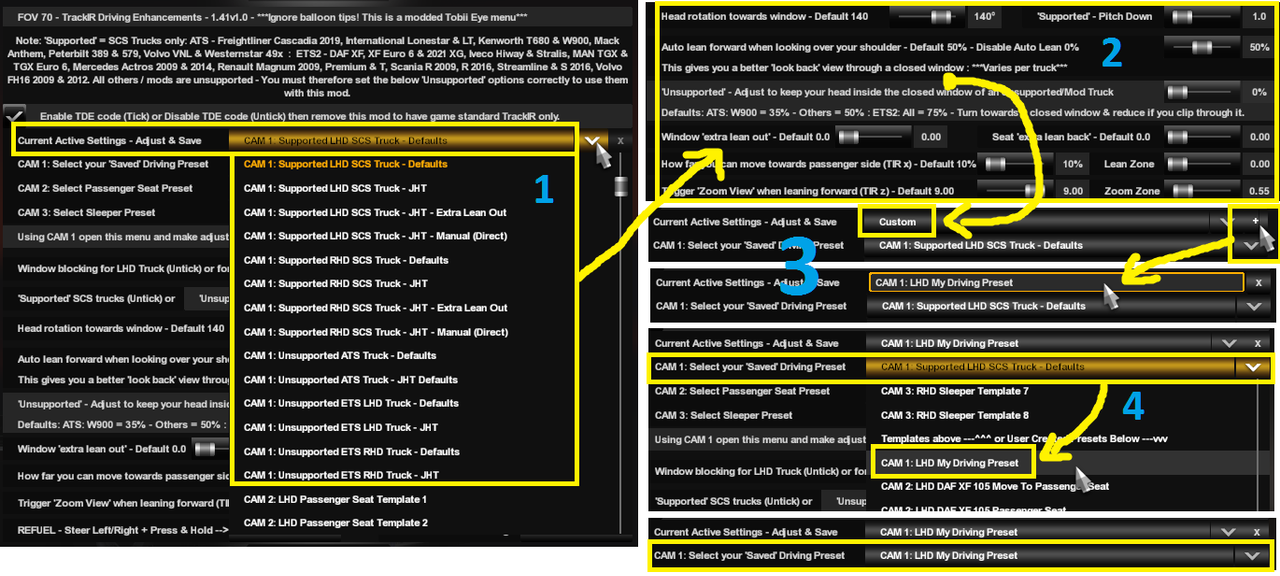
Adjusting the menu sliders and saving as new presets is considered optional (game version 1.41 to 1.50 only).
In the end you'll have:
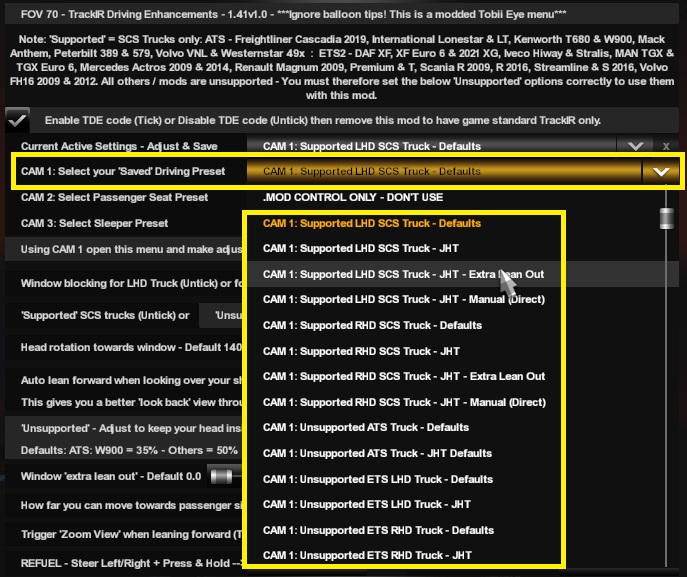
A couple of 'CAM 1 Driving' presets that you like to use, depending on what truck you are driving.
A lot of Passenger Seat presets to select from, choose the one that matches the truck you are driving.
A lot of Sleeper presets to select from, choose the one that matches the truck you are driving.
So, whilst there's a lot of info here that may put you off doing it, the end result is just a quick change of the presets in the TDE menu for CAM 1, CAM 2 & CAM 3 whenever you change trucks!
==============================================================================
There's 3 menu mods to choose from, as listed below:
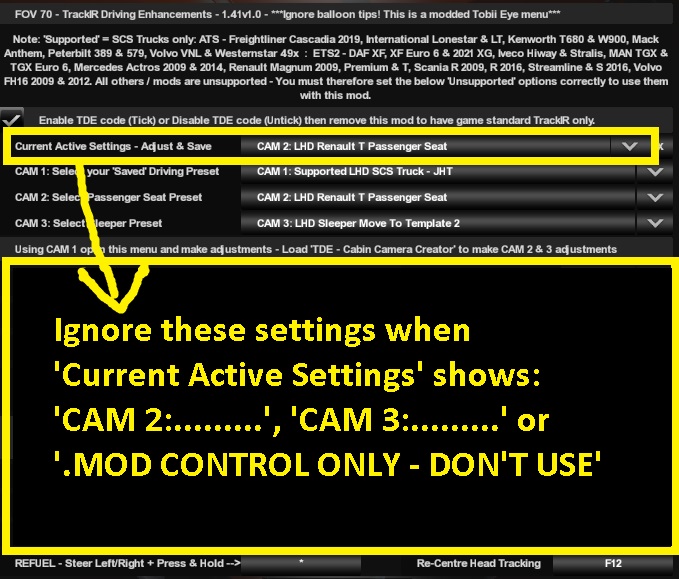
The menu is used to select the required presets for driving seat, passenger seat & sleeper.
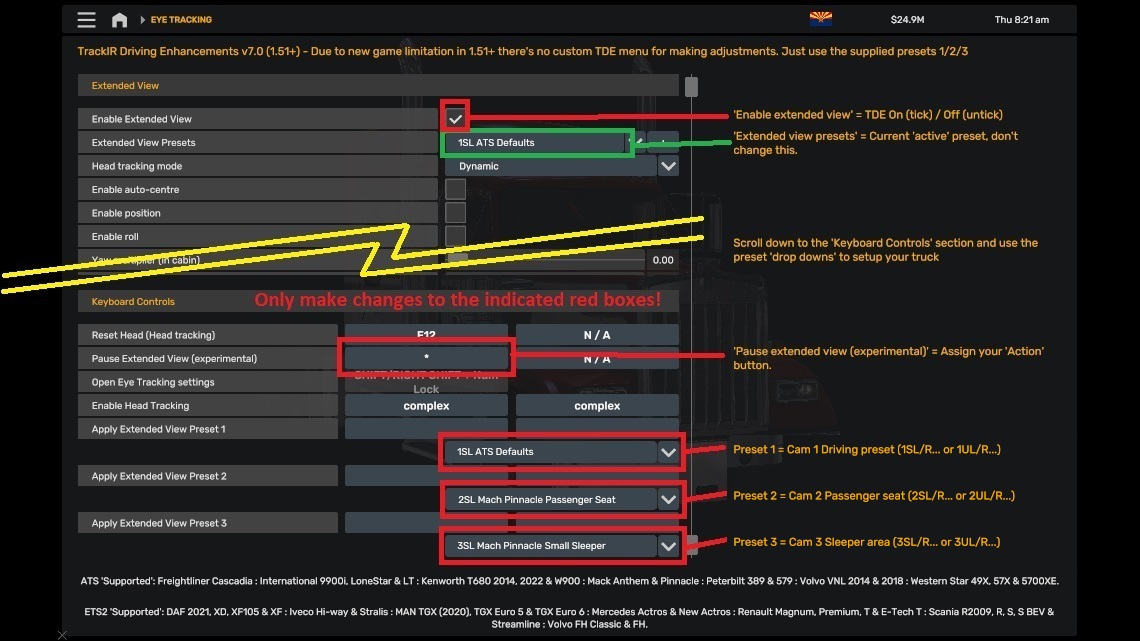
Press SHIFT + NUMLOCK to access the Tobii Eye menu to make changes as required.
Press ESCAPE to go back to driving screen.
See post 2 for full menu usage details to suit your game version: viewtopic.php?p=46458#p46458
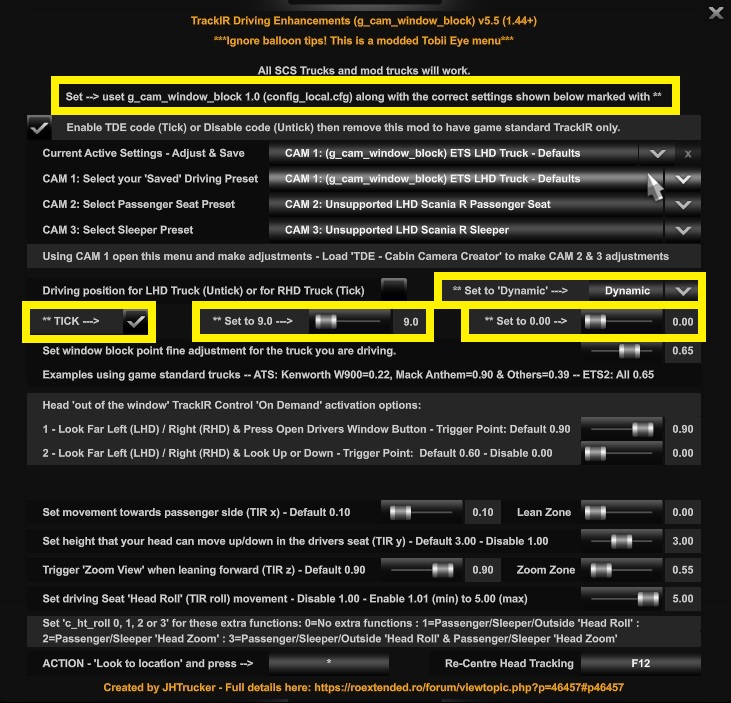
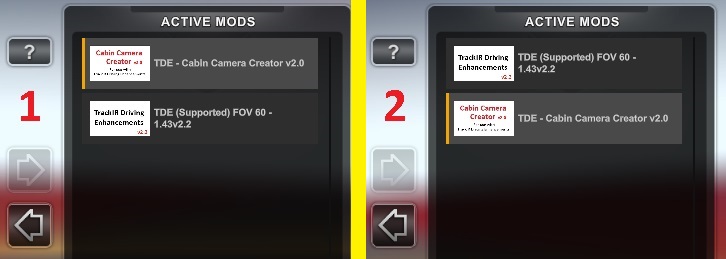
'TrackIR Driving Enhancements', 'TDE (Unsupported)' or 'TDE (g_cam_window_block)'. All 3 use the same required controls.sii & config_local.cfg file edits.
(Only use one TDE mod at a time!)
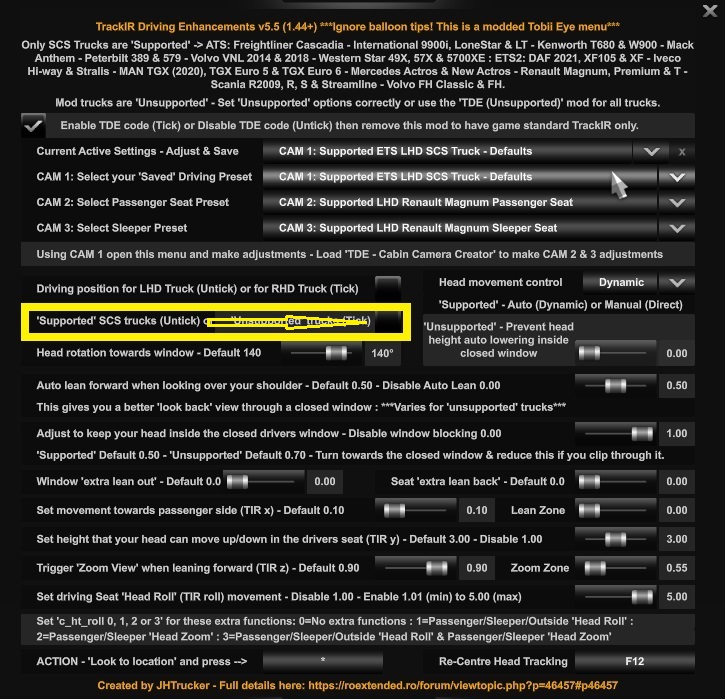
'TrackIR Driving Enhancements' - 'Supported' SCS Trucks as listed:
ATS: Freightliner Cascadia - International 9900i, International LoneStar & International LT - Kenworth T680 2014, Kenworth T680 2022 & Kenworth W900 - Mack Anthem & Mack Pinnacle - Peterbilt 389 & Peterbilt 579 - Volvo VNL 2014 & Volvo VNL 2018 - Western Star 49X, Western Star 57X & Western Star 5700XE.
ETS2: DAF 2021 XF, DAF 2021 XG, DAF XD, DAF XF105 & DAF XF - Iveco Hi-Way, Iveco Stralis & Iveco S-Way - MAN TGX (2020), MAN TGX Euro 5 & MAN TGX Euro 6 - Mercedes Actros & Mercedes New Actros - Renault Magnum, Renault Premium, Renault E-Tech T & Renault T - Scania R2009, Scania R, Scania S, Scania S BEV & Scania Streamline - Volvo FH3 Classic, Volvo FH4, Volvo FH5 & Volvo FH6.
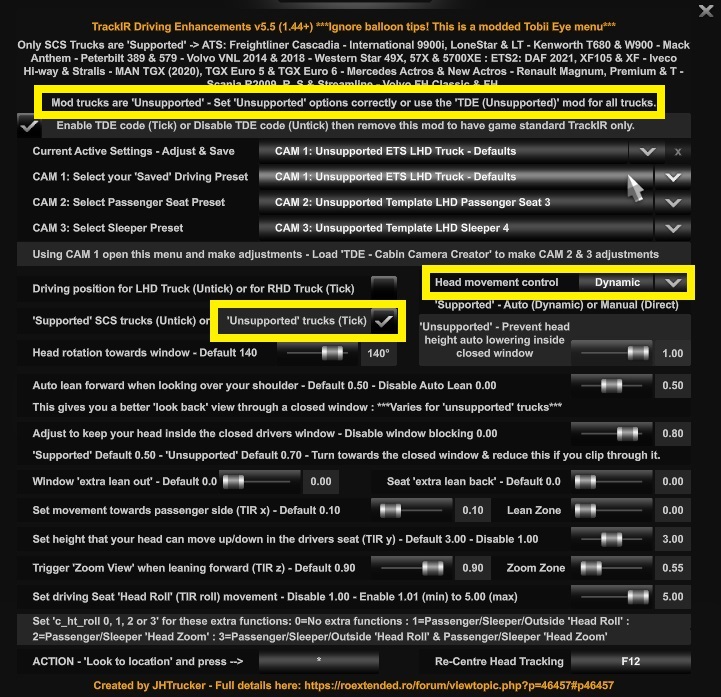
All other trucks are considered 'Unsupported' - You must therefore set the menu options correctly to use them with this mod.
Note: I don't have any SCS Truck tuning pack DLC's, they may perhaps cause an error or CTD when using this mod?, if so use 'TDE (Unsupported)' Mod instead.
There's 3 modes of control - Auto "Dynamic" / Manual "Direct" / Unsupported.
Auto "Dynamic" - This mode is for supported SCS trucks or mod trucks. You turn your head and it moves out through the open window.
Manual "Direct" - This mode is for supported SCS trucks only. Your head will only move out through an open window if you also lean sideways towards the open window at the same time as turning your head. You're in control of all head movement, keep it real.
Unsupported - This mode is for trucks that are not supported and will then work the same as 'TDE (Unsupported)' mod and its features only.
Important: Ensure you pick the correct mode in the menu to suit the truck you are currently driving.
'Supported' gives you:
High quality interiors always visible while your head is inside the truck cab.
Outside sounds don't increase through a closed window when looking over your shoulder.
Rain drops on the closed drivers window remain visible when looking through it.
You can disable 'window blocking', if required, for game standard head movement.
------------------------------------------------------------------------------
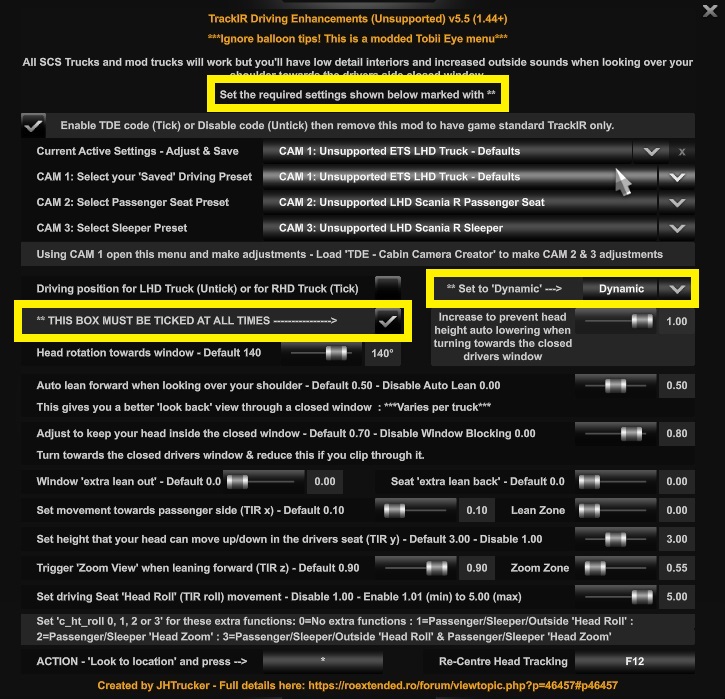
'TDE (Unsupported)' - For any truck:
If you mainly drive mod trucks then use this mod.
But low quality interiors, louder outside sounds & rain in the cab (if raining outside) when looking over your shoulder through a closed drivers window. This is because the game still thinks your head is outside at this point.
'TrackIR Driving Enhancements' mod fixes these issues but for supported SCS trucks only.
You can disable 'window blocking', if required, for game standard head movement, which also prevents the above listed issues.
------------------------------------------------------------------------------
'TDE (g_cam_window_block)' - For any truck:
If you prefer the window blocking to work the same way as my 'TrackIR Option 7 Window Blocking' mod that uses g_cam_window_block, then use this mod. But you'll hear louder outside sounds when looking through the closed drivers window because of the way SCS implemented this feature, the game still thinks your head is outside at this point. 'TrackIR Driving Enhancements' mod fixes this issue but for supported SCS trucks only.
------------------------------------------------------------------------------
Note: The 'TrackIR Driving Enhancements' mod is the best one to use as it will work with 'Supported' game default trucks and mod trucks, but you'll need to ensure you always use the correct settings/presets to suit the truck you are currently driving, a game default truck (supported) or a mod truck (unsupported).
If you want to keep things simple, all trucks considered 'unsupported', use one of the other mods:
'TDE (Unsupported)...' or 'TDE (g_cam_window_block)...'
The only difference between these 2 mods are the way in which the window is blocked.
------------------------------------------------------------------------------
Important Note: TDE has been deliberately coded to make it easy to see if your current truck is 'supported' or 'unsupported':
Using 'TrackIR Driving Enhancements...' mod:
In the driving seat, if your head won't go out of the window, your current truck is 'Supported' but you are using 'Unsupported' presets/settings. Change them to 'Supported'.
If your head is stuck looking back over, your current truck is 'Unsupported' but you are using 'Supported' presets/settings. Change them to 'Unsupported'.
Using 'TDE (Unsupported)...' or 'TDE (g_cam_window_block)...' mods:
If your head is stuck looking back over, you are using 'supported' settings. Always use 'Unsupported' presets/settings.
==============================================================================
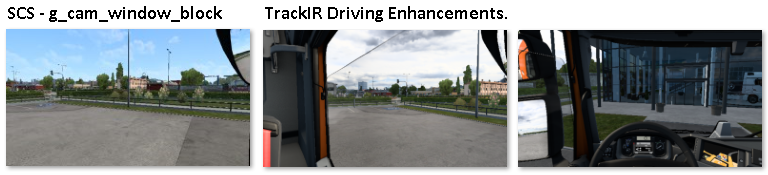
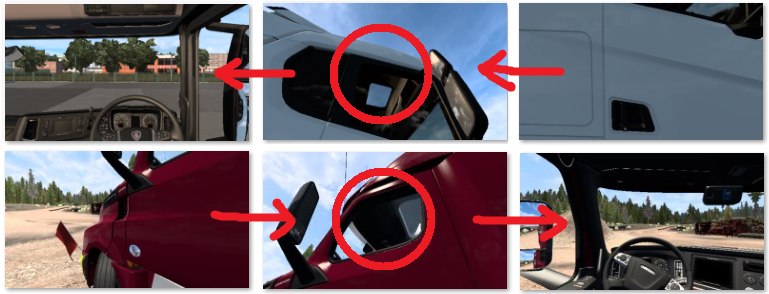
Window block comparison:
SCS - g_cam_window_block for mouse users and 'TDE (g_cam_window_block)' mod. The block point for your head is through the glass not before it and so you can't see that the window is slightly open. At this point, even with the window closed, outside sound volume is increased.
'TrackIR Driving Enhancements' mod - Here you can see the window is slightly open and you also get a better look behind view. Outside sound volume only increases when the window is opened.
How 'Window Blocking' works: - For 'Supported' & 'Unsupported' mods only.
You press 'open driver window' button and your head is unblocked, it can now pass through the opening window.
You press 'open driver window' button again and your head is blocked, back to only turning head inside the cab.
You press 'close driver window' button and your head is blocked, back to only turning head inside the cab.
To open driver window to 50% only and therefore still be blocked, do this:
Quick press 'open driver window' button.
When window is ~50% open, quick press 'open driver window' button again. This will stop the window motion and will block your head. So you can open the window as far as you like as long as you then press 'open drivers window' button again to stop the motion and you'll still be blocked.
To open driver window fully, do this:
Quick press 'open driver window' button and leave it to open.
Your head isn't blocked whilst the window is opening, so just wait for it to finish.
Note 1: Pressing 'close driver window' button will always block your head no matter how open the window is.
Note 2: Every time you start the game your head will be blocked whether the window is open or closed. The controls.sii file gets no feedback from the game to set it correctly. Just press 'open driver window' button to get back in sync if required.
Note 3: You should only press the window buttons with the truck electricity on.
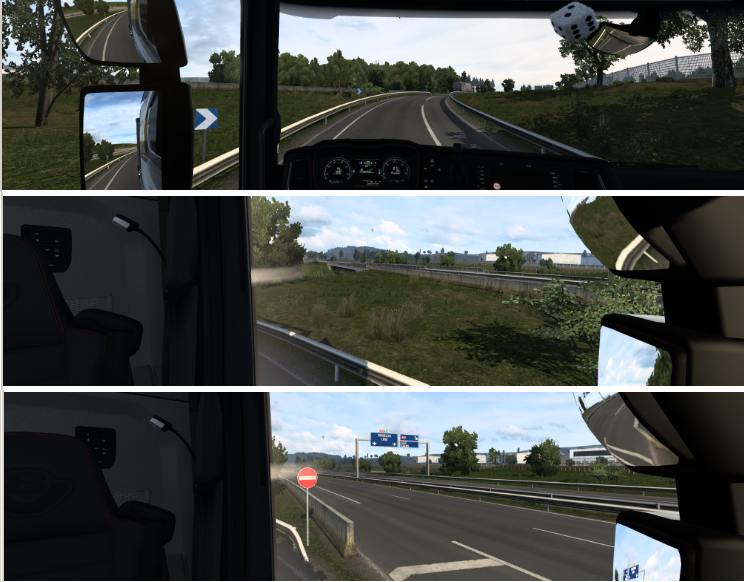
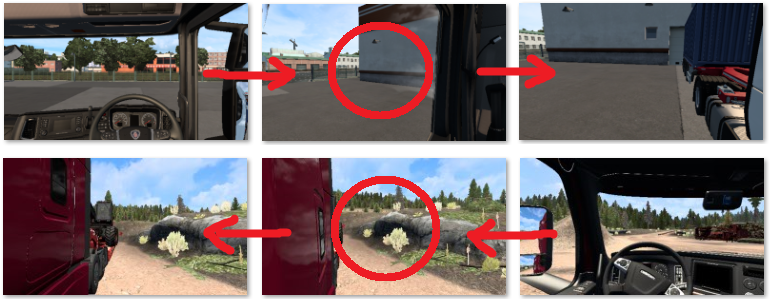
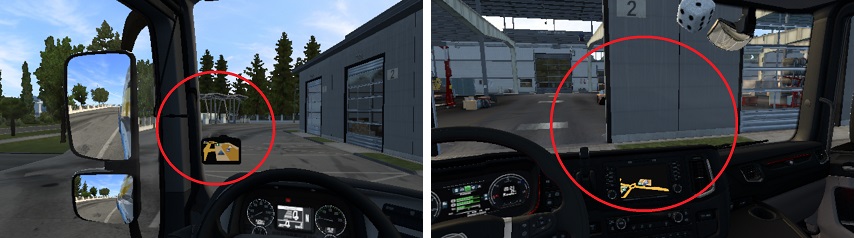
Example head movement views:
With the window closed you can't see much behind when driving along a motorway, use your mirrors or open the window if you need to.
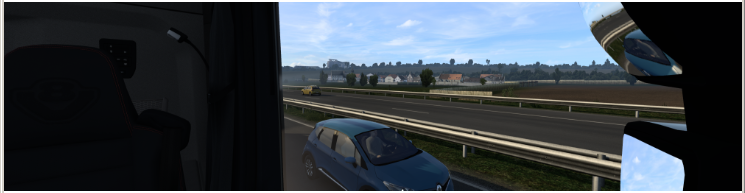
With the window closed you can still see behind when entering a motorway as long as you think ahead. Like in real life.
==============================================================================
Passenger Seat or Sleeper area:
CAM 2: Select Passenger Seat Preset [Drop Down List]
Select from the list the correct 'Passenger seat' preset to match the truck you are currently driving. Don't use any other type of preset!
CAM 3: Select Sleeper Preset [Drop Down List]
Select from the list the correct 'Sleeper' preset to match the truck you are currently driving. Don't use any other type of preset!
==============================================================================
For the best experience use 'Look Action':
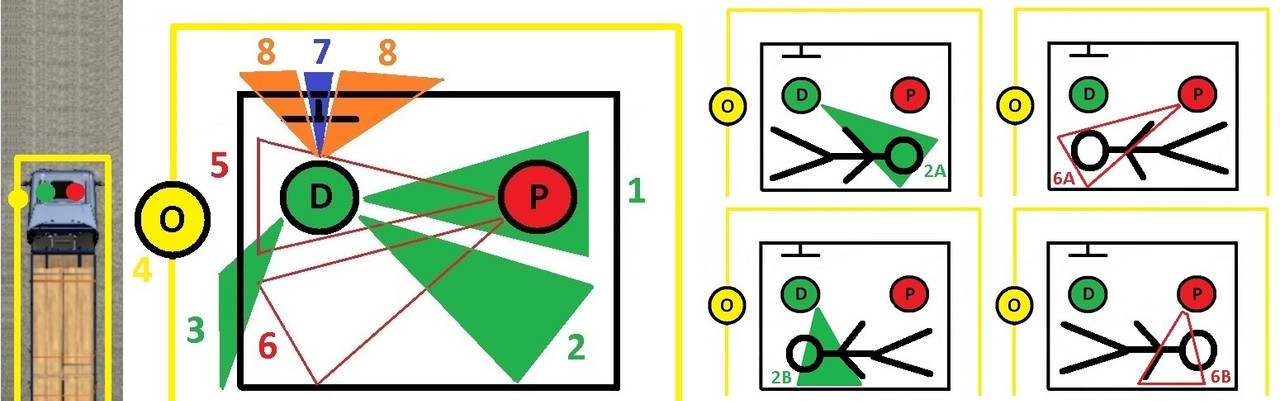
D = Drivers Seat, P = Passenger Seat & O = Outside truck
1 = From drivers seat - Look to passenger seat trigger zone and press 'Action'.
2 = From drivers seat - Look to sleeper trigger zone and press 'Action'.
2A - From drivers seat - Look behind passenger seat and press 'Action' *.
2B - From drivers seat - Look further behind you and press 'Action' *.
3 = From drivers seat - With steering centered, look over your shoulder to outside trigger zone and press 'Action'.
4 = From outside drivers door - With steering centered, look up to drivers door window and press 'Action'.
5 = From passenger seat - Look to driver seat trigger zone and press 'Action'.
6 = From passenger seat - Look to sleeper trigger zone and press 'Action'. <- 'Switch To' mode only.
6A - From passenger seat - Look behind drivers seat and press 'Action' *. <- 'Switch To' mode only.
6B - From passenger seat - Look further behind you and press 'Action' *. <- 'Switch To' mode only.
7 = From drivers seat - Look to dash & look down slightly to the trigger zone and press 'Action'.
8 = From drivers seat - Look to gps (windscreen or console mounted) trigger zone and press 'Action'.
Notes for above 2A, 2B, 6A & 6B marked as *:
With qualifying sleeper presets you can choose how you want to be positioned in the sleeper area:
Head behind drivers seat with feet behind passenger seat or
Head behind passenger seat with feet behind drivers seat.
Note 1: For 'supported' trucks only. See post 7 'TDE - Cabin Camera Creator' for more info.
Note 2: If a non-qualifying sleeper preset is used, you'll be positioned to where that preset is configured to be no matter how you switch to it.
Note 3: This can be disabled if you'd rather always have your prefered sleeper location selected - See post 6 'TDE - Optional edits' for more info.
Not shown on above trigger zones sketch:
9 = From sleeper area - Look up at the ceiling (>90 degrees) and press 'Action' to sleep. You must already be parked on a rest icon.
10 = From sleeper area - Look away from the ceiling and press 'Action' to return to the drivers seat.
11 = From drivers seat - Look down between drivers seat and passenger seat (~90 degrees right LHD or ~90 left RHD & ~60 degrees down) and press 'Action' to switch to devcam. After using devcam in the usual way, press 'Action' again to switch back to outside drivers door.
Note: If your in game head has restricted rotation you still need to rotate your real head towards the trigger zones for them to work.
Example 1: Menu mod 'TrackIR Driving Enhancements' should work ok when using a 'supported' game default truck where driver 'Head Rotation' >=140 (default) & passenger 'Head Rotation' >=160 (default).
Example 2: Menu mod 'TDE (g_cam_window_block).scs' has restricted in game drivers head rotation for that window blocking method to work. Just keep turning your real head for outside trigger zone to work (3).
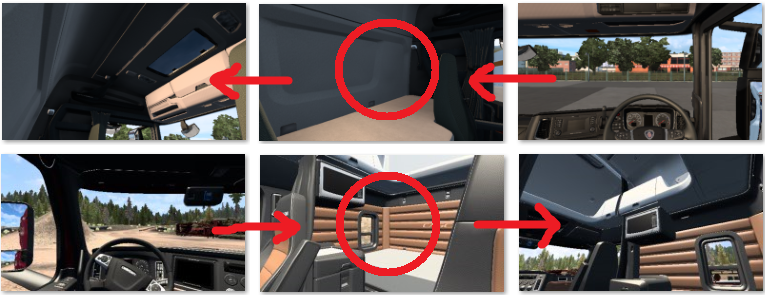
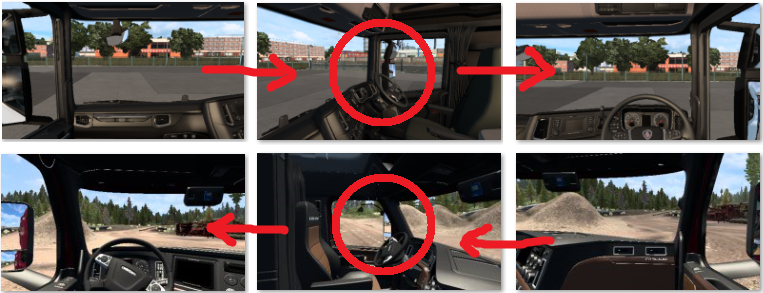
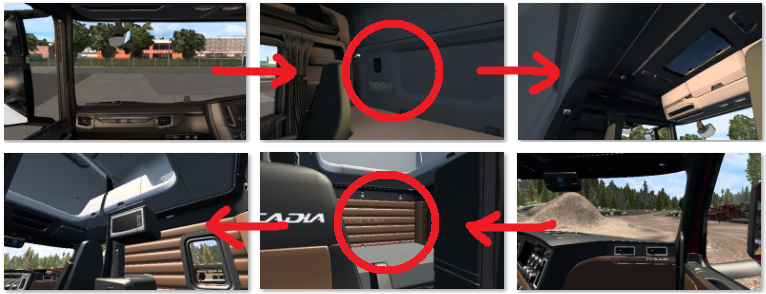
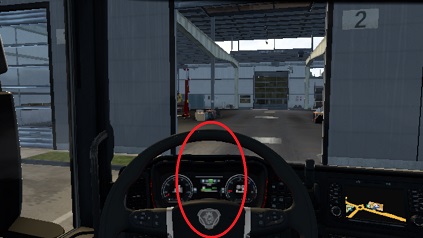
Look at the red circled area and press 'Action' button to change positions for both LHD & RHD trucks.
Action button is "number pad multiply" - Use the menu to choose your own 'Action' button.
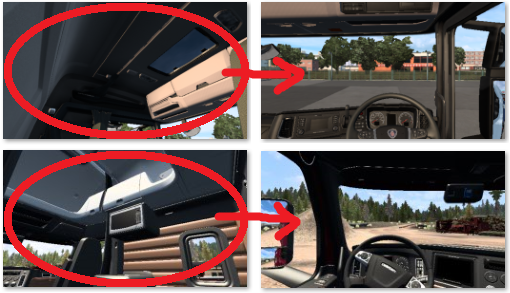
Driver seat -> Centre real steering wheel -> Look over your shoulder to outside (window open or closed) -> Press 'Action' -> Outside.
Outside -> Look up to Driver door window -> Press 'Action' -> Driver seat.
Driver seat -> Look to Passenger side -> Press 'Action' -> Passenger seat.
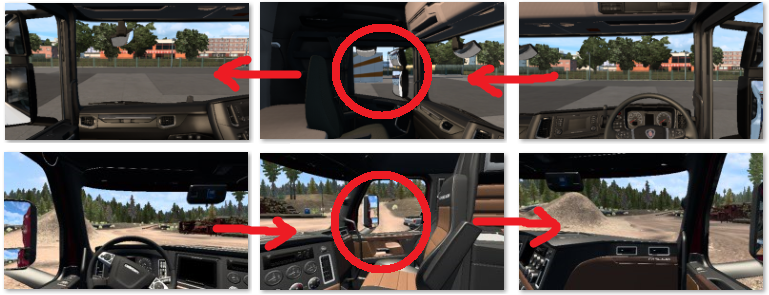
Driver seat -> Look to Sleeper -> Press 'Action' -> Sleeper (position is whatever you have set for CAM 3.
Passenger seat -> Look to Driver side -> Press 'Action' -> Driver seat.
Passenger seat -> Look to Sleeper -> Press 'Action' -> Sleeper (position is whatever you have set for CAM 3.
Sleeper -> Look away from the ceiling -> Press 'Action' -> Driver seat.
Note: If 'Move To' mode is being used, then after pressing 'Action' you'll be automatically moved in first person to your required location rather than instantly switching to it.
TIP: For driver seat to sleeper area or driver seat to outside, you can avoid the possible feeling of motion sickness by turning your real head back to the centre of your monitor once the animation starts (TrackIR is disabled during the animation), your real head will then be in the correct position when the animation stops and TrackIR is re-enabled.
Dashboard display - Step through available displays:
In drivers seat - Look straight ahead and down at the dash display and quick press 'Action' button to step through the screens.
Centre console GPS or windscreen GPS - Change from on/zoom1/zoom2/zoom3/zoom4/off (1.41-1.45).
Centre console GPS or windscreen GPS - Change from zoom1/zoom2/zoom3/zoom4 (1.46+).
In drivers seat - Look to GPS and quick press 'Action' button to step through the screens.
Optional - 'Infotainment Display Mode' (1.46+) - See post 6 "TDE - Optional edits" for more info.
In drivers seat - Look to centre console GPS and press & hold 'Action' button for +1 sec to turn it on/off.
Switch to DEVCAM (you need to have already enabled its use):
Driver seat -> Look down at the floor between drivers seat and passenger seat -> Press 'Action' -> Devcam (under truck).
Optional - Use wheel/pedals/shifter to control the devcam, when finished -> Press 'Action' -> If your wheel is centered you'll be stood outside the drivers door -> Look up to Driver door window -> Press 'Action' -> Driver seat.

Note 1: See post 6 "TDE - Optional edits" for the Devcam line edits & setup options.
Note 2: You can still just use mouse & keyboard.
Refuel examples:
LHD with pump on left side.
Driver seat -> Centre real steering wheel -> Look over your shoulder to outside -> Press 'Action' -> Outside.
Turn real steering wheel left/right to 'walk' along side the truck or around the front to the other side whilst still being free to look around.
Look down at the fuel tank(s) and quick press 'Action' button -> Refueling. Note: Refueling is toggled on/off by the 'Action' button.
'Walk' back to Driver door by re-centering steering wheel -> Look up to Driver door window -> Press 'Action' -> Driver seat.

Note: Once refueling has started, you are free to look or walk around while you wait. Refueling will stop if you press 'Action' again, fuel tank(s) are full or you re-enter your truck.
Note: When using "Free Roam" 'walking' options you have to press the games 'Activate' key/button, as per the default game.
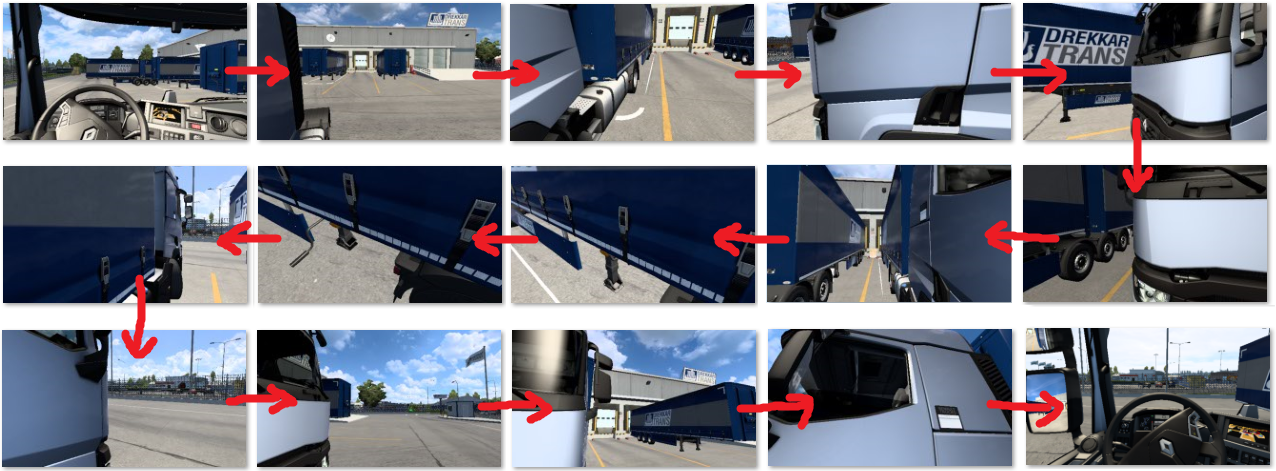
Trailer attach example:
Backup to trailer.
Driver seat -> Centre real steering wheel -> Look over your shoulder to outside -> Press 'Action' -> Outside.
'Walk' around front of truck and down the other side to the crank handle - Look down at it - Press 'Action' - Turn and 'walk' back around to the drivers door.
Look up to Driver door window -> Press 'Action' -> Driver seat.
Note: When using "Free Roam" 'walking' options you have to press the games 'Attach/Detach' key/button, as per the default game.
Owned trailer cargo load/unload example:
Park your truck and trailer(s).
Driver seat -> Centre real steering wheel -> Look over your shoulder to outside -> Press 'Action' -> Outside.
'Walk' to the back of your first trailer, driver side or passenger side -> Press 'Action' -> Cargo load/unload screen -> Turn and 'walk' back to the drivers door whilst inspecting your trailers cargo (if it was loaded).
Look up to Driver door window -> Press 'Action' -> Driver seat.

Note: When using "Free Roam" 'walking' options you have to press the games 'Activate' key/button, as per the default game.
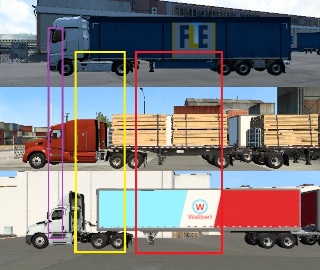
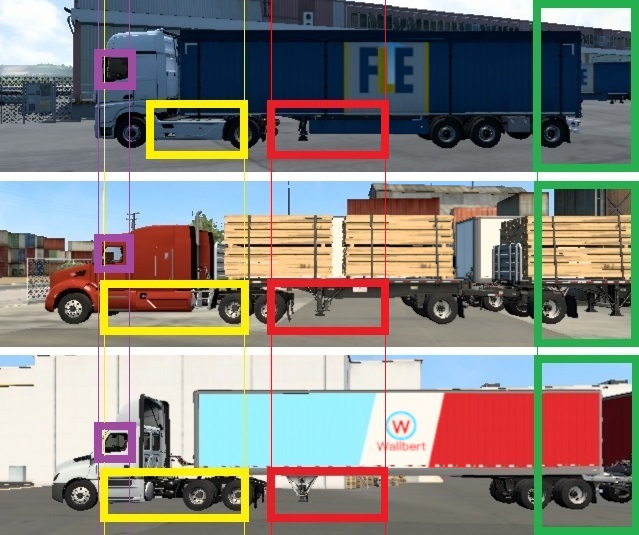
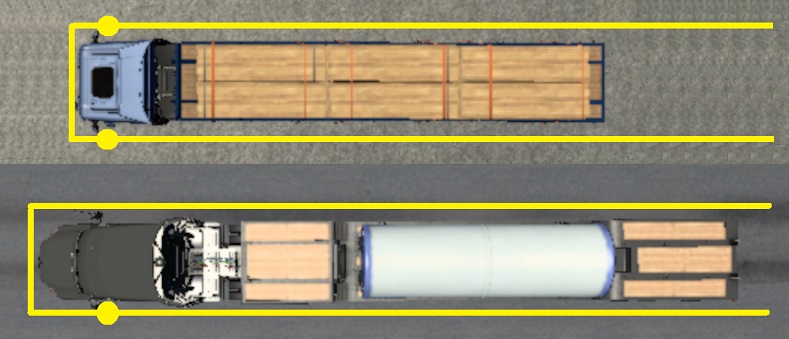
Trigger zones for refuel, crank handle & owned trailers when using the 'Action' button:
It's not possible to distinguish between different truck chassis lengths and where the fuel tank(s) are located.
This pic shows the trigger zones for drivers door (purple), refueling (yellow), 'attach/detach' crank handle (red) and 'own trailer' cargo load/unload (green). Fuel, crank handle and owned trailer zones are the same at the passenger side. These should work for all current truck types and lengths.
Note: There's no 'trigger zones' when using "Free Roam" 'walking' options.
Service example:
Driver seat -> Centre real steering wheel -> Look over your shoulder to outside -> Press 'Action' -> Outside.
Press 'Activate' (as normal) to enter service.
Exit service -> Look up to Driver door window -> Press 'Action' -> Driver seat.

Note 1: If you change your truck from LHD to RHD or vice versa then don't forget to change the CAM 1/2/3 Presets to suit before driving away!
Note 2: See post 10, Demo videos, section How to enter Truck Service or Showroom, for enhanced 'walk to' option: viewtopic.php?p=46613#p46613
Showroom example:
Driver seat -> Centre real steering wheel -> Look over your shoulder to outside -> Press 'Action' -> Outside.
Press 'Activate' (as normal) to enter showroom -> buy truck and trade in your current one -> Exit showroom.
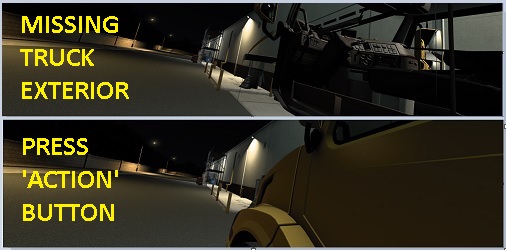
Press 'Action' to fix 'missing truck' or 'restricted head yaw movement' problem due to the game auto changing back to the interior camera in this situation.
Look up to Driver door window -> Press 'Action' -> Driver seat.

Note 1: If you change from LHD to RHD or vice versa then don't forget to change the CAM 1/2/3 Presets to suit before driving away!
Note 2: See post 10, Demo videos, section How to enter Truck Service or Showroom, for enhanced 'walk to' option: viewtopic.php?p=46613#p46613
==============================================================================
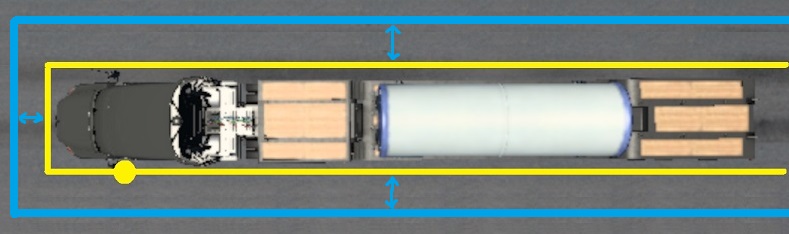
Outside movement limits when using 'walk' path:
Enter or exit the truck via the drivers door for LHD or RHD - In either 'Switch To' or 'Move To' mode.
The yellow line represents the 'walk' path around the truck.
Outside the drivers door is the start point, there's 3 'walking' methods:
1 "Wheel Rotate" - Fully rotate your wheel left or right to 'walk', the faster you turn the faster you 'walk', but you'll also be turning against the wheels FFB, in that case try option 2 below.
2 "Wheel Hold" - Turn and hold your wheel to the left or right to 'walk', speed is dependant on how far you turn the wheel (max ~90 degrees for a 900 wheel).
3 "Walk Keys Face Truck" - Use the games 'Walk Mode Keys', FORWARD, to 'walk' in the direction you are looking (around truck/trailer only), with a fixed speed, that you can set, including slower movement when looking at the truck/trailer.
To set your preferred max 'walk' speed see post 6 'Optional Edits' (mix eyegazeon).
Whilst 'walking' you have full use of TrackIR yaw,pitch,roll & y to look where you want to.
If using option 2 or 3 then you'll also have a slight 'head bob' whille 'walking'.
Use your real clutch pedal or 'Walk Mode Key', "Back", to step away from your truck and trailer (blue line) but keeping parallel with the yellow 'walk' path around your truck and trailer.
Useful if you want to stand back to take a screenshot from eye level, check external cab accessories or step to the side to 'walk' past a wide load on the trailer etc.
Note: Refueling and 'look up to get back into cab' actions are disabled when you have stepped away from your truck, step back to be next to the truck to re-enable.
If your truck and trailer(s) are not inline then you can use your real Accelerator, Brake and Clutch pedals to adjust the 'walk' path to suit.
When using your real steering wheel & pedals:
Press Brake Pedal (B) to turn your view and the 'walk' path to the left, the further you press the pedal the faster it will turn.
Press Accelerator Pedal (A) to turn your view and the 'walk' path to the right, the further you press the pedal the faster it will turn.
Stop pressing 'Brake' (B) / 'Accelerator' (A) once the path is in the direction you need it to be, it will hold its position.
Quick Press Clutch pedal (C) to step away from the truck/trailer(s) - Offset 'walk' path selected - Quick press Clutch pedal (C) again to return to the originally selected 'walk' path.
OR
When using 'Walk Mode Keys':
Press & Hold 'Walk mode LEFT key' to turn your view and the 'walk' path to the left.
Press & Hold 'Walk mode RIGHT key' to turn your view and the 'walk' path to the right.
Stop pressing 'LEFT' / 'RIGHT' once the path is in the direction you need it to be, it will hold its position.
Quick Press 'Walk mode BACK key' to step away from the truck/trailer(s) - Offset 'walk' path selected - Quick Press 'Walk mode BACK key' again to return to the originally selected 'walk' path.

1 - Yellow - Default walk path selected every time you exit your truck.
Yellow/Red - Press Brake pedal (B) or 'Walk Mode Key LEFT' to adjust the path to the left as per typical examples (2 to 5)
Yellow/Green - Press Accelerator pedal (A) or 'Walk Mode Key RIGHT' to adjust the path to the right as per typical examples (6 to 9)
10 - Blue - Quick Press Clutch pedal (C) or 'Walk Mode Key BACK' to smooth step away from the truck/trailer. Press again to return.
Note 1: The adjustment point where the path turns is fixed to avoid 'walking' through your truck.
Note 2: If your truck & trailer(s) are not inline and you 'walk' into the side of your trailer, you'll walk straight through it. Collision has been disabled as it's more annoying than useful.
Note 3: Different 'walk' control options available on post 6 'TDE - Optional edits', if required.
Note 4: When in passenger seat, sleeper area or outside, the truck steering, accelerator, brake & clutch pedals are all disabled. You can't therefore drive when outside (CAM 4) or sat on the passenger seat (CAM 2) or in the sleeper area (CAM 3). Don't forget to enable parking brake before moving from the drivers seat and don't change seats whilst driving!
------------------------------------------------------------------------------
NEW 03/01/2025
Outside movement when using 'Free Roam' mode:
This is a basic 'Free Roam' mode (don't expect GTA style exploring!).
You are free to 'walk' around the general area of your truck.
There's no collision active and so you can 'walk' through everything, enabling collision just causes all sorts of strange movements, therefore it's best without.
Your 'walking' height doesn't change (but you can crouch and stand on your tippy toes), you can't 'walk' up a slope, you'll just 'walk' through it. Therefore, for the best experience, only 'walk' around a flat area.
In 'Free Roam' mode only, 'Look Actions' for Refueling & Attach/Detach the trailer are not available as there's no trigger points for them, use game default key/button instead.
Refueling - Stand next to the fuel tank (or anywhere at all) and press & hold your 'Activate' key/button.
Attach/Detach trailer - Stand next to the crank handle (or anywhere at all) and press your Attach/Detach key/button.
Getting back into your truck - Stand next to the drivers door (or anywhere at all) and look up and press 'Action' in the usual TDE way.
Service/Showroom - Whilst parked on the icon, 'walk' into reception area and press 'Activate' key/button. On exit 'walk' back to truck.
You can roleplay to do the same as the above 'Service/Showroom' option for all other functions that require 'Activate':
Job select example, get out, 'walk' to a nearby hut/office, press 'Activate' and select job, then 'walk' back to your truck.
Hotel sleeping example, get out, 'walk' to hotel door, press 'Activate' to sleep, then 'walk' back to your truck.
Use your imagination to fill in other aspects of being a truck driver that the game doesn't provide.
See post 6 'TDE - Optional edits' for required edits to enable 'Free Roam'.
=========================================================================================
Post 01 - Description - viewtopic.php?p=46457#p46457
Post 02 - General Menu Information and Usage - viewtopic.php?p=46458#p46458
Post 03 - Quick start guide - viewtopic.php?p=46459#p46459
Post 04 - Controls.sii file edits (Part 1) - viewtopic.php?p=46460#p46460
Post 05 - Controls.sii file edits (Part 2) - viewtopic.php?p=46461#p46461
Post 06 - Optional edits - viewtopic.php?p=46462#p46462
Post 07 - Cabin Camera Creator - viewtopic.php?p=46506#p46506
Post 08 - Problems & Solutions / To do list - viewtopic.php?p=46559#p46559
Post 09 - Q & A Section - viewtopic.php?p=46612#p46612
Post 10 - TrackIR Driving Enhancements - Demo videos - viewtopic.php?p=46613#p46613
Note: This isn't a mod to just drop into your mod manager, you'll also need to follow instructions and edit your controls.sii & config_local.cfg files.
For TrackIR or devices that use the games TrackIR inputs.
Your TrackIR device must already be configured and working with the standard game.
Using just Yaw is possible but will result in some limited functionality.
For best results, use at least Yaw, Pitch, X & Z or better still, all 6DOF.
I used my TrackIR 3 (from 2005) to create this using Yaw, Pitch, Roll, X, Y, Z & Trueview enabled.
This won't work for VR. But you can try this "TEST" VR version here: viewtopic.php?p=55557#p55557
This won't work for Tobii Eye. But you can try 'Tobii Eye Driving Enhancements' instead: viewtopic.php?p=57548#p57548
If you don't have any headtracking devices, try this instead: viewtopic.php?p=67254#p67254
This is for, what I think, is a more realistic sim experience. The goal is to perform every thing in first person and move as seamlessly as possible from inside to outside and back again, be the driver... not the truck!
Updated 27/10/2021 - New menu mods (v2.0) and required date highlighted config_local.cfg & controls.sii file edits on post 2. Updated descriptions in this post.
Updated 06/11/2021 - Date highlighted updated descriptions in this post.
Updated 22/12/2021 - New menu mods (v2.2) and required date highlighted config_local.cfg & controls.sii file edits on post 2. Updated descriptions in this post. What's new, look here: viewtopic.php?p=48312#p48312
Updated 17/01/2022 - New mod 'TDE - Cabin Camera Creator v2' on post 5. Date highlighted controls.sii file edits on post 2. What's new, look here: viewtopic.php?p=49398#p49398
Updated 16/03/2022 - New menu mods (v3.0) and required Date highlighted controls.sii file edits on post 2. Updated descriptions in this post. What's new, look here: viewtopic.php?p=50213#p50213
Updated 22/04/2022 - New menu mods (v4.0) and required Date highlighted controls.sii file edits on post 2. Updated descriptions in this post. What's new, look here: viewtopic.php?p=50547#p50547
Updated 19/05/2022 - New menu mods v4.1 (1.38-1.43) & v5.0 (1.44) and required date highlighted controls.sii file edits (191/195/205/280/283/284/306/313/339/340/375/377/507). Updated descriptions in this post. What's new, look here: viewtopic.php?p=50918#p50918
Updated 15/07/2022 - Date highlighted amended controls.sii file edits (191/195/200'optional post 6'/279/510/513/514). What's new, look here: viewtopic.php?p=51893#p51893
Updated 12/08/2022 - New menu mods v5.1 (1.44 & 1.45) and date highlighted controls.sii file edit (config_lines[284]: "mix headtrz...) for 1.38 to 1.45. What's new, look here: viewtopic.php?p=52736#p52736
Updated 31/10/2022 - Date highlighted amended controls.sii file edits to fix a problem caused by using '-sysmouse' as a game launch option. What's new, look here: viewtopic.php?p=54640#p54640
Updated 16/12/2022 - New menu mods v4.2 (1.38-1.43) & v5.2 (1.44-1.46) and date highlighted controls.sii file edits. What's new, look here: viewtopic.php?p=56190#p56190
Updated 14/02/2023 - New menu mods v4.3 (1.38-1.43) & v5.3 (1.44-1.46) and date highlighted controls.sii file edits. What's new, look here: viewtopic.php?p=57402#p57402
Updated 07/03/2023 - Fixed a glitch in z movement for date highlighted 'mix headtrz...'
Updated 25/03/2023 - Fixed a glitch for sleep activation date highlighted 'mix activate ...'. What's new, look here: viewtopic.php?p=57910#p57910
Updated 01/07/2023 - New menu mods v4.4 (1.38-1.43) & v5.4 (1.44-1.47) and date highlighted controls.sii file edits. What's new, look here: viewtopic.php?p=59545#p59545
Updated 03/07/2023 - Fix for 'mix headtrz...' What's new, look here: viewtopic.php?p=59583#p59583
Update 24/08/2023 - TDE v5.4 and associated line edits still work on game version 1.48 but SCS has added a bug that affects their Tobii Eye menu and therefore also affects my TDE menu... See this post for more info: viewtopic.php?p=60275#p60275
Updated 11/12/2023 - New menu mods v4.5 (1.41-1.43) & v5.5 (1.44+) and date highlighted controls.sii file edits. What's new, look here: viewtopic.php?p=62527#p62527
Updated 06/01/2024 - New menu mod v5.51 (1.44+). What's new, look here: viewtopic.php?p=62993#p62993
Updated 22/01/2024 - Date highlighted controls.sii file edits. What's new, look here: viewtopic.php?p=63183#p63183
Updated 16/02/2024 - New menu mods v4.6 (1.38-1.43) & v5.6 (1.44+) and Date highlighted controls.sii & config_local.cfg file edits. What's new, look here: viewtopic.php?p=63446#p63446
Updated 04/04/2024 - Added first person animated movement. Date highlighted controls.sii file edits. What's new, look here: viewtopic.php?p=63906#p63906
Updated 19/05/2024 - New menu mod v6.0 (1.50). What's new, look here: viewtopic.php?p=64214#p64214
Updated 06/06/2024 - Added first person animated movement to Service/Showroom. Date highlighted controls.sii file edits. What's new, look here: viewtopic.php?p=64457#p64457
Updated 07/07/2024 - New menu mod v6.1 (1.50) and date highlighted controls.sii file edits. What's new, look here: viewtopic.php?p=65068#p65068
Updated 08/08/2024 - New TDE Optional sounds. What's new, look here: viewtopic.php?p=65430#p65430
Updated 22/09/2024 - New mod 'TDE (Unsupported) v7.0 (1.51+)'. What's new, look here: viewtopic.php?p=65781#p65781
Updated 27/09/2024 - New mod 'TrackIR Driving Enhancements v7.0 (1.51+)' and date highlighted controls.sii file edits. What's new, look here: viewtopic.php?p=65886#p65886
Updated 30/11/2024 - New mods 'TDE v4.7, v5.7, v6.2 & v7.1' and date highlighted config_local.cfg & controls.sii file edits. What's new, look here: viewtopic.php?p=66722#p66722
Updated 03/01/2025 - New mods 'TDE v4.8, v5.8, v6.3 & v7.2' and date highlighted config_local.cfg & controls.sii file edits. What's new, look here: viewtopic.php?p=67196#p67196
Updated 21/04/2025 - Small fixes/improvements with date highlighted controls.sii file edits. What's new, look here: viewtopic.php?p=68029#p68029
Updated 31/05/2025 - Small fixes/improvements with date highlighted controls.sii file edits. What's new, look here: viewtopic.php?p=68281#p68281
Updated 26/06/2025 - Bug fix with date highlighted controls.sii file edits. What's new, look here: viewtopic.php?p=68382#p68382
=======================================================================================
Confirmed to work for ATS/ETS2 game versions 1.41 to 1.54
Note: From game version 1.51 there's no custom TDE menu, due to new UI limitations.
A quick test of Driving Academy (1.52): TDE functions work correctly but when the on screen text
instructions state "press 'complex' to continue", just press your 'Activate' button.
From update 11/12/2023 TDE will no longer work for game versions 1.38, 1.39 & 1.40
=======================================================================================
Features:
Game version 1.41 to 1.50: A custom in game menu that has drop down lists, tick boxes & sliders so you can setup all of the 'TrackIR Driving Enhancements' features to suit you and any given truck and then save as a preset.
Game version 1.51+: Uses the in game Tobii Eye menu to select the required presets to suit you and any given truck.
Note: The file used to create the custom TDE menu is no longer available within the game extracted files, hence no custom menu and reduced functionality.
TrackIR 6DOF Yaw, Pitch, Roll, X, Y & Z movements. When driving, those movements can each be disabled via TDE menu, if required, except Yaw. Full TrackIR is auto enabled for non-driving features.
TrackIR X, Y & Z improvements to help see around those massive mirrors or huge side exhaust.
'Window blocking' - Your head remains inside the truck cab when the windows are closed but still has full look left / right movement inside the cab. Open the windows to put your head out.
Note: 'Window blocking' can be disabled, if required, you'll then have game standard head movement through the open or closed window.
Sit in the passenger seat (cam 2) or lay down / sit in the sleeper area (cam 3) before activating sleep.
Exit your truck (cam 4) - Stand outside, in first person, whilst 'walking' a path around your truck to refuel or attach/detach the trailer etc with yaw/pitch/roll/y head movement.
You 'walk' on a path around your truck by using your wheel, gamepad thumbstick used for steering or the games 'walk mode' keys.
NEW 03/01/2025
Optional - Outside, basic 'Free Roam Walking'. You can 'walk' around the general area of your truck using your wheel/pedals, gamepad thumbsticks/triggers used for steering, accelerator & brake or your keyboard using the games 'walk mode' keys.
'Action' button - Combines multiple tasks to 1 button and your head movement. 'Action' button assigned via TDE menu.
You can change from driver seat to passenger seat to sleeper area or outside by looking at the location and pressing the 'Action' button.
The movement can be instant, 'Switch To' or auto animated in first person, 'Move To' (TDE Default).
Inside - You can switch GPS screens or switch dash screens by looking at them and pressing the 'Action' button.
Outside - You can refuel, attach/detach the trailer or load/unload the cargo by looking at their 'trigger zones' and pressing the 'Action' button.
Note: You can still assign individual keys/buttons to those actions, as per default game, if you'd rather keep it that way.
Lean forward to zoom interior camera with your head instead of a button press. This can be disabled, via TDE menu, if required.
Optional - Toggle interior camera zoom on/off using the 'Action' button.
Optional - Adjust the big left/right mirrors whilst sat in the driving seat without using the F4 menu.
Optional - Sound effects.
Optional - Non-linear Brake pedal movement:
This gives a more progressive brake pedal feel, rather than the default linear motion, whilst still having maximum braking force when you fully press your brake pedal.
By default, both left & right windows operate together when pressing 'open left window' & 'close left window' buttons. This way you only need to use the same two buttons, whether you are driving LHD or RHD trucks. You can still assign all 4 buttons if you want, so the windows once again operate independently.
The ability to disable all the line edits, via the TDE menu, and remove the mod for playing multiplayer, for example, with game standard TrackIR without having to re-edit your controls.sii file.
Quick start setup on post 3, including a pre-configured controls.sii file for easy testing.
Optional - Game version 1.41 to 1.50 only: 'TDE - Cabin Camera Creator' is an additional custom Menu Mod to help you to position your Passenger Seat or Sleeper camera for any given truck and save as a preset. Each TDE mod has passenger seat and sleeper area presets for all game default trucks, you don't have to create any unless you'd like them positioned differently.
Optional - If the sunny days are too bright, toggle sunglasses on/off as required. See my 'Sunglasses' mod here: viewtopic.php?p=53334#p53334
For best results always use your own truck rather than a 'quick job' truck.
Here's a quick demo video showcasing some of the above features:
Getting out to refuel - Sleeping in the sleeper cab - Getting out to attach your trailer.
If you're wondering, that box with the coloured buttons on it is just a cheap usb number pad with big plastic buttons stuck to the keys that I use.
White --> TrackIR on/off (in TrackIR software) & Diff Lock
Blue --> Truck lift axle & Trailer lift axle
Red --> Park brake & Action
G27 buttons used for all other things I need to press.
All demo 'help' videos are here: viewtopic.php?p=46613#p46613
NOTE: If you don't want all the extra TrackIR functionality but only want game basic TrackIR along with sleeping in the sleeper and 'walking' around your truck to attach/detach the trailer & refuel, then you can use 'Driving Enhancements' instead: viewtopic.php?p=67254#p67254
==============================================================================
TDE cameras:
CAM 1 - Keyboard 1 - Game standard driving view.
CAM 2 - Keyboard 2 - NEW - Passenger Seat. *** You cannot drive from this camera ***
CAM 3 - Keyboard 3 - NEW - Sleeper Area. *** You cannot drive from this camera ***
CAM 4 - Keyboard 4 - NEW - Outside truck. *** You cannot drive from this camera ***
CAM 5 - Keyboard 5 - Game standard chase view.
CAM 6 - Keyboard 6 - Game standard top down view.
CAM 7 - Keyboard 7 - Game standard roof view.
CAM 8 - Keyboard 8 - Game standard Drive-By view.
CAM 9 - Keyboard 9 - Game standard bumper view.
CAM 10 - ALT + Keyboard 9 - Game standard On-Wheel view.
Note 1: You can switch from (cam 1/2/3/4) to (cam 5/6/7/8/9/10) OR switch from (cam 5/6/7/8/9/10) to (cam 1).
Note 2: You can't switch from an external 'driving' camera (cam 5/6/7/8/9/10) to a 'non-driving' camera (cam 2/3/4) to avoid losing control of your truck.
Note 3: Game standard 'Cam Cycle' function is disabled because it breaks TDE functionality.
Remember, this is about realism and keeping everything in first person, so CAM 1, 2, 3 & 4 should be the only cameras to use.
Available cameras when TDE code is disabled (via the TDE menu tick box):
CAM 1 - Keyboard 1 - Game standard driving view.
CAM 2 - Keyboard 2 - Game standard chase view.
CAM 3 - Keyboard 3 - Game standard top down view.
CAM 4 - Keyboard 4 - Game standard roof view.
CAM 5 - Keyboard 5 - Game standard drivers window view (the TDE mod also has to be removed for this camera to work correctly).
CAM 6 - Keyboard 6 - Game standard Bumper view.
CAM 7 - Keyboard 7 - Game standard On-Wheel view.
CAM 8 - Keyboard 8 - Game standard Drive-By view.
CAM 9 - Keyboard 9 - Cam Cycle.
You should take your time to familiarise yourself with all the settings.
(All information is split into sections and contained within the first 10 posts.)
Post 01 - Description - This post.
Post 02 - General Menu Information and Usage - viewtopic.php?p=46458#p46458
Post 03 - Quick start guide - viewtopic.php?p=46459#p46459
Post 04 - Controls.sii file edits (Part 1) - viewtopic.php?p=46460#p46460
Post 05 - Controls.sii file edits (Part 2) - viewtopic.php?p=46461#p46461
Post 06 - Optional edits - viewtopic.php?p=46462#p46462
Post 07 - Cabin Camera Creator - viewtopic.php?p=46506#p46506
Post 08 - Problems & Solutions / To do list - viewtopic.php?p=46559#p46559
Post 09 - Q & A Section - viewtopic.php?p=46612#p46612
Post 10 - TrackIR Driving Enhancements - Demo videos - viewtopic.php?p=46613#p46613
Using the supplied presets in the TDE menu is the easiest way to start.
Adjusting the menu sliders and saving as new presets is considered optional (game version 1.41 to 1.50 only).
In the end you'll have:
A couple of 'CAM 1 Driving' presets that you like to use, depending on what truck you are driving.
A lot of Passenger Seat presets to select from, choose the one that matches the truck you are driving.
A lot of Sleeper presets to select from, choose the one that matches the truck you are driving.
So, whilst there's a lot of info here that may put you off doing it, the end result is just a quick change of the presets in the TDE menu for CAM 1, CAM 2 & CAM 3 whenever you change trucks!
==============================================================================
There's 3 menu mods to choose from, as listed below:
The menu is used to select the required presets for driving seat, passenger seat & sleeper.
Press SHIFT + NUMLOCK to access the Tobii Eye menu to make changes as required.
Press ESCAPE to go back to driving screen.
See post 2 for full menu usage details to suit your game version: viewtopic.php?p=46458#p46458
'TrackIR Driving Enhancements', 'TDE (Unsupported)' or 'TDE (g_cam_window_block)'. All 3 use the same required controls.sii & config_local.cfg file edits.
(Only use one TDE mod at a time!)
'TrackIR Driving Enhancements' - 'Supported' SCS Trucks as listed:
ATS: Freightliner Cascadia - International 9900i, International LoneStar & International LT - Kenworth T680 2014, Kenworth T680 2022 & Kenworth W900 - Mack Anthem & Mack Pinnacle - Peterbilt 389 & Peterbilt 579 - Volvo VNL 2014 & Volvo VNL 2018 - Western Star 49X, Western Star 57X & Western Star 5700XE.
ETS2: DAF 2021 XF, DAF 2021 XG, DAF XD, DAF XF105 & DAF XF - Iveco Hi-Way, Iveco Stralis & Iveco S-Way - MAN TGX (2020), MAN TGX Euro 5 & MAN TGX Euro 6 - Mercedes Actros & Mercedes New Actros - Renault Magnum, Renault Premium, Renault E-Tech T & Renault T - Scania R2009, Scania R, Scania S, Scania S BEV & Scania Streamline - Volvo FH3 Classic, Volvo FH4, Volvo FH5 & Volvo FH6.
All other trucks are considered 'Unsupported' - You must therefore set the menu options correctly to use them with this mod.
Note: I don't have any SCS Truck tuning pack DLC's, they may perhaps cause an error or CTD when using this mod?, if so use 'TDE (Unsupported)' Mod instead.
There's 3 modes of control - Auto "Dynamic" / Manual "Direct" / Unsupported.
Auto "Dynamic" - This mode is for supported SCS trucks or mod trucks. You turn your head and it moves out through the open window.
Manual "Direct" - This mode is for supported SCS trucks only. Your head will only move out through an open window if you also lean sideways towards the open window at the same time as turning your head. You're in control of all head movement, keep it real.
Unsupported - This mode is for trucks that are not supported and will then work the same as 'TDE (Unsupported)' mod and its features only.
Important: Ensure you pick the correct mode in the menu to suit the truck you are currently driving.
'Supported' gives you:
High quality interiors always visible while your head is inside the truck cab.
Outside sounds don't increase through a closed window when looking over your shoulder.
Rain drops on the closed drivers window remain visible when looking through it.
You can disable 'window blocking', if required, for game standard head movement.
------------------------------------------------------------------------------
'TDE (Unsupported)' - For any truck:
If you mainly drive mod trucks then use this mod.
But low quality interiors, louder outside sounds & rain in the cab (if raining outside) when looking over your shoulder through a closed drivers window. This is because the game still thinks your head is outside at this point.
'TrackIR Driving Enhancements' mod fixes these issues but for supported SCS trucks only.
You can disable 'window blocking', if required, for game standard head movement, which also prevents the above listed issues.
------------------------------------------------------------------------------
'TDE (g_cam_window_block)' - For any truck:
If you prefer the window blocking to work the same way as my 'TrackIR Option 7 Window Blocking' mod that uses g_cam_window_block, then use this mod. But you'll hear louder outside sounds when looking through the closed drivers window because of the way SCS implemented this feature, the game still thinks your head is outside at this point. 'TrackIR Driving Enhancements' mod fixes this issue but for supported SCS trucks only.
------------------------------------------------------------------------------
Note: The 'TrackIR Driving Enhancements' mod is the best one to use as it will work with 'Supported' game default trucks and mod trucks, but you'll need to ensure you always use the correct settings/presets to suit the truck you are currently driving, a game default truck (supported) or a mod truck (unsupported).
If you want to keep things simple, all trucks considered 'unsupported', use one of the other mods:
'TDE (Unsupported)...' or 'TDE (g_cam_window_block)...'
The only difference between these 2 mods are the way in which the window is blocked.
------------------------------------------------------------------------------
Important Note: TDE has been deliberately coded to make it easy to see if your current truck is 'supported' or 'unsupported':
Using 'TrackIR Driving Enhancements...' mod:
In the driving seat, if your head won't go out of the window, your current truck is 'Supported' but you are using 'Unsupported' presets/settings. Change them to 'Supported'.
If your head is stuck looking back over, your current truck is 'Unsupported' but you are using 'Supported' presets/settings. Change them to 'Unsupported'.
Using 'TDE (Unsupported)...' or 'TDE (g_cam_window_block)...' mods:
If your head is stuck looking back over, you are using 'supported' settings. Always use 'Unsupported' presets/settings.
==============================================================================
Window block comparison:
SCS - g_cam_window_block for mouse users and 'TDE (g_cam_window_block)' mod. The block point for your head is through the glass not before it and so you can't see that the window is slightly open. At this point, even with the window closed, outside sound volume is increased.
'TrackIR Driving Enhancements' mod - Here you can see the window is slightly open and you also get a better look behind view. Outside sound volume only increases when the window is opened.
How 'Window Blocking' works: - For 'Supported' & 'Unsupported' mods only.
You press 'open driver window' button and your head is unblocked, it can now pass through the opening window.
You press 'open driver window' button again and your head is blocked, back to only turning head inside the cab.
You press 'close driver window' button and your head is blocked, back to only turning head inside the cab.
To open driver window to 50% only and therefore still be blocked, do this:
Quick press 'open driver window' button.
When window is ~50% open, quick press 'open driver window' button again. This will stop the window motion and will block your head. So you can open the window as far as you like as long as you then press 'open drivers window' button again to stop the motion and you'll still be blocked.
To open driver window fully, do this:
Quick press 'open driver window' button and leave it to open.
Your head isn't blocked whilst the window is opening, so just wait for it to finish.
Note 1: Pressing 'close driver window' button will always block your head no matter how open the window is.
Note 2: Every time you start the game your head will be blocked whether the window is open or closed. The controls.sii file gets no feedback from the game to set it correctly. Just press 'open driver window' button to get back in sync if required.
Note 3: You should only press the window buttons with the truck electricity on.
Example head movement views:
With the window closed you can't see much behind when driving along a motorway, use your mirrors or open the window if you need to.
With the window closed you can still see behind when entering a motorway as long as you think ahead. Like in real life.
==============================================================================
Passenger Seat or Sleeper area:
CAM 2: Select Passenger Seat Preset [Drop Down List]
Select from the list the correct 'Passenger seat' preset to match the truck you are currently driving. Don't use any other type of preset!
CAM 3: Select Sleeper Preset [Drop Down List]
Select from the list the correct 'Sleeper' preset to match the truck you are currently driving. Don't use any other type of preset!
==============================================================================
For the best experience use 'Look Action':
D = Drivers Seat, P = Passenger Seat & O = Outside truck
1 = From drivers seat - Look to passenger seat trigger zone and press 'Action'.
2 = From drivers seat - Look to sleeper trigger zone and press 'Action'.
2A - From drivers seat - Look behind passenger seat and press 'Action' *.
2B - From drivers seat - Look further behind you and press 'Action' *.
3 = From drivers seat - With steering centered, look over your shoulder to outside trigger zone and press 'Action'.
4 = From outside drivers door - With steering centered, look up to drivers door window and press 'Action'.
5 = From passenger seat - Look to driver seat trigger zone and press 'Action'.
6 = From passenger seat - Look to sleeper trigger zone and press 'Action'. <- 'Switch To' mode only.
6A - From passenger seat - Look behind drivers seat and press 'Action' *. <- 'Switch To' mode only.
6B - From passenger seat - Look further behind you and press 'Action' *. <- 'Switch To' mode only.
7 = From drivers seat - Look to dash & look down slightly to the trigger zone and press 'Action'.
8 = From drivers seat - Look to gps (windscreen or console mounted) trigger zone and press 'Action'.
Notes for above 2A, 2B, 6A & 6B marked as *:
With qualifying sleeper presets you can choose how you want to be positioned in the sleeper area:
Head behind drivers seat with feet behind passenger seat or
Head behind passenger seat with feet behind drivers seat.
Note 1: For 'supported' trucks only. See post 7 'TDE - Cabin Camera Creator' for more info.
Note 2: If a non-qualifying sleeper preset is used, you'll be positioned to where that preset is configured to be no matter how you switch to it.
Note 3: This can be disabled if you'd rather always have your prefered sleeper location selected - See post 6 'TDE - Optional edits' for more info.
Not shown on above trigger zones sketch:
9 = From sleeper area - Look up at the ceiling (>90 degrees) and press 'Action' to sleep. You must already be parked on a rest icon.
10 = From sleeper area - Look away from the ceiling and press 'Action' to return to the drivers seat.
11 = From drivers seat - Look down between drivers seat and passenger seat (~90 degrees right LHD or ~90 left RHD & ~60 degrees down) and press 'Action' to switch to devcam. After using devcam in the usual way, press 'Action' again to switch back to outside drivers door.
Note: If your in game head has restricted rotation you still need to rotate your real head towards the trigger zones for them to work.
Example 1: Menu mod 'TrackIR Driving Enhancements' should work ok when using a 'supported' game default truck where driver 'Head Rotation' >=140 (default) & passenger 'Head Rotation' >=160 (default).
Example 2: Menu mod 'TDE (g_cam_window_block).scs' has restricted in game drivers head rotation for that window blocking method to work. Just keep turning your real head for outside trigger zone to work (3).
Look at the red circled area and press 'Action' button to change positions for both LHD & RHD trucks.
Action button is "number pad multiply" - Use the menu to choose your own 'Action' button.
Driver seat -> Centre real steering wheel -> Look over your shoulder to outside (window open or closed) -> Press 'Action' -> Outside.
Outside -> Look up to Driver door window -> Press 'Action' -> Driver seat.
Driver seat -> Look to Passenger side -> Press 'Action' -> Passenger seat.
Driver seat -> Look to Sleeper -> Press 'Action' -> Sleeper (position is whatever you have set for CAM 3.
Passenger seat -> Look to Driver side -> Press 'Action' -> Driver seat.
Passenger seat -> Look to Sleeper -> Press 'Action' -> Sleeper (position is whatever you have set for CAM 3.
Sleeper -> Look away from the ceiling -> Press 'Action' -> Driver seat.
Note: If 'Move To' mode is being used, then after pressing 'Action' you'll be automatically moved in first person to your required location rather than instantly switching to it.
TIP: For driver seat to sleeper area or driver seat to outside, you can avoid the possible feeling of motion sickness by turning your real head back to the centre of your monitor once the animation starts (TrackIR is disabled during the animation), your real head will then be in the correct position when the animation stops and TrackIR is re-enabled.
Dashboard display - Step through available displays:
In drivers seat - Look straight ahead and down at the dash display and quick press 'Action' button to step through the screens.
Centre console GPS or windscreen GPS - Change from on/zoom1/zoom2/zoom3/zoom4/off (1.41-1.45).
Centre console GPS or windscreen GPS - Change from zoom1/zoom2/zoom3/zoom4 (1.46+).
In drivers seat - Look to GPS and quick press 'Action' button to step through the screens.
Optional - 'Infotainment Display Mode' (1.46+) - See post 6 "TDE - Optional edits" for more info.
In drivers seat - Look to centre console GPS and press & hold 'Action' button for +1 sec to turn it on/off.
Switch to DEVCAM (you need to have already enabled its use):
Driver seat -> Look down at the floor between drivers seat and passenger seat -> Press 'Action' -> Devcam (under truck).
Optional - Use wheel/pedals/shifter to control the devcam, when finished -> Press 'Action' -> If your wheel is centered you'll be stood outside the drivers door -> Look up to Driver door window -> Press 'Action' -> Driver seat.
Note 1: See post 6 "TDE - Optional edits" for the Devcam line edits & setup options.
Note 2: You can still just use mouse & keyboard.
Refuel examples:
LHD with pump on left side.
Driver seat -> Centre real steering wheel -> Look over your shoulder to outside -> Press 'Action' -> Outside.
Turn real steering wheel left/right to 'walk' along side the truck or around the front to the other side whilst still being free to look around.
Look down at the fuel tank(s) and quick press 'Action' button -> Refueling. Note: Refueling is toggled on/off by the 'Action' button.
'Walk' back to Driver door by re-centering steering wheel -> Look up to Driver door window -> Press 'Action' -> Driver seat.
Note: Once refueling has started, you are free to look or walk around while you wait. Refueling will stop if you press 'Action' again, fuel tank(s) are full or you re-enter your truck.
Note: When using "Free Roam" 'walking' options you have to press the games 'Activate' key/button, as per the default game.
Trailer attach example:
Backup to trailer.
Driver seat -> Centre real steering wheel -> Look over your shoulder to outside -> Press 'Action' -> Outside.
'Walk' around front of truck and down the other side to the crank handle - Look down at it - Press 'Action' - Turn and 'walk' back around to the drivers door.
Look up to Driver door window -> Press 'Action' -> Driver seat.
Note: When using "Free Roam" 'walking' options you have to press the games 'Attach/Detach' key/button, as per the default game.
Owned trailer cargo load/unload example:
Park your truck and trailer(s).
Driver seat -> Centre real steering wheel -> Look over your shoulder to outside -> Press 'Action' -> Outside.
'Walk' to the back of your first trailer, driver side or passenger side -> Press 'Action' -> Cargo load/unload screen -> Turn and 'walk' back to the drivers door whilst inspecting your trailers cargo (if it was loaded).
Look up to Driver door window -> Press 'Action' -> Driver seat.
Note: When using "Free Roam" 'walking' options you have to press the games 'Activate' key/button, as per the default game.
Trigger zones for refuel, crank handle & owned trailers when using the 'Action' button:
It's not possible to distinguish between different truck chassis lengths and where the fuel tank(s) are located.
This pic shows the trigger zones for drivers door (purple), refueling (yellow), 'attach/detach' crank handle (red) and 'own trailer' cargo load/unload (green). Fuel, crank handle and owned trailer zones are the same at the passenger side. These should work for all current truck types and lengths.
Note: There's no 'trigger zones' when using "Free Roam" 'walking' options.
Service example:
Driver seat -> Centre real steering wheel -> Look over your shoulder to outside -> Press 'Action' -> Outside.
Press 'Activate' (as normal) to enter service.
Exit service -> Look up to Driver door window -> Press 'Action' -> Driver seat.
Note 1: If you change your truck from LHD to RHD or vice versa then don't forget to change the CAM 1/2/3 Presets to suit before driving away!
Note 2: See post 10, Demo videos, section How to enter Truck Service or Showroom, for enhanced 'walk to' option: viewtopic.php?p=46613#p46613
Showroom example:
Driver seat -> Centre real steering wheel -> Look over your shoulder to outside -> Press 'Action' -> Outside.
Press 'Activate' (as normal) to enter showroom -> buy truck and trade in your current one -> Exit showroom.
Press 'Action' to fix 'missing truck' or 'restricted head yaw movement' problem due to the game auto changing back to the interior camera in this situation.
Look up to Driver door window -> Press 'Action' -> Driver seat.
Note 1: If you change from LHD to RHD or vice versa then don't forget to change the CAM 1/2/3 Presets to suit before driving away!
Note 2: See post 10, Demo videos, section How to enter Truck Service or Showroom, for enhanced 'walk to' option: viewtopic.php?p=46613#p46613
==============================================================================
Outside movement limits when using 'walk' path:
Enter or exit the truck via the drivers door for LHD or RHD - In either 'Switch To' or 'Move To' mode.
The yellow line represents the 'walk' path around the truck.
Outside the drivers door is the start point, there's 3 'walking' methods:
1 "Wheel Rotate" - Fully rotate your wheel left or right to 'walk', the faster you turn the faster you 'walk', but you'll also be turning against the wheels FFB, in that case try option 2 below.
2 "Wheel Hold" - Turn and hold your wheel to the left or right to 'walk', speed is dependant on how far you turn the wheel (max ~90 degrees for a 900 wheel).
3 "Walk Keys Face Truck" - Use the games 'Walk Mode Keys', FORWARD, to 'walk' in the direction you are looking (around truck/trailer only), with a fixed speed, that you can set, including slower movement when looking at the truck/trailer.
To set your preferred max 'walk' speed see post 6 'Optional Edits' (mix eyegazeon).
Whilst 'walking' you have full use of TrackIR yaw,pitch,roll & y to look where you want to.
If using option 2 or 3 then you'll also have a slight 'head bob' whille 'walking'.
Use your real clutch pedal or 'Walk Mode Key', "Back", to step away from your truck and trailer (blue line) but keeping parallel with the yellow 'walk' path around your truck and trailer.
Useful if you want to stand back to take a screenshot from eye level, check external cab accessories or step to the side to 'walk' past a wide load on the trailer etc.
Note: Refueling and 'look up to get back into cab' actions are disabled when you have stepped away from your truck, step back to be next to the truck to re-enable.
If your truck and trailer(s) are not inline then you can use your real Accelerator, Brake and Clutch pedals to adjust the 'walk' path to suit.
When using your real steering wheel & pedals:
Press Brake Pedal (B) to turn your view and the 'walk' path to the left, the further you press the pedal the faster it will turn.
Press Accelerator Pedal (A) to turn your view and the 'walk' path to the right, the further you press the pedal the faster it will turn.
Stop pressing 'Brake' (B) / 'Accelerator' (A) once the path is in the direction you need it to be, it will hold its position.
Quick Press Clutch pedal (C) to step away from the truck/trailer(s) - Offset 'walk' path selected - Quick press Clutch pedal (C) again to return to the originally selected 'walk' path.
OR
When using 'Walk Mode Keys':
Press & Hold 'Walk mode LEFT key' to turn your view and the 'walk' path to the left.
Press & Hold 'Walk mode RIGHT key' to turn your view and the 'walk' path to the right.
Stop pressing 'LEFT' / 'RIGHT' once the path is in the direction you need it to be, it will hold its position.
Quick Press 'Walk mode BACK key' to step away from the truck/trailer(s) - Offset 'walk' path selected - Quick Press 'Walk mode BACK key' again to return to the originally selected 'walk' path.
1 - Yellow - Default walk path selected every time you exit your truck.
Yellow/Red - Press Brake pedal (B) or 'Walk Mode Key LEFT' to adjust the path to the left as per typical examples (2 to 5)
Yellow/Green - Press Accelerator pedal (A) or 'Walk Mode Key RIGHT' to adjust the path to the right as per typical examples (6 to 9)
10 - Blue - Quick Press Clutch pedal (C) or 'Walk Mode Key BACK' to smooth step away from the truck/trailer. Press again to return.
Note 1: The adjustment point where the path turns is fixed to avoid 'walking' through your truck.
Note 2: If your truck & trailer(s) are not inline and you 'walk' into the side of your trailer, you'll walk straight through it. Collision has been disabled as it's more annoying than useful.
Note 3: Different 'walk' control options available on post 6 'TDE - Optional edits', if required.
Note 4: When in passenger seat, sleeper area or outside, the truck steering, accelerator, brake & clutch pedals are all disabled. You can't therefore drive when outside (CAM 4) or sat on the passenger seat (CAM 2) or in the sleeper area (CAM 3). Don't forget to enable parking brake before moving from the drivers seat and don't change seats whilst driving!
------------------------------------------------------------------------------
NEW 03/01/2025
Outside movement when using 'Free Roam' mode:
This is a basic 'Free Roam' mode (don't expect GTA style exploring!).
You are free to 'walk' around the general area of your truck.
There's no collision active and so you can 'walk' through everything, enabling collision just causes all sorts of strange movements, therefore it's best without.
Your 'walking' height doesn't change (but you can crouch and stand on your tippy toes), you can't 'walk' up a slope, you'll just 'walk' through it. Therefore, for the best experience, only 'walk' around a flat area.
In 'Free Roam' mode only, 'Look Actions' for Refueling & Attach/Detach the trailer are not available as there's no trigger points for them, use game default key/button instead.
Refueling - Stand next to the fuel tank (or anywhere at all) and press & hold your 'Activate' key/button.
Attach/Detach trailer - Stand next to the crank handle (or anywhere at all) and press your Attach/Detach key/button.
Getting back into your truck - Stand next to the drivers door (or anywhere at all) and look up and press 'Action' in the usual TDE way.
Service/Showroom - Whilst parked on the icon, 'walk' into reception area and press 'Activate' key/button. On exit 'walk' back to truck.
You can roleplay to do the same as the above 'Service/Showroom' option for all other functions that require 'Activate':
Job select example, get out, 'walk' to a nearby hut/office, press 'Activate' and select job, then 'walk' back to your truck.
Hotel sleeping example, get out, 'walk' to hotel door, press 'Activate' to sleep, then 'walk' back to your truck.
Use your imagination to fill in other aspects of being a truck driver that the game doesn't provide.
See post 6 'TDE - Optional edits' for required edits to enable 'Free Roam'.
=========================================================================================
Post 01 - Description - viewtopic.php?p=46457#p46457
Post 02 - General Menu Information and Usage - viewtopic.php?p=46458#p46458
Post 03 - Quick start guide - viewtopic.php?p=46459#p46459
Post 04 - Controls.sii file edits (Part 1) - viewtopic.php?p=46460#p46460
Post 05 - Controls.sii file edits (Part 2) - viewtopic.php?p=46461#p46461
Post 06 - Optional edits - viewtopic.php?p=46462#p46462
Post 07 - Cabin Camera Creator - viewtopic.php?p=46506#p46506
Post 08 - Problems & Solutions / To do list - viewtopic.php?p=46559#p46559
Post 09 - Q & A Section - viewtopic.php?p=46612#p46612
Post 10 - TrackIR Driving Enhancements - Demo videos - viewtopic.php?p=46613#p46613