In this post, I will show you how to find the mathematically correct FOV (and other multimon settings) to use for any monitor setup. Before we get started:
What is a "mathematically correct" FOV?
Basically, the screen(s) in front of you take up a certain amount of space in your vision. By taking measurements, we can mathematically calculate the FOV (field of view) that is taken up by your screen(s). By applying the values in-game, the resulting view becomes perfectly accurate to your setup. It makes each monitor look like a window into the game world.
Why does it matter?
Having the correct FOV makes things look realistic, which improves your depth perception, helping you judge distances and speeds more accurately. It's especially important for sim racing, but it's also great for immersion.
Are there any downsides?
Yes. Unless you have massive screens and/or are comfortable being very close to your screen, the mathematically correct FOV will be very low. That means you may not be able to see your dashboard or even a side mirror without turning your view. It's a tradeoff between realism and practicality. There are ways to mitigate the downsides, which I'll go over later, but whether it’s worth it or not is up to you.
Examples
To get a sense of what a correct FOV might look like, here’s a shot of my own tuned setup.
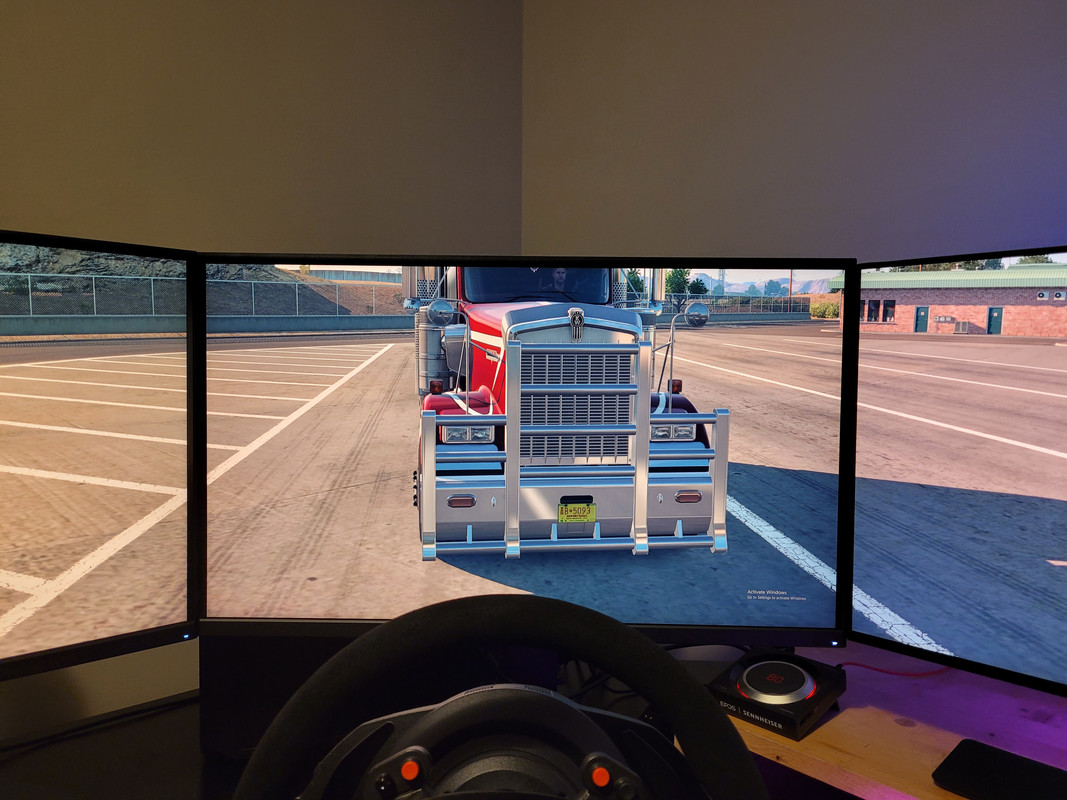
Here is a short clip of it in motion.
I also recorded some janky headcam footage, it should show roughly what it looks like when driving.
It's hard to convey through a camera, but notice that:
- objects look as large as they would in real life
- lines crossing monitors are perfectly straight
- there's no distortion or stretching, no fisheye lens effect
Step 1: Obtain Multimon File
The multimon_config.sii file is required for full control of the game's FOV settings. If you want more details about this file, see the documentation page from SCS. It also lists some console commands, useful for editing settings on the fly without having to restart the game. Link: https://eurotrucksimulator2.com/multimon_config.php
If you’ve already got this file installed, move on to the next step. Otherwise, follow these instructions to generate a new file.
- Navigate to Documents/[Game Name]
- Edit config.cfg, change r_multimon_mode to “4”, and hit save
- Start the game once, and multimon_config.sii should appear in the folder
Step 2: Open Custom Calculator
I've made a custom Google Sheets calculator that automatically finds the correct settings for any given setup.
IMPORTANT: To use the calculator, you must "Make A Copy". Do not request permission to edit.
- On desktop, go to File >> Make a copy.
- On mobile, tap the three dots to see more options, then it’s Share and Export >> Make a Copy.
If you want to learn more about how the calculator functions, see my dedicated documentation post. Link: viewtopic.php?f=23&t=2206
Step 3: Enter Measurements
Read the general tips and color legend on the landing page, then choose which calculator you want to use. If you just want something quick and easy, use the Basic Calculator. For the full range of options and more advanced configurations, use the Hybrid Calculator. Most users should ignore the standalone calculators, they are just there for the sake of completeness.
Fill out your chosen calculator with the measurements from your monitor(s). Once entered, check the visualization diagrams to make sure it matches your setup; adjust the inputs if not. For more guidance, read the step by step guide below.
Basic Calculator:
- For screen width, measure the width of the screen, excluding bezels (repeat for all monitors)
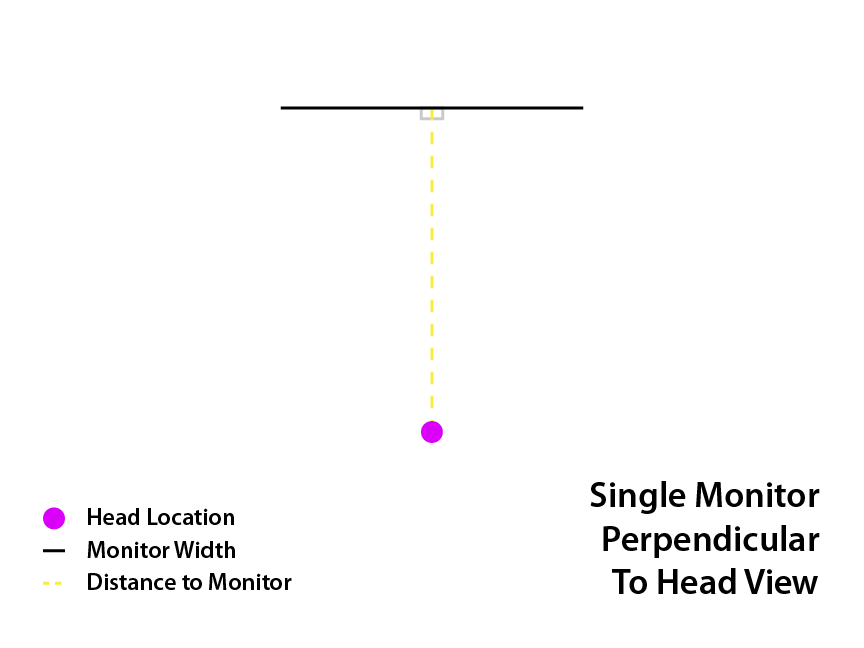
- For perpendicular eye distance, measure eye distance to center monitor in a straight line
- For monitor angle, measure how much the side monitors are angled inwards, if applicable (0° means parallel with center)
- For bezel widths, measure width of bezels between monitors, if applicable
- For screen height of center monitor, measure height of screen, excluding bezels
- For vertical offset of center monitor, enter a negative number (try a quarter of the screen height)
- If applicable, follow steps in next section to align side monitors
- For screen height, measure height of screen, excluding bezels (repeat for all monitors)
- If side monitor is center, top, or bottom aligned, select the appropriate option under auto vertical alignment, and you are finished
- If you need a specific offset, choose one of the auto alignment options to start with
- Figure out how much distance the side monitor should move from that position in order to match your setup
- Enter that distance into vertical offset (positive moves up, negative moves down)
- Repeat above steps for other side monitor, if applicable
Hybrid Calculator:
- Start with only the center monitor
- If your center monitor is angled, choose whether to yaw or pitch from the dropdown
- For yaw, positive rotates the back to face right, and negative rotates the back to face left
- For pitch, positive rotates the back to face up, and negative rotates the back to face down
- For screen width and height, you can measure just one of them (without bezels), then enter “Auto” in the other
- You can also measure both manually, it may be more accurate in some cases
- If the monitor is curved, find the curvature specification, usually given as the radius of a circle in millimeters (e.g. 1800R)
- Convert that value from millimeters to whichever unit you’re using, and enter it into curvature radius
- For pixel screen width and height, enter the resolution of the monitor
- To add more monitors, choose which direction to add monitor to using the dropdown
- For monitor angle, enter the angle relative to adjacent monitor
- Enter 0 if it’s parallel, positive to angle inwards, and negative to angle outwards
- For screen width, height, curvature radius, and pixel width and height, enter them the same way as before
- Repeat above steps for each monitor until all monitors have been added
- Fill in any highlighted bezel widths to adjust the spacing between monitors
- If needed, choose an option under auto alignment to align a side monitor to the center monitor
- If needed, use any highlighted lateral or vertical offsets to fine tune the positions of monitors
- If needed, use lateral/vertical pixel offsets to adjust virtual position of monitors
- Choose which monitor(s) the UI should be displayed on by checking or unchecking the boxes
- Under FOV adjustment method, choose the option you prefer; value is for center monitor only
- If eye distance to screen center, measure directly from eyes to center of screen (can be at an angle in some cases)
- If perpendicular eye distance, measure in the direction perpendicular to the surface of the screen
- If target horizontal or vertical FOV, simply choose a desired value in degrees
- For vertical offset of center monitor, enter a negative number (try a quarter of the screen height)
- If other monitors are not aligned, use one of the auto alignment options
- If needed, follow steps in next section to more precisely align monitors
- If none of the options under auto alignment provide the correct alignment, still choose one of the options to start with
- Figure out how much distance the monitor should move from that position in order to match your setup
- Enter that distance into lateral or vertical offset (positive moves right/up, negative moves left/down)
- Repeat above steps for other monitors, if applicable
- Under auto alignment of center monitor, choose LHD or RHD
- If other monitors are not aligned, use one of the auto alignment options
- If needed, follow steps in previous section to more precisely align monitors
- For a curved monitor, under split into how many views, choose a number other than 1
- Total number of views is limited to 4; any extra views will be excluded
Step 4: Apply Settings
Console Script Method:
The Hybrid Calculator provides a “console script output” option, allowing you to quickly apply all the settings with a simple console command. This skips having to copy paste individual values, and should save you time when tweaking settings.
Note that the multimon_config.sii file will be overwritten, so make a backup if needed. That also means specialized multimon configs (such as from NPI AA tweaks) will be lost; avoid this method if you use those specialized configs.
Here are the instructions.
- To enable the developer console, set both g_developer and g_console to 1 in config.cfg
- Create a new text document in the same folder as config.cfg, and name it script.txt (or whatever you like)
- Double click the indicated cell in the Hybrid Calculator output, select all the text, and hit copy
- Open the script file, paste in the text, and hit save
- Start the game, then press the tilde key (~) to open the console
- Run the command “exec /home/script.txt” (or whatever you named it)
- All settings from the calculator should now be applied
Manual Method:
For those not using the console method, follow this manual method to apply the settings from the calculator.
The number of monitors in the multimon_config.sii file should match the number of output monitors from the calculator. I’ve provided blank templates you can use to get started.
Single View:
Code: Select all
SiiNunit
{
multimon_config : _nameless.Single.View {
 normalized_ui_x: 0.000000
 normalized_ui_width: 1.000000
 monitors: 1
 monitors[0]: _nameless.monitor.1
}

monitor_config : _nameless.monitor.1 {
 name: monitor1
 normalized_x: 0.000000
 normalized_y: 0.000000
 normalized_width: 1.000000
 normalized_height: 1.000000
 horizontal_fov_relative_offset: 0.000000
 vertical_fov_relative_offset: 0.000000
 heading_offset: 0.000000
 pitch_offset: 0.000000
 roll_offset: 0.000000
 camera_space_offset: (0.000000, 0.000000, 0.000000)
 horizontal_fov_override: 0.000000
 vertical_fov_override: 0.000000
 frustum_subrect_x: 0.000000
 frustum_subrect_y: 0.000000
 frustum_subrect_width: 1.000000
 frustum_subrect_height: 1.000000
 render_interior: true
 render_exterior: true
}

}
Dual View:
Code: Select all
SiiNunit
{
multimon_config : _nameless.Dual.View {
 normalized_ui_x: 0.000000		// Set to 0.5 to move UI to monitor 2
 normalized_ui_width: 0.500000
 monitors: 2
 monitors[0]: _nameless.monitor.1
 monitors[1]: _nameless.monitor.2
}

monitor_config : _nameless.monitor.1 {
 name: monitor1
 normalized_x: 0.000000
 normalized_y: 0.000000
 normalized_width: 0.500000
 normalized_height: 1.000000
 horizontal_fov_relative_offset: 0.000000
 vertical_fov_relative_offset: 0.000000
 heading_offset: 0.000000
 pitch_offset: 0.000000
 roll_offset: 0.000000
 camera_space_offset: (0.000000, 0.000000, 0.000000)
 horizontal_fov_override: 0.000000
 vertical_fov_override: 0.000000
 frustum_subrect_x: 0.000000
 frustum_subrect_y: 0.000000
 frustum_subrect_width: 1.000000
 frustum_subrect_height: 1.000000
 render_interior: true
 render_exterior: true
}

monitor_config : _nameless.monitor.2 {
 name: monitor2
 normalized_x: 0.500000
 normalized_y: 0.000000
 normalized_width: 0.500000
 normalized_height: 1.000000
 horizontal_fov_relative_offset: 0.000000
 vertical_fov_relative_offset: 0.000000
 heading_offset: 0.000000
 pitch_offset: 0.000000
 roll_offset: 0.000000
 camera_space_offset: (0.000000, 0.000000, 0.000000)
 horizontal_fov_override: 0.000000
 vertical_fov_override: 0.000000
 frustum_subrect_x: 0.000000
 frustum_subrect_y: 0.000000
 frustum_subrect_width: 1.000000
 frustum_subrect_height: 1.000000
 render_interior: true
 render_exterior: true
}

}
Triple View:
Code: Select all
SiiNunit
{
multimon_config : _nameless.Triple.View {
 normalized_ui_x: 0.333333
 normalized_ui_width: 0.333333
 monitors: 3
 monitors[0]: _nameless.monitor.1
 monitors[1]: _nameless.monitor.2
 monitors[2]: _nameless.monitor.3
}

monitor_config : _nameless.monitor.1 {
 name: monitor1
 normalized_x: 0.333333
 normalized_y: 0.000000
 normalized_width: 0.333333
 normalized_height: 1.000000
 horizontal_fov_relative_offset: 0.000000
 vertical_fov_relative_offset: 0.000000
 heading_offset: 0.000000
 pitch_offset: 0.000000
 roll_offset: 0.000000
 camera_space_offset: (0.000000, 0.000000, 0.000000)
 horizontal_fov_override: 0.000000
 vertical_fov_override: 0.000000
 frustum_subrect_x: 0.000000
 frustum_subrect_y: 0.000000
 frustum_subrect_width: 1.000000
 frustum_subrect_height: 1.000000
 render_interior: true
 render_exterior: true
}

monitor_config : _nameless.monitor.2 {
 name: monitor2
 normalized_x: 0.000000
 normalized_y: 0.000000
 normalized_width: 0.333333
 normalized_height: 1.000000
 horizontal_fov_relative_offset: 0.000000
 vertical_fov_relative_offset: 0.000000
 heading_offset: 0.000000
 pitch_offset: 0.000000
 roll_offset: 0.000000
 camera_space_offset: (0.000000, 0.000000, 0.000000)
 horizontal_fov_override: 0.000000
 vertical_fov_override: 0.000000
 frustum_subrect_x: 0.000000
 frustum_subrect_y: 0.000000
 frustum_subrect_width: 1.000000
 frustum_subrect_height: 1.000000
 render_interior: true
 render_exterior: true
}

monitor_config : _nameless.monitor.3 {
 name: monitor3
 normalized_x: 0.666667
 normalized_y: 0.000000
 normalized_width: 0.333333
 normalized_height: 1.000000
 horizontal_fov_relative_offset: 0.000000
 vertical_fov_relative_offset: 0.000000
 heading_offset: 0.000000
 pitch_offset: 0.000000
 roll_offset: 0.000000
 camera_space_offset: (0.000000, 0.000000, 0.000000)
 horizontal_fov_override: 0.000000
 vertical_fov_override: 0.000000
 frustum_subrect_x: 0.000000
 frustum_subrect_y: 0.000000
 frustum_subrect_width: 1.000000
 frustum_subrect_height: 1.000000
 render_interior: true
 render_exterior: true
}

}
Quad View:
Code: Select all
SiiNunit
{
multimon_config : _nameless.Quad.View {
 normalized_ui_x: 0.250000
 normalized_ui_width: 0.250000
 monitors: 4
 monitors[0]: _nameless.monitor.1
 monitors[1]: _nameless.monitor.2
 monitors[2]: _nameless.monitor.3
 monitors[3]: _nameless.monitor.4
}

monitor_config : _nameless.monitor.1 {
 name: monitor1
 normalized_x: 0.250000
 normalized_y: 0.000000
 normalized_width: 0.250000
 normalized_height: 1.000000
 horizontal_fov_relative_offset: 0.000000
 vertical_fov_relative_offset: 0.000000
 heading_offset: 0.000000
 pitch_offset: 0.000000
 roll_offset: 0.000000
 camera_space_offset: (0.000000, 0.000000, 0.000000)
 horizontal_fov_override: 0.000000
 vertical_fov_override: 0.000000
 frustum_subrect_x: 0.000000
 frustum_subrect_y: 0.000000
 frustum_subrect_width: 1.000000
 frustum_subrect_height: 1.000000
 render_interior: true
 render_exterior: true
}

monitor_config : _nameless.monitor.2 {
 name: monitor2
 normalized_x: 0.000000
 normalized_y: 0.000000
 normalized_width: 0.250000
 normalized_height: 1.000000
 horizontal_fov_relative_offset: 0.000000
 vertical_fov_relative_offset: 0.000000
 heading_offset: 0.000000
 pitch_offset: 0.000000
 roll_offset: 0.000000
 camera_space_offset: (0.000000, 0.000000, 0.000000)
 horizontal_fov_override: 0.000000
 vertical_fov_override: 0.000000
 frustum_subrect_x: 0.000000
 frustum_subrect_y: 0.000000
 frustum_subrect_width: 1.000000
 frustum_subrect_height: 1.000000
 render_interior: true
 render_exterior: true
}

monitor_config : _nameless.monitor.3 {
 name: monitor3
 normalized_x: 0.500000
 normalized_y: 0.000000
 normalized_width: 0.250000
 normalized_height: 1.000000
 horizontal_fov_relative_offset: 0.000000
 vertical_fov_relative_offset: 0.000000
 heading_offset: 0.000000
 pitch_offset: 0.000000
 roll_offset: 0.000000
 camera_space_offset: (0.000000, 0.000000, 0.000000)
 horizontal_fov_override: 0.000000
 vertical_fov_override: 0.000000
 frustum_subrect_x: 0.000000
 frustum_subrect_y: 0.000000
 frustum_subrect_width: 1.000000
 frustum_subrect_height: 1.000000
 render_interior: true
 render_exterior: true
}

monitor_config : _nameless.monitor.4 {
 name: monitor4
 normalized_x: 0.750000
 normalized_y: 0.000000
 normalized_width: 0.250000
 normalized_height: 1.000000
 horizontal_fov_relative_offset: 0.000000
 vertical_fov_relative_offset: 0.000000
 heading_offset: 0.000000
 pitch_offset: 0.000000
 roll_offset: 0.000000
 camera_space_offset: (0.000000, 0.000000, 0.000000)
 horizontal_fov_override: 0.000000
 vertical_fov_override: 0.000000
 frustum_subrect_x: 0.000000
 frustum_subrect_y: 0.000000
 frustum_subrect_width: 1.000000
 frustum_subrect_height: 1.000000
 render_interior: true
 render_exterior: true
}

}
If you are using NPI AA tweaks, don’t use these templates, just make sure you’ve downloaded the appropriate one from step 2 of the NPI AA post. Link: viewtopic.php?f=23&t=1000
Then copy the values from the calculator’s output fields into the appropriate places. Make sure to hit save when you’re done.
If you’re using Nvidia Surround or equivalent, disable bezel correction. Use the calculator to correct for bezels.
That's it, you should now have a mathematically correct FOV. If you have any issues with the resulting view, read the following section for tweaking suggestions.
Adjustment Recommendations
This section explains more about the different adjustments you can do using my calculator, and what I recommend for different setups.
Virtual Screen Space:
Any pixel inputs in Hybrid Calculator are related to virtual screen space. Check that the virtual screen space visualization diagram matches what you see in your display settings. If you’re using Nvidia Surround or equivalent, the r_mode_width and height output should match your surround resolution.
You’ll notice that there are two outputs for the UI parameters, with and without aspect ratio compensation. If the UI would clip, the compensation shrinks the UI to prevent it, though it will result in black bars. Toggle the checkmark under the virtual screen space visualization diagram to see the difference, if there is one. Choose which one you prefer when applying the settings.
If you have mismatched monitors, my other post can guide you through how to optimize your setup. Link: viewtopic.php?f=23&t=2163
Curve Compensation:
First, an explanation. The majority of 3D applications use rectilinear projection for their camera views, which looks correct on a flat display. However, a curved display still uses the same image, meaning it will appear bent and distorted. To achieve a truly mathematically correct view, the game would have to support cylindrical projection, but it doesn’t.
So all you can do is approximate the curve using flat views. The Hybrid Calculator can split monitors into multiple flat views with slight angles. The more views, the better the approximation, but there may be noticeable seams. There’s no one best way, just try it to see what you prefer.
Improving Visibility:
For many common setups, the mathematically correct FOV will be too low to see the dashboard or side mirrors. If you use Hybrid Calculator, it displays some overall FOV stats that show how much visibility you’ll have.
For example, to see the close mirror, you need that side's edge angle greater than 45. For the far mirror, that needs an angle greater than 60. To see the dashboard, the bottom edge angle should be greater than 22.5. These are rough estimates, different trucks and seat adjustments affect this a lot.
The ultimate solution is to fill more of your vision with screen, which is achieved by moving closer, getting bigger screens, or adding more screens. If those aren’t options though, there are other tricks that can help.
Will add more to this section later; for now, see FAQ section for more info
Frequently Asked Questions
It looks way too zoomed in, did I do something wrong?
Probably not. We’re all used to playing games at unrealistic, high FOV, so seeing what a realistic, low FOV looks like is often very jarring. Try and play for a bit, and you’ll likely find that your depth perception and sense of speed feels a lot more realistic.
If you're skeptical about it being realistic, watch this explainer video:
I can’t see my dashboard or side mirrors, what do I do?
You can shift the monitor(s) downward (or move yourself upward) to show more of the dashboard below. How to do this is outlined as optional steps in the guide. When I do this for my setup, I can see the gauges without moving the camera, although a few traffic lights now require me to look up to see them. That’s a good tradeoff in my opinion.
Another way to solve the problem would be to use another screen (or phone, tablet, ect.) to display just the dashboard, and place it nearby. Look up tutorials online, there should be plenty. Personally though, I like seeing the dashboard of the truck I’m actually driving, rather than a generic dashboard skin. Just feels more immersive to me.
In addition, I use buttons which let me quickly look to the left or right when pressed, then center my view when released. A great plugin is Smooth Interior Camera by Harry, it has this functionality built in, and other great features. Link: https://hary309.github.io/projects/hry-plugins/hry-sic
It’s still too impractical, can I somehow increase the FOV?
When using realistic FOV settings, your screen looks like a window into the game world. If you have a small window, then you can’t see much. But if you get a bigger window, or more windows, or get closer to the window, then you can see more.
In other words, the only ways to increase FOV while maintaining realism are to get bigger screens, get more screens, or move closer to your screens. But if those aren’t options, and you really can’t stand the low FOV, then you have no choice but to give up some realism.
For Basic Calculator, decrease the perpendicular eye distance input. For Hybrid Calculator, you also have the option of entering in a target FOV for the center monitor. If you don’t maintain the new eye distance, the resulting view will look less realistic, but all the bezels and angles should still align.
One edge of my side monitor looks really stretched, why?
All calculated FOV settings are only correct at the specific head position used in the calculation. See the visualization diagrams, and make sure your position matches what’s shown. If correct, the stretching will be perfectly cancelled out by the effects of foreshortening.
Try to keep your head in the same spot as best you can. Technically, even the small distance from the center of rotation of your head to your eyeballs, and the fact that (most) people have two eyes, will cause discrepancies. These problems are practically unavoidable on any fixed-display setup, but as long as you don’t move too much, the effects should be negligible.
If you want to minimize the stretching anyways, use the “midpoint between center & side monitor” value in Basic Calculator for the eye distance. This distance makes the side monitor face you directly, which balances the stretching on each edge.
For a similar effect using Hybrid Calculator, set target horizontal FOV to match the side monitor angle. For example, if the side monitor is angled inwards by 45 degrees, set the target horizontal FOV to 45. As long as the monitors are similar in width, this will balance the stretching on each edge.
Note that curved monitors will always add distortion, there’s no way to completely remove it. Play around with the curve compensation options in Hybrid Calculator, it should help reduce the stretching.
How should I adjust the in-game camera?
It’s usually best to keep the camera’s pitch at zero. In config.cfg, set g_interior_camera_zero_pitch to 1, and in your in-game seat adjustment menu, keep all the rotational camera adjustments in the middle. For the seat adjustment FOV, since we are using overrides in the multimon files, it will not affect our view. Setting it to the lowest (40) allows the most camera movement. You can move your seat and steering wheel position however you prefer.
Any tips on optimizing my monitor setup for the best trucking experience?
Ideally, you want large, flat displays that surround you like a box. The bigger they are, the better, as you get higher overall FOV. Bigger displays also let you have them further away without losing much FOV, allowing more room for your other peripherals.
Furthermore, you can adjust the balance between FOV and comfort to your preference. Moving closer to the screen increases overall FOV while decreasing comfort, and vice versa, moving further from the screen increases comfort while decreasing overall FOV. The “approximate total hFOV” value in my calculator may help you compare different setups.
Or, consider a VR headset. VR is more realistic and immersive than any monitor setup, though it does have its downsides, like reduced comfort and less perceived sharpness.
What about other games, could this calculator work for them?
Not really. The multimon file is unique to ATS/ETS2 as far as I know, and it has important functionality that other games don’t. Unless the game has something equivalent, my calculator can’t do much more than give you an FOV for your center monitor.
Some games have in-game calculators that provide triple screen support. You enter a few measurements, and the game tunes the view for your setup automatically. Obviously, it’s a lot easier than using an external calculator, but it also doesn’t provide as many options.
ATS/ETS2 actually has extremely good multi-monitor support, you can make some truly ridiculous setups if you wanted. The tradeoff is that it’s less user friendly than most other games. Hopefully my calculator has helped improve that a bit.
If you have a question that hasn't been answered with the above, feel free to ask me. If you find any mistakes, let me know.
=============================================================================================================================================================================================================================
Manual Calculation Methods
The following is what this post contained originally, but it's now mostly obsolete since I've made the calculator. If you're interested in the math and logic behind everything, or want to do manual calculations for some reason, then read on.
Centered Single View Setups
Starting simply with single screen setups. All you need is the distance your eyes are from the screen and your screen size. There are plenty of online FOV calculators that can give you a number right away, but here is the formula anyways.
Code: Select all
x: screen width (without bezels)
y: distance from eyes to monitor
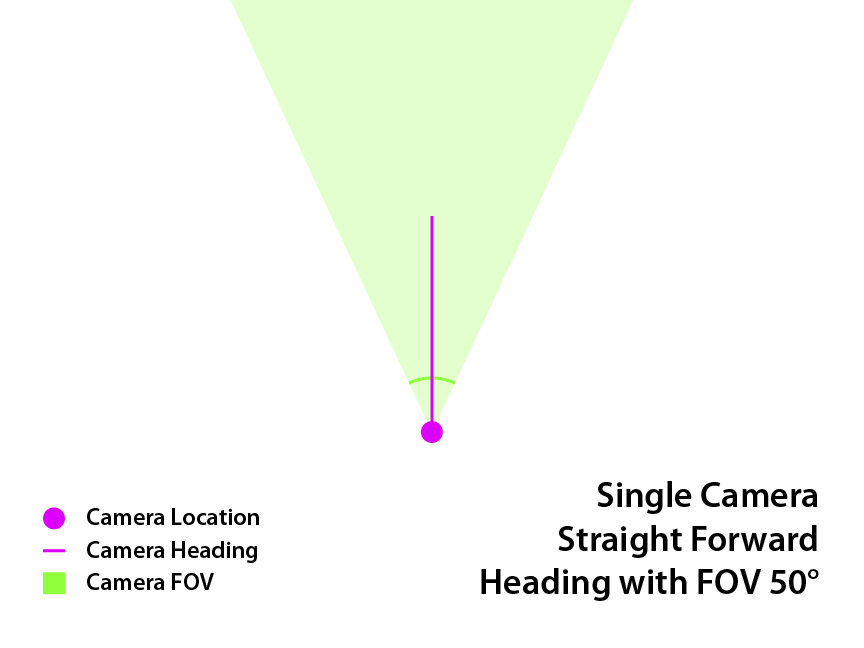
z: camera FOV
z = 2arctan(x/(2y))
Tip: use degree mode on your calculator
- Find FOV using above formula (or online calculator).
- In multimon_config.sii, change the horizontal_fov_override of your monitor to that number.
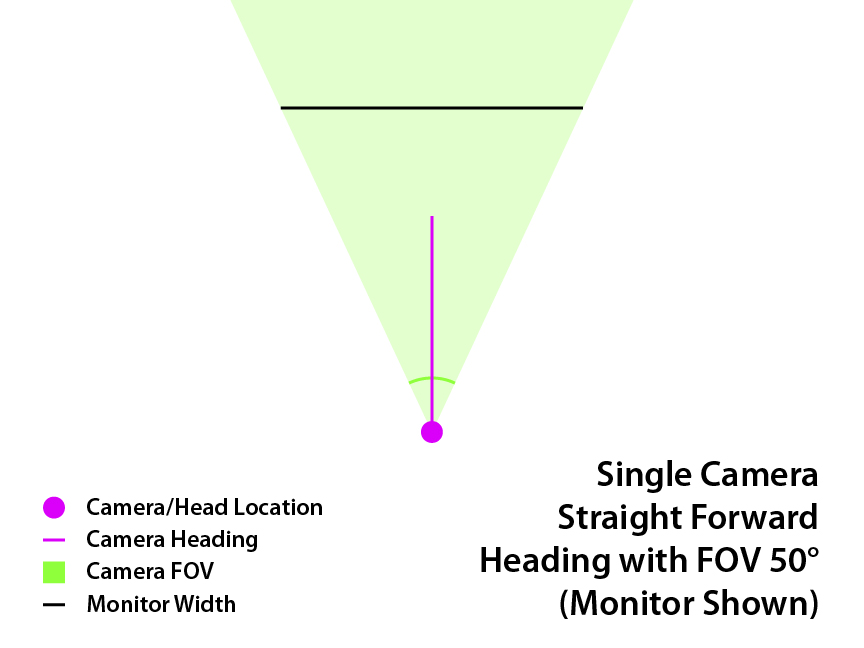
Here are some top-down view diagrams to help explain what's happening.
Real life:
In Game:
We want them to line up perfectly, like this:
Now if you find the FOV is too small, there are two options. You can move closer to your display, or you can buy a bigger display.
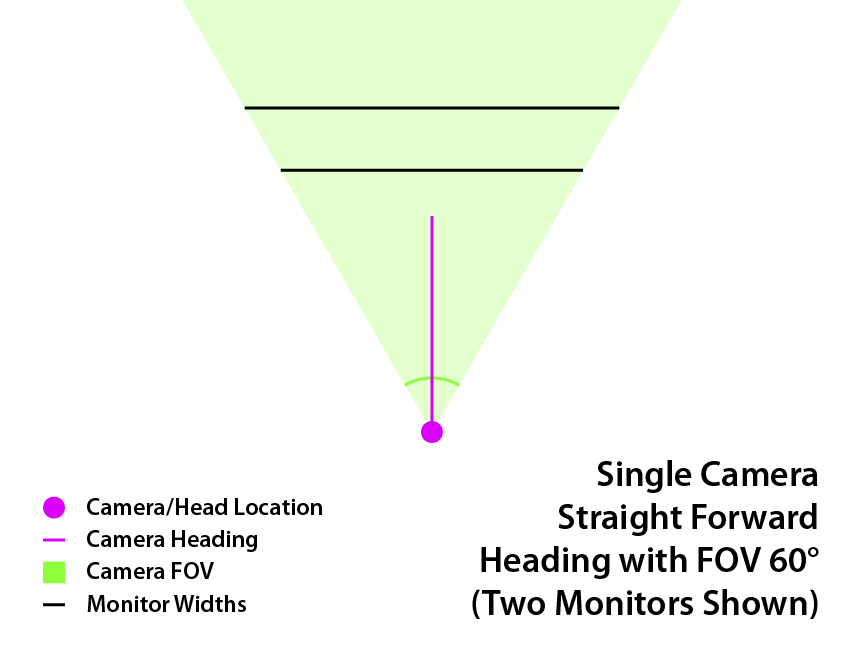
The lower black line is the same size monitor as before, but closer. The upper black line is a bigger monitor, at the same distance as before. Either option allows the FOV to be raised from 50° to 60° in this example.
Other Single View Setups
There are other types of setups where only ONE camera view is used. If you have multiple screens that are all parallel, it will look right if you use a multimon config file with just one rendered monitor, and stretch the FOV to the correct amount.
Centered Parallel Triples:
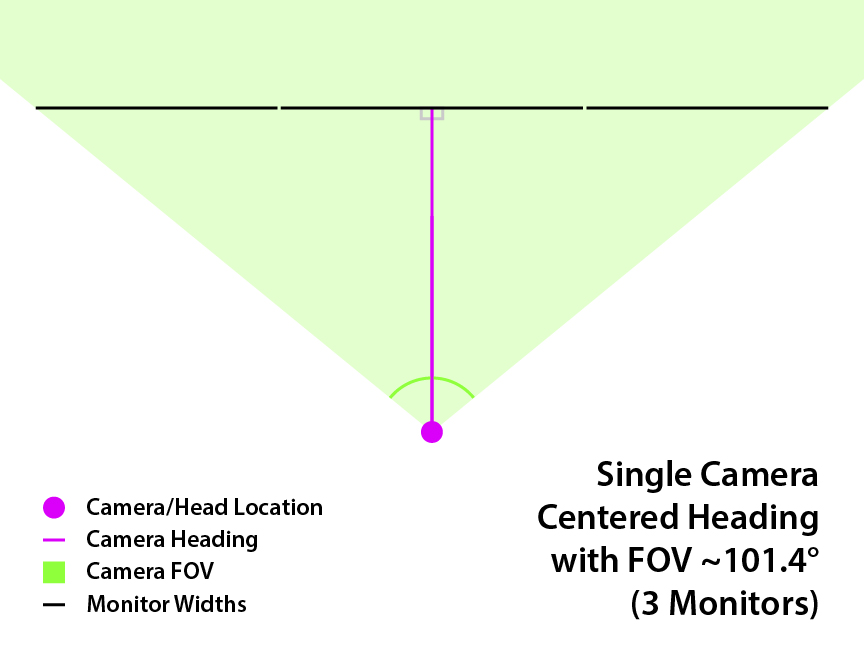
Just treat it as one big monitor, and calculate the FOV the same way as with a single monitor (see section above). Note that when measuring the screen width, include the bezels between monitors but not the bezels on the outer edges.
Alternatively, you can find the vertical FOV instead, and the game will automatically adjust the hFOV based on your aspect ratio. Simply use screen height in the formula instead of width, and alter the vertical_fov_override instead of horizontal_fov_override.
Use driver-side bezel correction, such as Nvidia Surround or AMD Eyefinity, to correct the inner bezels.
Off-Center Parallel Duals:
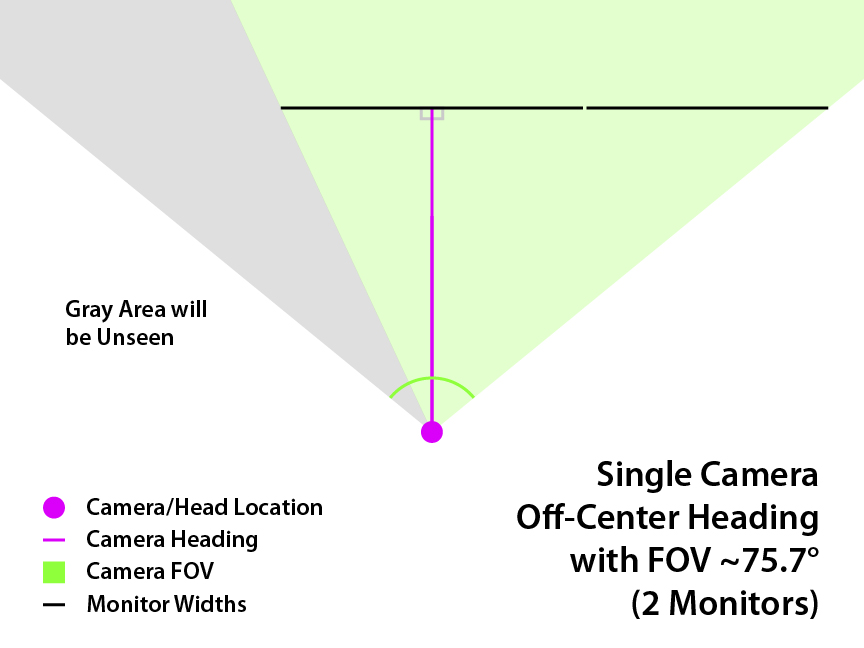
Off-center setups are a bit trickier to set up. See this post: viewtopic.php?f=23&t=2125&p=45054#p45054
Perpendicular Matching Multi-View Setups
This section is for when you have two or three adjacent monitors, each with their own camera views, and all monitors are identical and perpendicular to you.
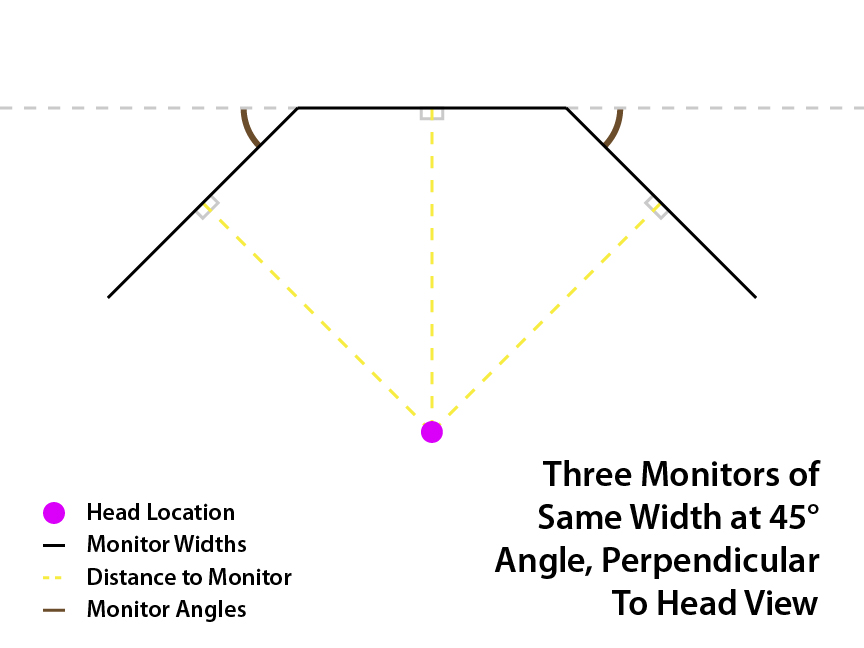
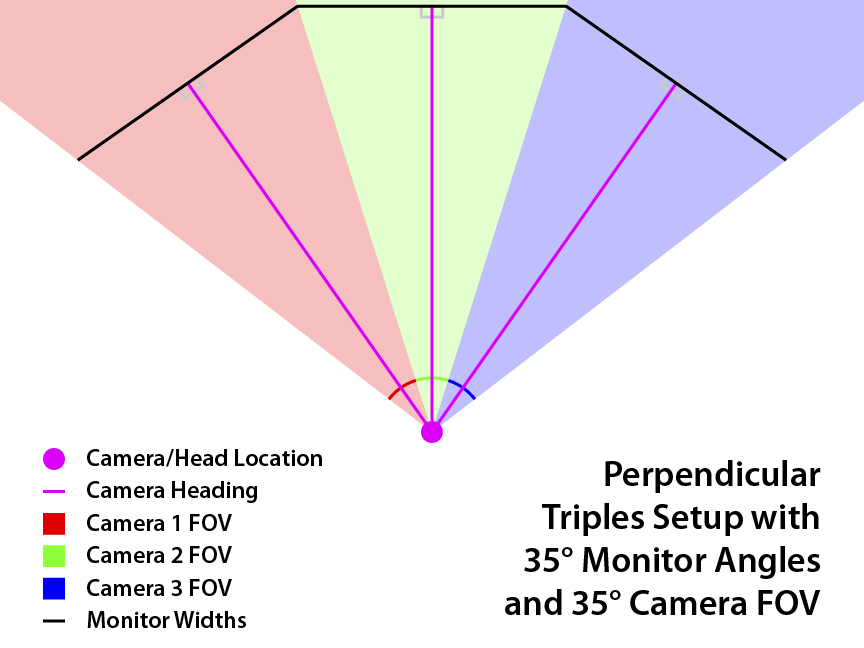
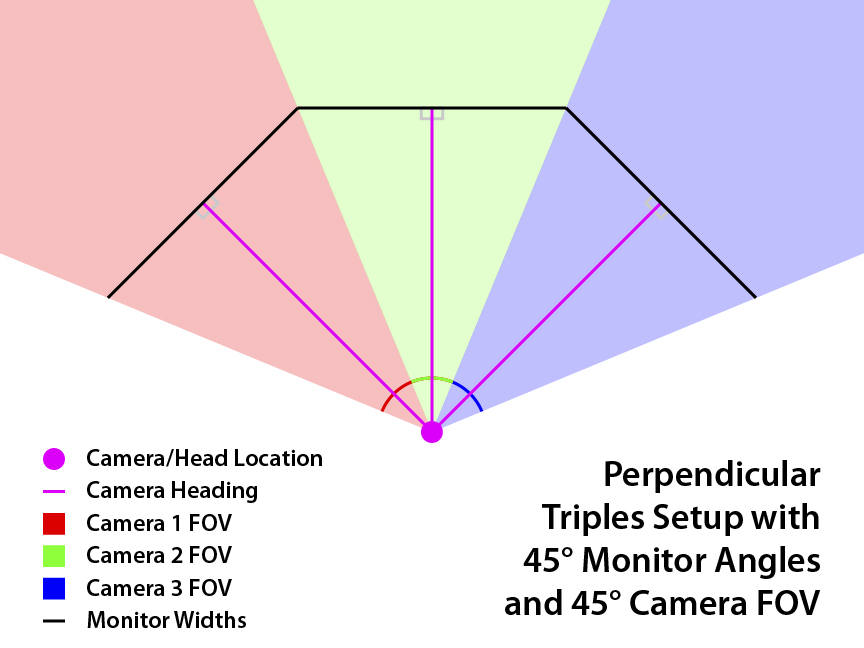
For this situation, an easy way to get the correct view is to match the monitors’ FOV to the angle of your side monitors. For example, if your monitor angles are 35°, the horizontal FOV of all monitors should be 35°. As long as you are sitting perpendicular to all displays, it will look correct. Here is the formula and setup instructions, including bezel correction.
Code: Select all
A: monitor angle
z: camera FOV

	z = A

x: monitor width (of one monitor, with bezels)
w: screen width (of one monitor, without bezels)
s: subrect ratio

	s = w/x
- Find the camera FOV (z) and the subrect ratio (s).
- In multimon_config.sii, change the horizontal_fov_override of each monitor to the camera FOV (z).
- Set horizontal_fov_relative_offset to 0 for all monitors.
- Set the heading_offset for each monitor:
> For center monitor, set to 0.
> For left monitor, set to A.
> For right monitor, set to -A. - Set the frustum_subrect_width and height of each monitor to the subrect ratio (s).
- Use frustum_subrect_y to center the image vertically; set it to (1-s)/2 for each monitor.
- Use frustum_subrect_x to center the image horizontally; set it to (1-s)/2 for each monitor.
Below are three example setups.
35°:
45°:
55°:
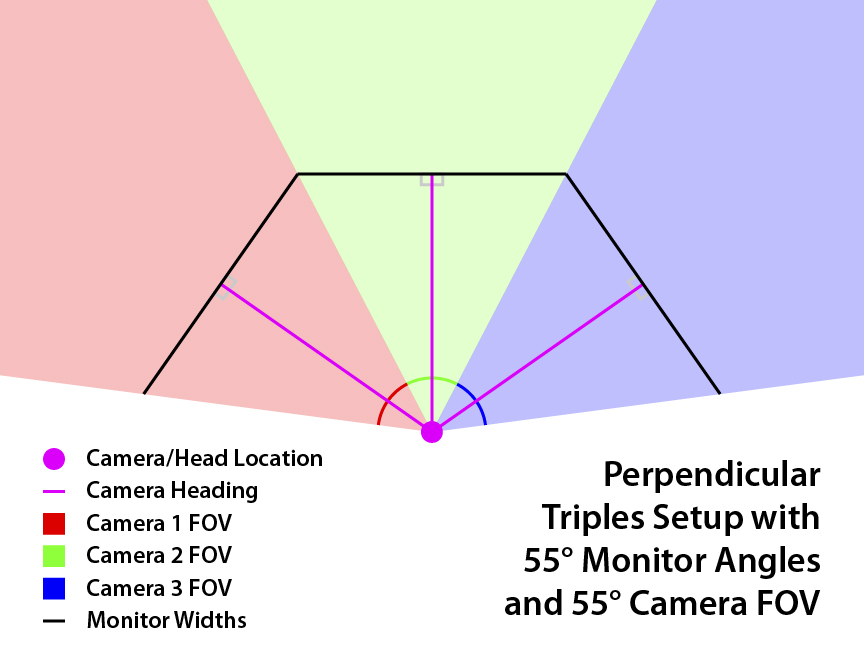
In all the above configurations, the monitor widths have stayed constant. You'll notice that increasing the monitor angles causes you to have to sit closer to stay perpendicular to the side monitors, which also allows for an increase in FOV. The benefit of having larger monitors for this type of setup is that they can be farther away from you at the same angles, giving you more room for your wheel or other peripherals. My triple 27" monitor setup, for example, can do 45° monitor angle (and FOV) before getting too close for comfort.
Other Multi-View Setups
If your multi-monitor setup does not contain matching monitors, or if you don’t sit perpendicular to all of them, you will need to follow some different procedures.
Perpendicular Mismatched Multi-View Setups
See this post: viewtopic.php?f=23&t=2125&p=45055#p45055
Non-Perpendicular Multi-View Setups
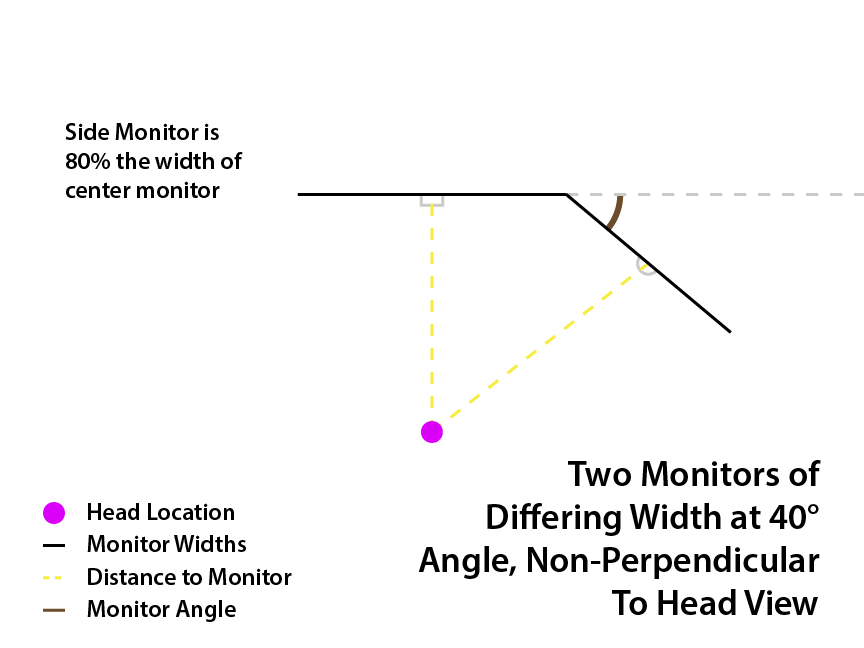
See this post: viewtopic.php?f=23&t=2125&p=45056#p45056
Information Relating to Vertical FOV
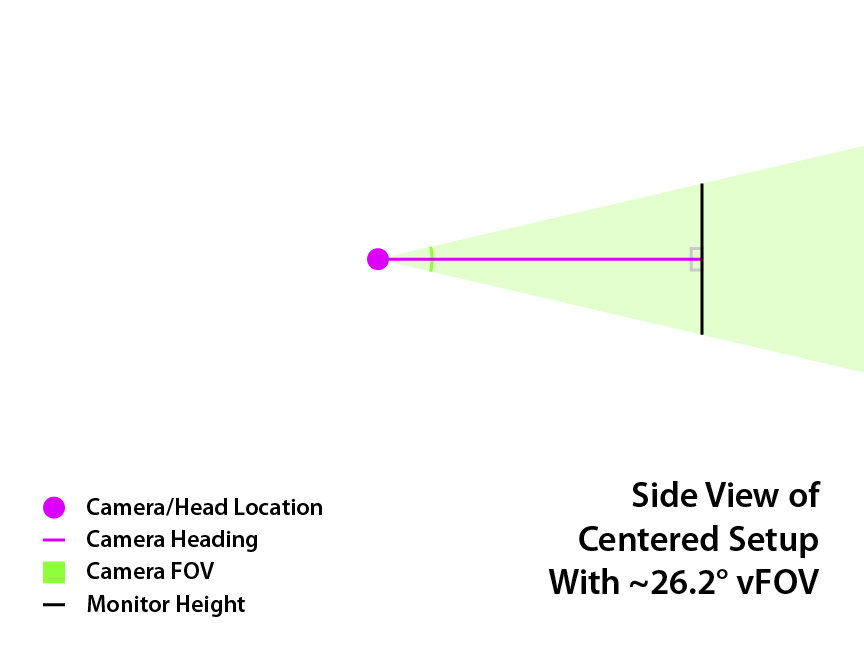
In all the above sections, I have been working with horizontal FOV. This is because the monitors are placed side by side, and we are dealing with the widths of monitors, so it's convenient to calculate horizontal values. However, it is also possible to use vertical FOV to obtain the mathematically correct view as well, we just have to use the height of the screen instead. For example, the formula for the vertical FOV of a single screen is the same.
Code: Select all
z = 2arctan(x/(2y))
Note that you only need to find either the horizontal or the vertical FOV, you do not need both. The game will automatically calculate the other one for you based on the aspect ratio of the monitor.
Here are some diagrams for vertical FOV; it should be clear that it’s almost identical to the horizontal FOV diagrams, just rotated.
Real Life:
In Game:
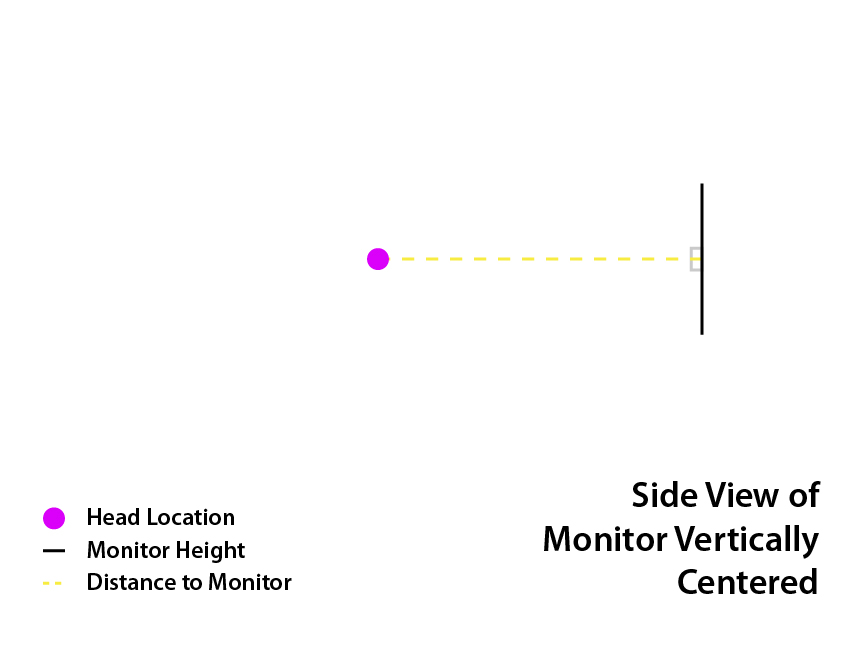
Shifting View Vertically
By default, the view will look correct if your eye level is at the center of the screen. However, you can change that if your screen is not positioned that way. In fact, it can be desirable to move your eye level upwards, as it can let you see more of your dashboard below. This is a way to mitigate one of the downsides of using lower FOV.
See this post: viewtopic.php?f=23&t=2125&p=45057#p45057
Universal Formula
If none of the above setups match your situation, or you just want something super consistent, here is a universal procedure that should work for almost any setup. For example, you can use this for a detached monitor not adjacent to any others, or a quad monitor setup, or a mix of landscape and portrait, ect.
See this post: viewtopic.php?f=23&t=2125&p=45058#p45058


